I’ve no recipe for you tonight, just a picture of yesterday’s turkey meatballs dished up the way they should be – perched on top of a bed of wholemeal spaghetti.
In case you’re wondering, the meatballs are juicy, sweet and light. Just what you need on this cold winter’s night!
I feel a bit ridiculous saying this when the memory of the chocolate hazelnut crepe I had for dessert last night is still fresh, but I’d like to be healthy. Wouldn’t we all?
Each day, we start out with the best of intentions and promise ourselves we’ll be good – and then, when confronted with the burger and fries we’ve wanted since time immemorial, our resistance crumbles like a honeycomb chocolate bar. Then the guilt sets in and the whole cycle begins again; the self-recrimination, the promise, the virtue of self-denial and sacrifice, and the inevitable ‘giving in’, generally a rather spectacular fall from grace involving a family-sized pizza and Sherlock DVDs.
Phew. How exhausting. I personally know of no quicker path to the ‘sharing’ bag of M&Ms.
Wouldn’t it be wonderful if eating wasn’t a constant exercise in the ability to say no? Wouldn’t it fantastic if we weren’t continuously enslaved by the thought of indulgence, held captive by the mere scent of a splurge, paralysed by the fear of one food group or another? (Carbs. Hang on, fat. No, calories. Wait, sugar. Here, munch this piece of cardboard while I think about it.)
I think that like most things in life, eating well is about balance; generally making the right choices about what you eat, but also treating yourself occasionally and sensibly, without any of the insanity that goes along with being given rare and temporary freedom from the shackles of self-denial.
But thankfully, it isn’t all about salads versus burgers (or crepes, if you like). A lot of the time, you can make everyday meals healthier by having a look at what goes into them. Once you understand the ingredients, you can start tweaking recipes here and there to make them better for you.
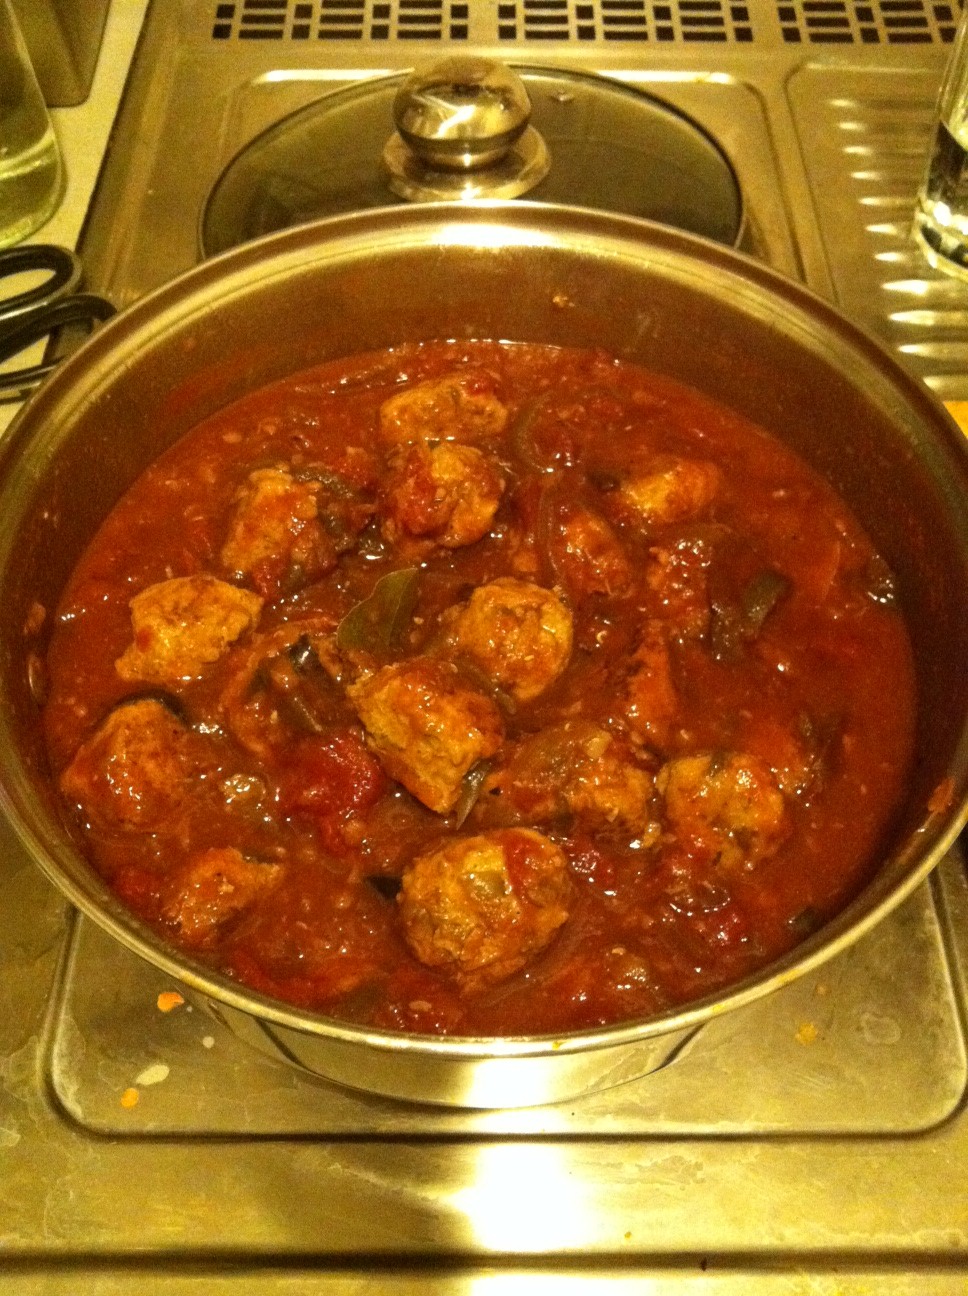
With all that in mind, I’m having a look at turkey mince this week. It depends on the cuts used to make the mince and the fat content, but in general, pound for pound, turkey mince is lower in fat, calories and cholesterol than beef, pork, lamb and chicken. You can find turkey breast mince which is even leaner and is perfectly fine to use for this particular dish.
Because of its low fat content, turkey mince can tend towards being dry and tasteless, so it does take a little more love to get it to taste good. This recipe’s not for the weekday; leave it til the weekend when you’ve got the time to spend on cooking!
A healthy and satisfying pot of heart-friendly love.
For the sauce
1 red onion, finely sliced
2 garlic cloves, finely chopped
2 x 400g cans peeled plum tomatoes
2 bay leaves
50g red lentils
Start by caramelising both onions. Basically, that means you put them into a non-stick saucepan over medium-high heat and stir occasionally as they go through the process from raw to soft to sticky, which should take around 30 minutes. You don’t want to fuss over them too much, and after about 10 minutes you can add a small splash of balsamic vinegar or sugar to help them along.
Once they’re caramelised, remove half and place into a large pot.
Back to the saucepan. Crumble in the stock cube with a little water, and add the garlic. Cook for a further 2 minutes and then remove from heat, allowing to cool completely.
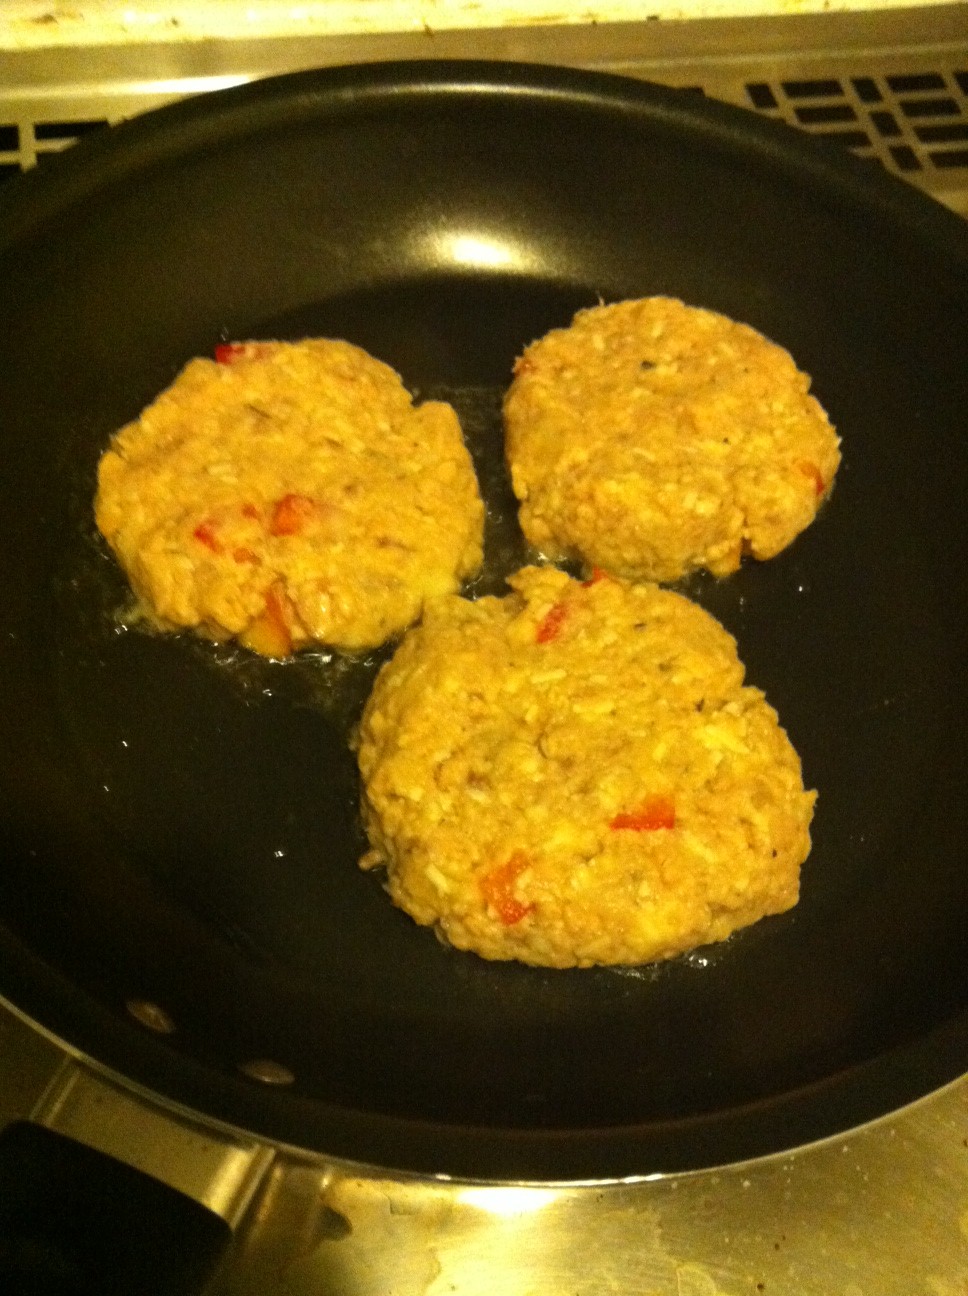
Place the cool sticky onion mixture in a large bowl with the turkey mince, egg, spices, grated carrot and tomato sauce. Season with salt and pepper and mix thoroughly.
Shape the meatballs with your hands. My mix made exactly 42 small meatballs, which I think are nicer than the big ones, but cook as you like.
While you’re getting ready to brown the turkey meatballs, get the sauce started. The large pot with the remaining caramelised onions can go back on the stove with the rest of the ingredients for the sauce. Cover and bring to a boil, adding a little water if the lentils soak up too much liquid.
Brown the turkey meatballs in batches and add to the pot. Simmer gently for 30 minutes.
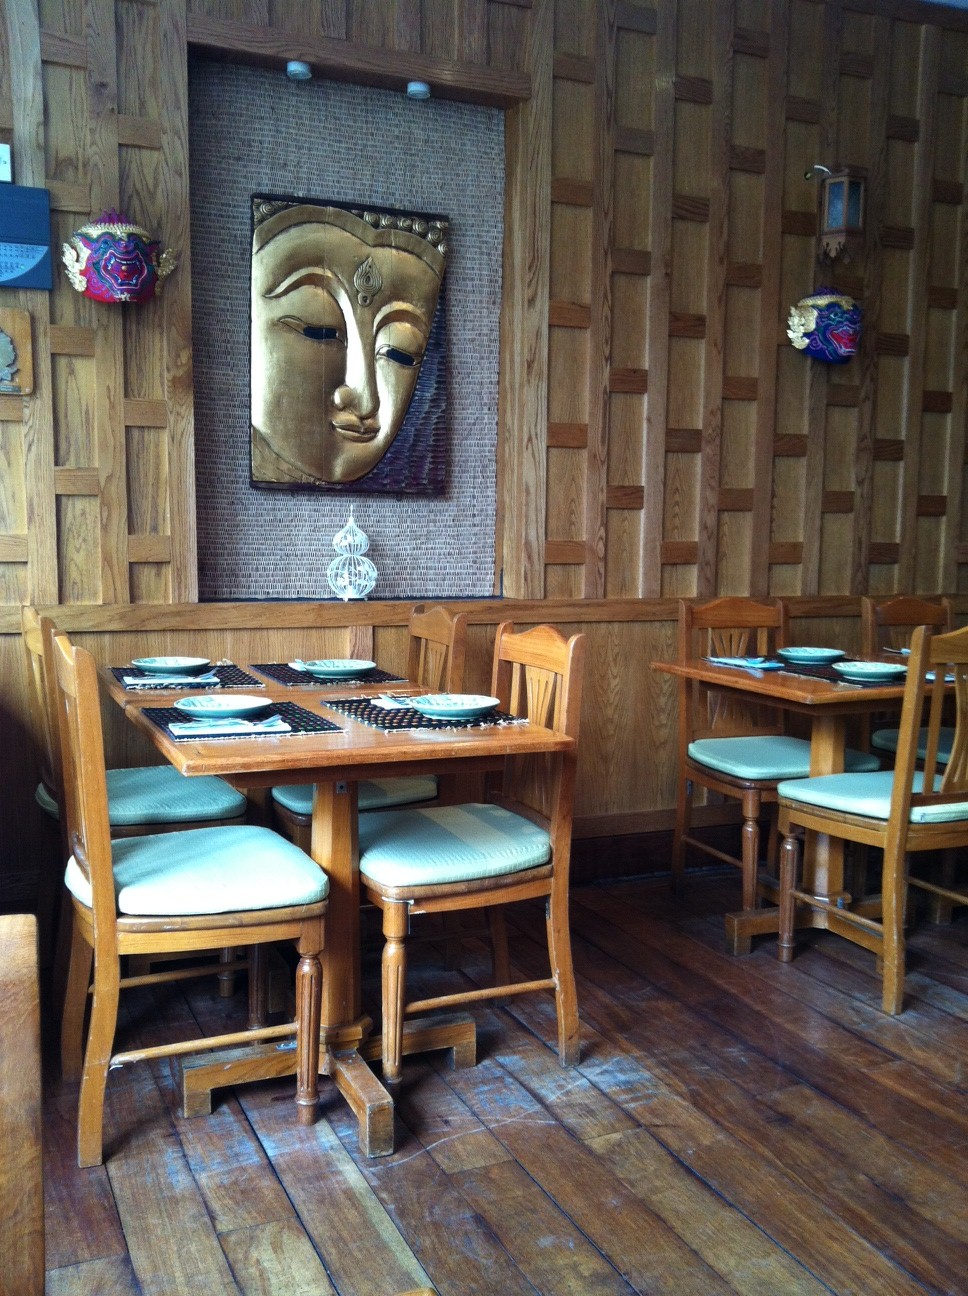
Som Tam House
131 Askew Road
London W12 9AU
Tel: 0208 749 9030 www.somtamhouse.co.uk
Free tea at Som Tam House
It’s snowing in London today, which means that my ‘goodbye winter’ Spanish stew was somewhat premature. The weather also means that people are being extra-irritating – huddled in inconvenient places like the tops of escalators, walking three abreast on footpaths, standing immobile in bus and tube doorways. All of this makes me cranky. And crankiness needs good food.
Som Tam House is a little Thai restaurant on Askew Road, and I chose it because it’s gotten some great reviews and today was clearly not a day to tempt Fate. It was completely empty when I went in at 12:30pm (Saturday), which usually makes me nervous, but it got busier as I was leaving and as it turns out I needn’t have worried about the food in the slightest.
The Restaurant
A small restaurant on Askew Road
Som Tam seats around 30 covers and is the very definition of ‘cute’. Wooden furnishings, comfy cushions and air conditioning are about all you could ever hope for in a restaurant that also offers a great value lunch menu for £5.50. The lunch menu changes every month and currently includes curry or stir-fry with rice, or a good selection of noodle dishes. You also get free tea, which cheered me up to no end.
The Food
I tend to judge a Thai restaurant on two dishes: Pad Thai and Panang curry. Is that fair, given that Pad Thai is really of Vietnamese origin and Panang curry is named after a Malay island? No matter. They’re what I always order when I’m trying out a new Thai restaurant and I think they’re a pretty good indicator because they’re (apparently) fairly easy to cook, yet you can get both of them really, really wrong.
Chicken Pad Thai can make everything right again.
I can only talk about the chicken Pad Thai because I was dining solo, but rest assured Panang curry will be in my future. The coriander garnish had seen better days, but it was easily picked off and didn’t do anything to mar the dish.
I was concerned because it looked a little wet, but the noodles were done to perfection – chewy and thankfully not sloppy. There were generous chunks of succulent chicken, a bright crunch from the bean sprouts and a deeper toothsomeness from the peanuts. Oddly, these were added to the noodles and fried, rather than being served alongside as an optional garnish.
The sauce was spot on – the chef had gotten right balance between the sugar and the tamarind, so it sat at that perfect place between sweet and sharp. It came in a nice big portion that still left me feeling a little bereft when it was all gone. For £5.50, this is a steal.
The Service
Flawless and snappy. The lovely waitress was so cheerful it shamed me out of my bad mood. Better still, there was no service charge on the bill which I really appreciate, even though I tip anyway.
I dislike the current London trend of adding ‘optional’ service charges to the bill – it’s just so gauche.
The Quibbles
Uh, the plate was slightly chipped? I’m struggling. I know some people freak out about crockery but in my book, if the worst thing you can say about a place is that its garnishes are limp and the plates are chipped, that’s a damn good restaurant.
The Verdict
The prices on the a la carte menu range from around £5.50 for fishcakes to £7 for a green curry. The webpage boasts that their prices are the same now as in 1999 – quite a feat and even more impressive when you realise that the food is of decent quality and very tasty.
It’s almost time to say goodbye to winter food for another year. Not that that really applies in London.
The other day we noticed that it was still light outside at 3pm. For the first time in months, it seems, you can go outside without gloves and a hat and not think you’re going to die of frostbite. That means the delights of Spring are just around the corner – and I know it seems like an impossibility right now, but in a few short weeks we’ll also be leaving the comforting realms of warm winter food behind.
Chorizo has become a regular feature on the menu of late. Are calorie-counters aghast? They needn’t be. This heavily spiced sausage is so strongly flavoured that you only ever need to use a small amount, and the smokiness will permeate the rest of the dish. Moreover, if you fry it slowly, the fat runs out and you can drain it away before plopping the toothsome morsels into a separate pan.
It also doesn’t hurt that chorizo has a good long fridge life, so you can keep some on hand for emergency stew action on those long, cold winter nights.
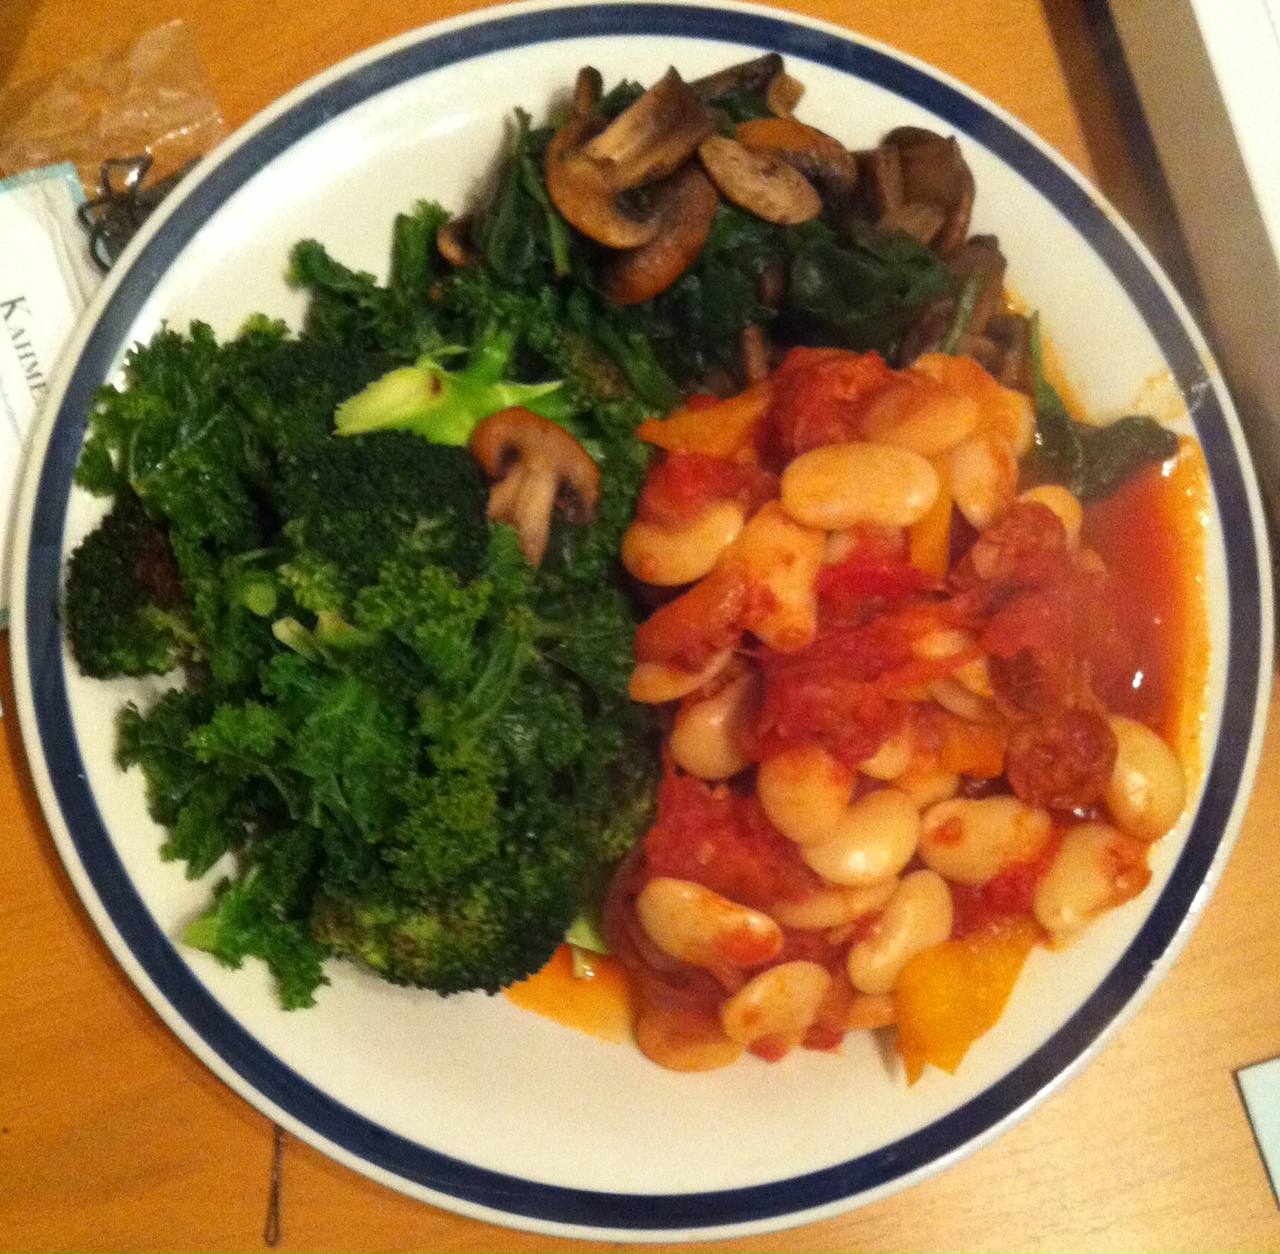
The basis for a hearty winter stew.
Spanish Stew
200g cooking chorizo (about 4 small links)
2 x 400g cans plum tomatoes
1 x 400g cans butter beans
1 yellow capsicum, sliced
1 red onion, finely sliced
2 cloves garlic, finely chopped
1 tablespoon smoked paprika
Skin the chorizo and pull into pieces. You can cut it, but I like the ragged edges of pulled chorizo.
Place the chorizo into a non-stick frypan over a medium heat. When it starts to sizzle, add the onion and garlic.
While that’s cooking away, pour the tomatoes into a saucepan and bring to the boil. When the chorizo is done, drain it and transfer the mixture to the saucepan, adding the rest of the ingredients.
Simmer for twenty minutes and serve with crusty bread – or for a healthier option, go with piles of vegetables like mushrooms, broccoli and kale.
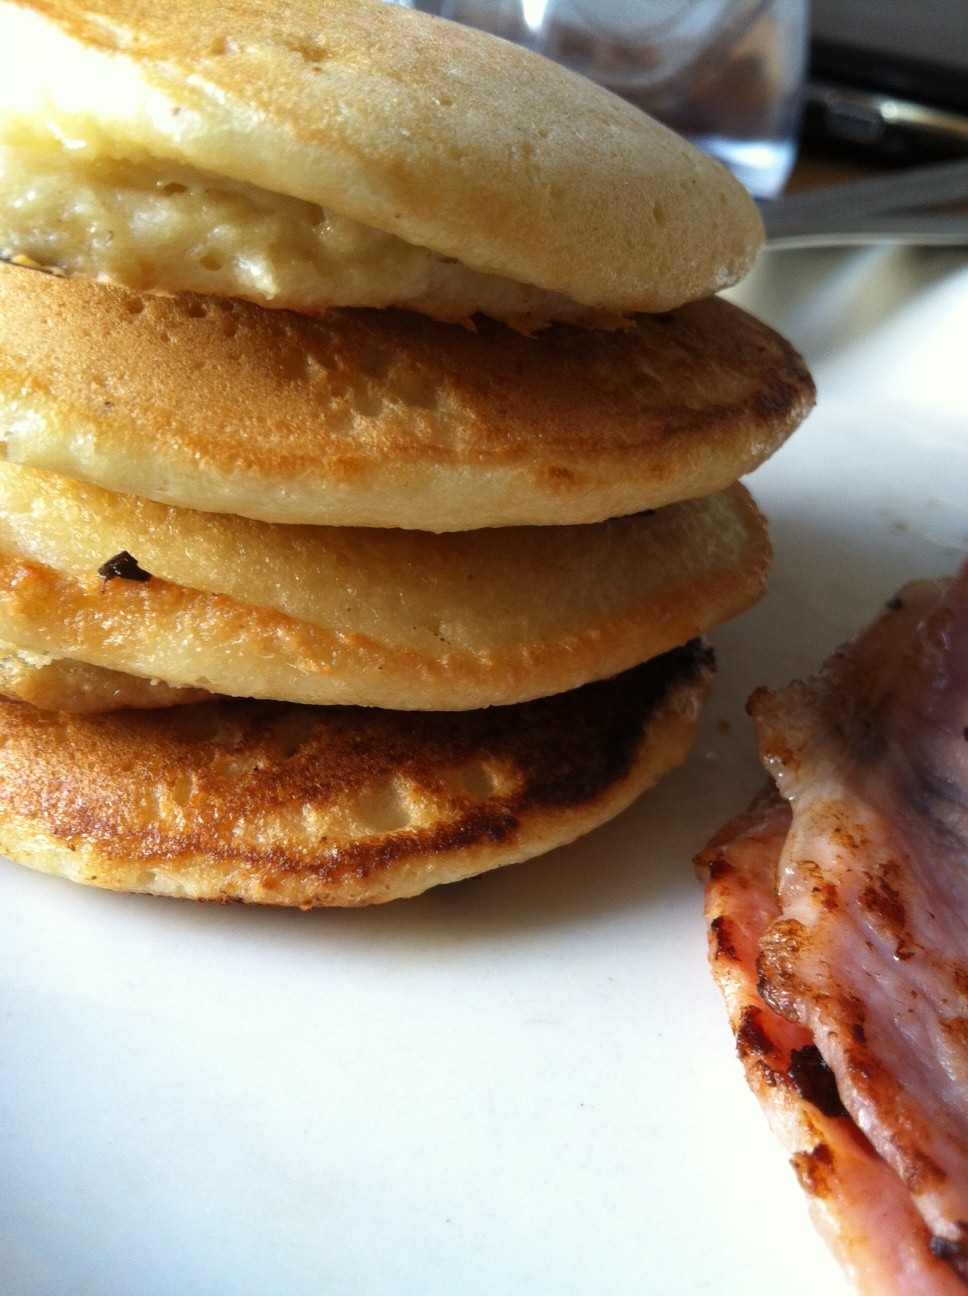
What is a Sunday without pancakes? Just another day of the week that ends in ‘y’, obviously.
When I was growing up, there was always a flurry of excitement when pikelets entered the house. Pikelets are really pancakes, but Down Under pancakes are the size of a small dinner plate, whereas pikelets are a neat, manageable handful. Each member of my family pretty much eats them the same way; slathered in peanut butter, or toasted and slathered in peanut butter.
It wasn’t until much later in life that I learned the ‘proper’ way of eating them in Australia is with golden syrup, and by then it was too late – the lifelong habit of eating savoury goods with these little gems had stuck. Eventually I happened upon the Canadian way of eating them with bacon and maple syrup, and it became a close second to the peanut butter breakfast rally.
Pancakes should be light, fluffy and served with something equally delicious.
Of course, making pancakes is pretty simple, but the primary ingredient is flour. Not only do I rarely keep flour in the house (there’s a bad weevil experience behind that), but one of my good friends has recently been diagnosed with both IBS and coeliac disease, and it has been my mission over the past few weeks to look at things she can eat, which is trickier than you might expect.
Coeliac disease is at least consistent, although painful: no gluten, which means no wheat, barley, rye, spelt, flour derived from any of those, nothing that has come into contact with gluten products. Restrictive, but straightforward. Lots of things are marked gluten-free and the label will generally tell you if gluten is present in the product.
IBS is a whole different beast. Following the FODMAP diet seems to help her, but it’s difficult to remember what to avoid. It’s also supremely tough to eat out when you have to avoid onion and garlic and that’s present in almost everything in a commercial kitchen.
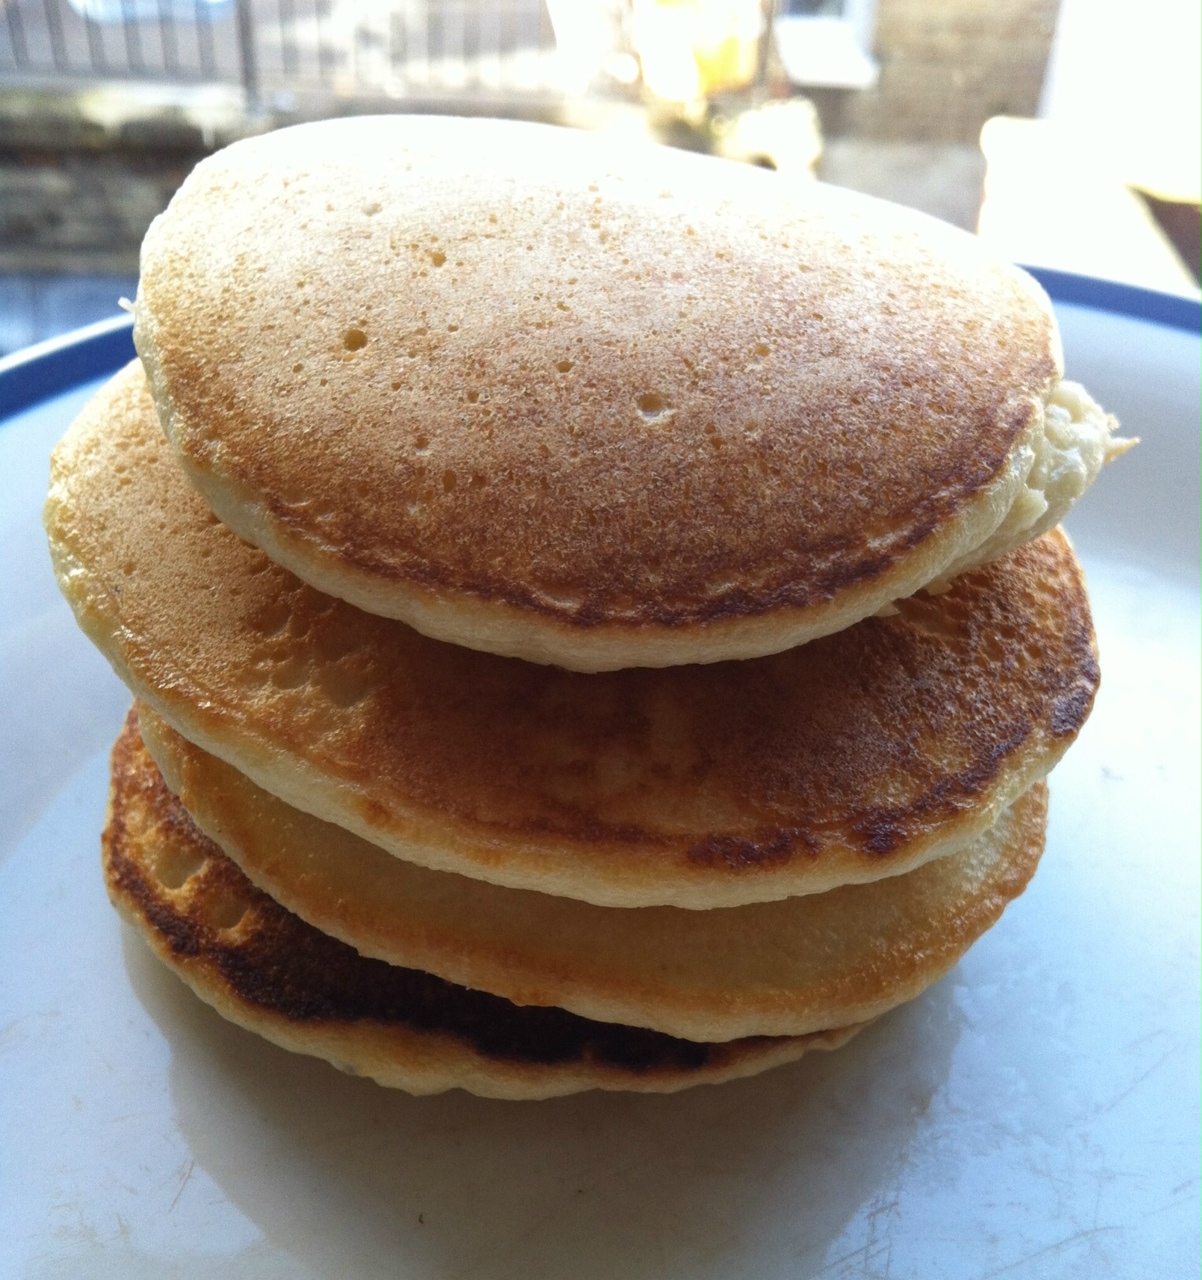
I wanted to try out a recipe that would help my buddy put the spark back into her Sunday breakfast. So here it is: taken from about.com, these almond flour pancakes are gluten-free, IBS-friendly, low-carb, easy and very filling.
I probably did not need to eat all four pancakes, but hey, it’s a Sunday.
Almond flour pancakes (makes 4)
Half a cup of almond flour
1 egg
10 drops of liquid stevia (you can substitute with liquid sucralose or just use half a tablespoon of sugar)
1/8 cup of water
1 tablespoon oil
small sprinkle of salt
Warm your non-stick frying pan over medium heat whilst you mix all ingredients together.
Place two tablespoons of mixture into the pan. The good thing about this is that it doesn’t spread far, so if your pan is big enough you can do two at a time.
The pancake needs about 2-3 minutes on the first side before you flip it. They don’t really bubble the same way a pancake does, but you’ll know when it’s ready to turn because the edges will become lighter as they cook – once the pancake has a white ring all the way around, it’s ok to flip. It will need about a minute on the other side.
Serve with bacon, peanut butter or if you must, drizzled with golden syrup, and relish the Sunday-morning feeling.
The perfect Sunday breakfast.
A note about cooking for coeliacs: this is probably an obvious point but if you’re cooking for a coeliac, make sure the pan, all your utensils and crockery are ultra-squeaky-clean. The slightest bit of gluten can make them seriously ill.
I hadn’t heard of Nigel Slater before I landed in this fine country, but I’ve really taken to him. There’s something charming and earnest in his boyishly enthusiastic manner that inspires a certain recklessness in the kitchen – and I think we could all do with some of that now and again. ‘Use every last bit,’ he commands from the screen, turning pumpkin skin into crisps and dangerously ripe cherries into a tart. Don’t be afraid to experiment, just trust the flavours, be inventive and it will all work out.
A worthy mantra, especially if you’re living on a budget and your palate has progressed beyond the student days of burgers and pasta.
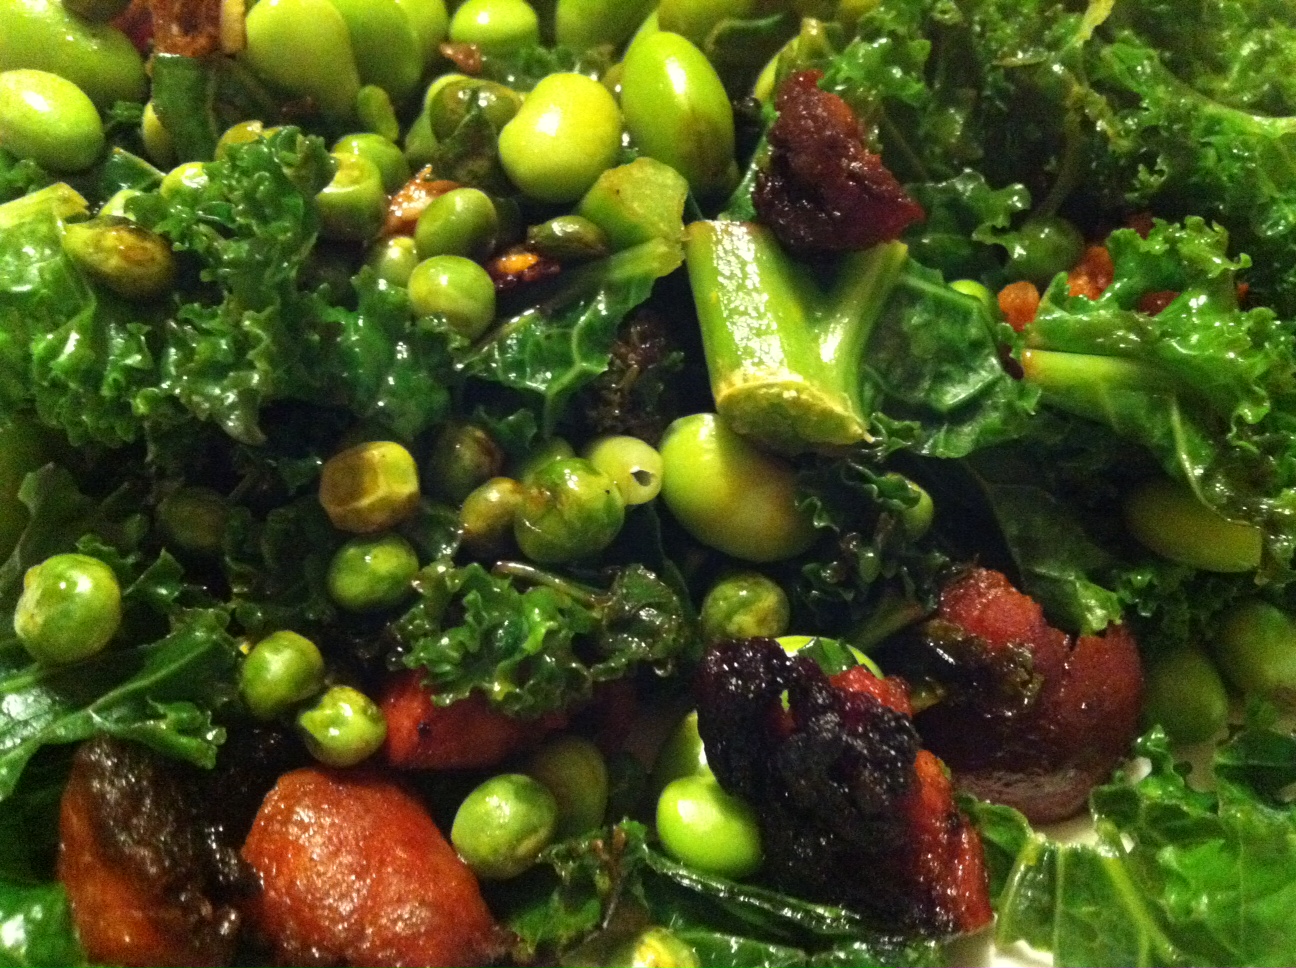
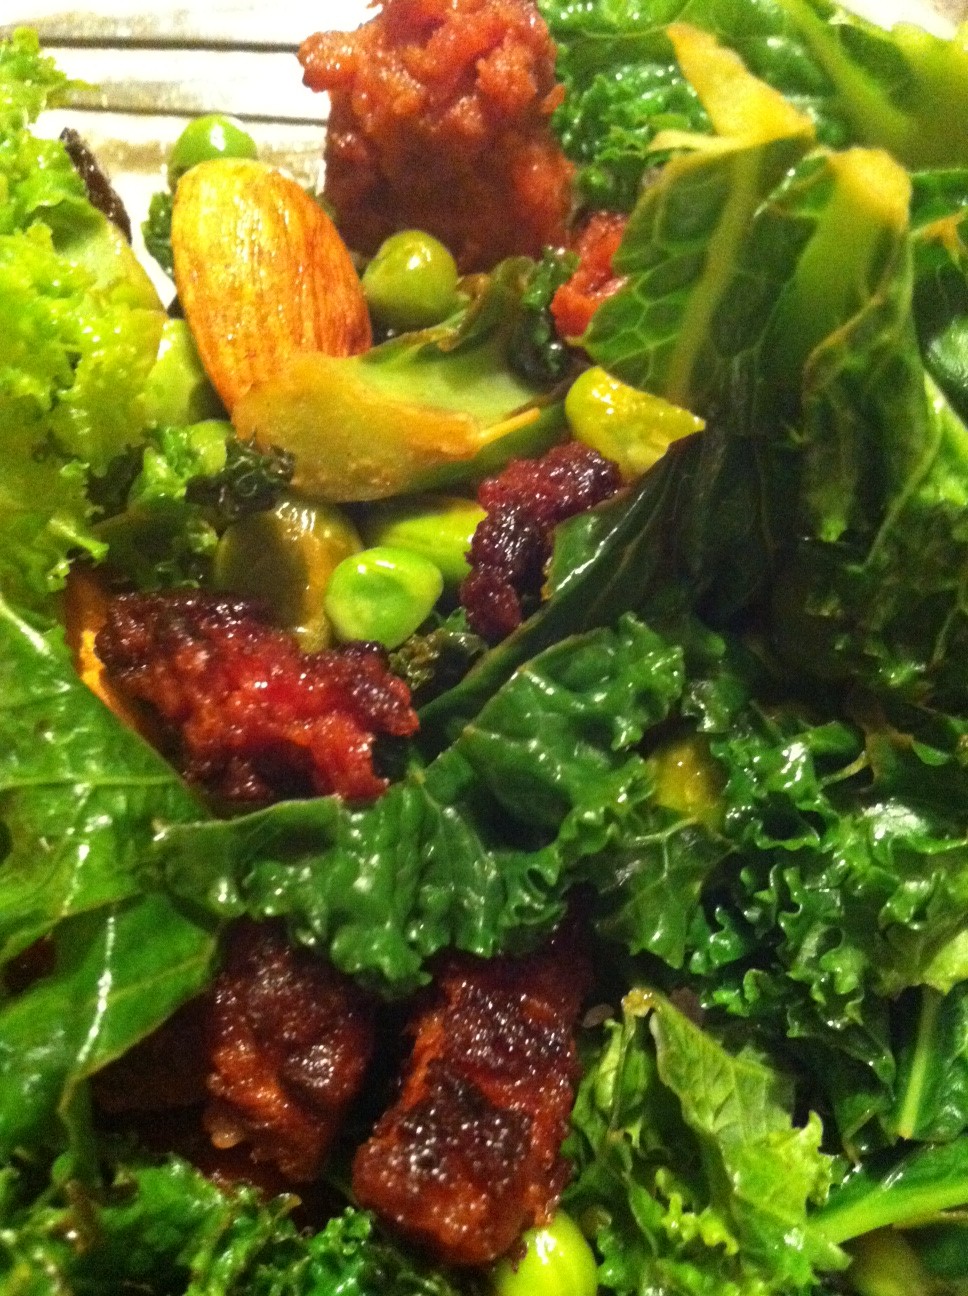
As soon as I saw curly kale, I knew I wanted to try it. It’s a hardy winter vegetable, a type of cabbage, rich in vitamins and minerals and perfect for the cold weather because you can cook it. No longer need your long, crisp nights be accompanied by an equally chilly salad.
The fantastic thing about curly kale is that when cooked, it takes on a substantial weightiness that can hold its own against meat, whilst also keeping its light, springy form. Like most greens, it doesn’t taste like much – all the better to flavour it with.
I confess I tweaked Nigel’s original recipe a little – I felt it needed just a little more to take on the complexity my stomach associates with a full meal. This is a perfect winter dinner; filling, nutritious and ready to eat in about fifteen minutes.
Spicy chorizo and curly kale
100g cooking chorizo (about 2 links)
100g curly kale, sliced
2 cloves garlic, sliced
Half a cup of edamame beans, cooked
Quarter of a cup of peas, frozen
Small handful of almonds (optional)
Remove the chorizo from its skin and pull the links into small pieces. You can chop them, of course, but I rather like the way pulling forms them into ragged sausage balls which then go on to have gloriously browned peaks.
Place the chorizo over medium heat and cook through – it should only take about 3 minutes if your pieces are small. Remove and set on kitchen paper.
Drain the fat and discard, but don’t wipe down the pan – the oil will help you to fry everything else and imbue it with the wonderful flavours of the chorizo. Turn the heat down to medium and add the garlic slices, followed by the peas and kale.
Fry until the kale starts turning a dark, shiny green, then add the cooked edamame beans and the chorizo back to the pan. Keep over a medium heat until the tough stalks of the kale are cooked through, then season to taste and serve on a large plate with a scattering of almonds.
Cooking with kale. Isn’t it good to branch out a little!
As it nears the end of January, the health kick you started at the beginning of the year starts to lose its sheen and you begin to wonder if you can actually go to jail for clobbering that pizza-munching individual over the head with a cucumber and nicking off with a slice of Meatlovers.
If I was on the jury, I just might acquit you.
Not many people have a vast repertoire of healthy meals they routinely prepare, but I don’t think that’s because we don’t know how to make them. I think it’s just because we often forget how many things we can cook. Sometimes all it takes is seeing someone else making a dish to make us remember that we already know how to make it, that we too can reach the heights of healthy culinary brilliance.
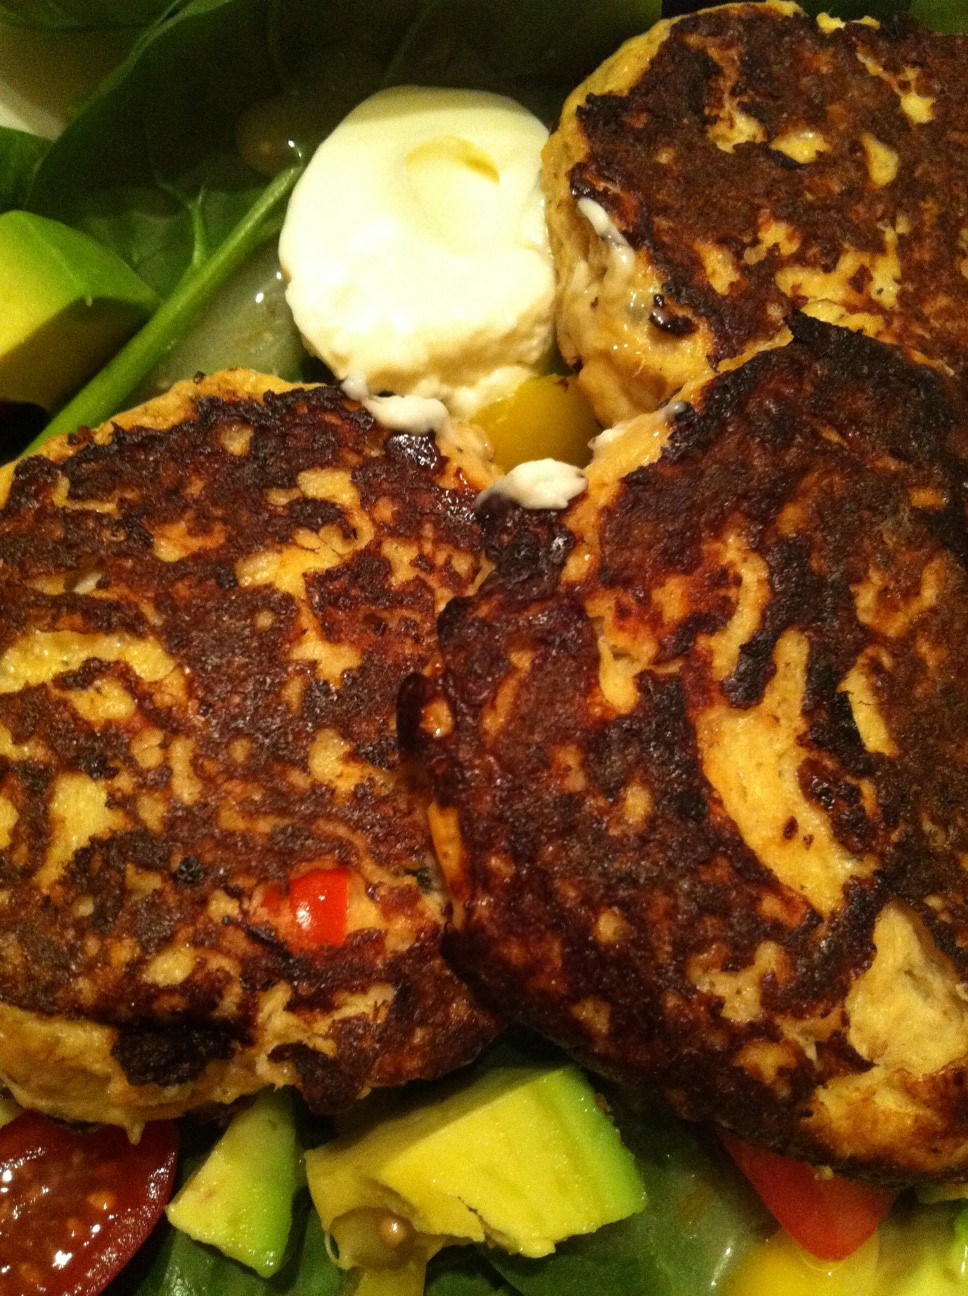
So here’s a little reminder from the tiny kitchen that fishcakes are easy, light, delicious and nutritious. I’ve made these without potato because this month I’m trying to go easy on the carbs, but the cauliflower mash I made last night has substituted nicely. They are a little difficult to flip in the pan because of it, but they taste absolutely scrummy.
Low-carb salmon fishcakes – makes 12
Half an onion, very finely chopped
415g salmon
1 egg
1 cup cauliflower mash
Handful grated cheddar
Salt and pepper
Incredibly, the majority of the work is done as soon as you’ve prepped the ingredients. Simply combine everything in a large bowl and work through to form a sticky, lumpy paste. If it’s too dry, add some milk or another egg. If it’s a little too wet, it should dry out a bit when you place it in the fridge.
Refrigerate the mixture to help it set.
You’ll need to refrigerate for at least half an hour, then take it out and form into patties. Fry in a little oil for about five minutes on the first side, and flip very carefully – they’ll be difficult to flip, but you can do it with two spatulas.
These are a one-turn job. Make sure you don’t try to flip them too early!
Serve with lemon, a dab of mayonnaise and a large salad.
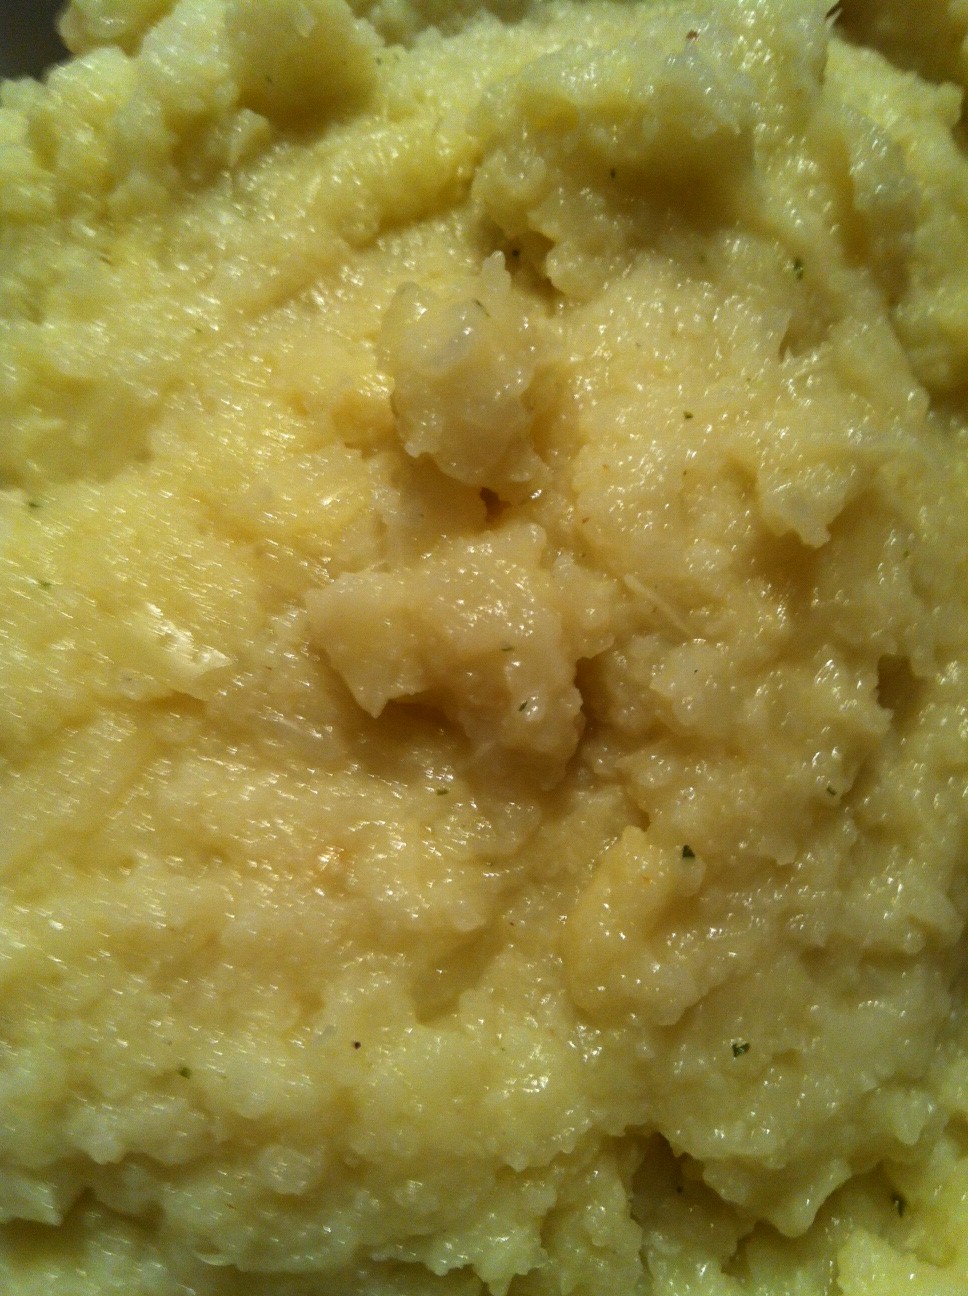
I have covered cauliflower mash before – a recipe so simple it’s almost cheating to call it a recipe – but lately I’ve been experimenting a little with the standard formula and whilst I still love the old favourite, I’ve got to say that this one is closer to the starchy texture of real potato mash.
The point of mash, for me, is to provide a good textural base on which to build your main meal – stew, casserole, pie, sausages. You’re not looking for a strong flavour, but I find that using a vegetable cube and garlic just lifts it slightly. You’d be surprised at how mild the garlic is, but if you don’t care for these flavours you might like to leave them out altogether.
The end product is closer to a mash that has had butter and milk added – thick, creamy and sticky, as opposed to the fine sand-like fluffiness of pure whipped potato.
Gourmet cauliflower mash
1 large head of cauliflower
Vegetable stock cube
3 cloves of garlic, peeled
30ml cream (I used soy cream)
Chop the cauliflower into florets and place in a pot with the garlic and stock cube. Cover with water and boil until very soft.
Drain the pot and mash, garlic and all. I used a hand masher but I’m sure a stick blender would produce excellent results.
Return the pot to medium heat without the lid. This bit is all about making it as fluffy and dry as possible, so you want to evaporate all the liquid left. Add the cream, stirring frequently and it should take around 5 minutes to produce a fantastic pot of cauliflower mash.
Suddenly, post-Christmas penance doesn’t seem so bad.
Well! Where on earth have I been?
You know how it is over Christmas. There’s the huge leadup where you embrace the Christmas spirit and try to push people out of the way when you’re buying presents on Oxford St, then there are the alcohol-soaked Christmas parties, then (if your family is anything like my boyfriend’s) there are days and days of being fed turkey and ham and potatoes and chocolate biscuits until you feel you might as well hop into the oven and roast alongside the bird. Ain’t it glorious?
Then, inevitably, comes the period of self-recrimination where you realise that you maybe ate one or fifteen too many Roses. The new year begins. And so does the diet.
Salads are fantastic because they’re healthy, quick and no-fuss. The trouble is, when you’re eating a salad you always, always know about it. It goes from making you feel virtuous and elated at how good you’re being to your body to making you feel depressed and like you’d kill a small puppy for a plate of pasta. Trust me, I know.
The trick is to use fresh ingredients and keep it interesting. I am not a fan of bitter leaves, although I know lots of people who think they provide a nice contrast in a salad (actually, I’m not a fan of bitter flavours, full stop). But each to their own.
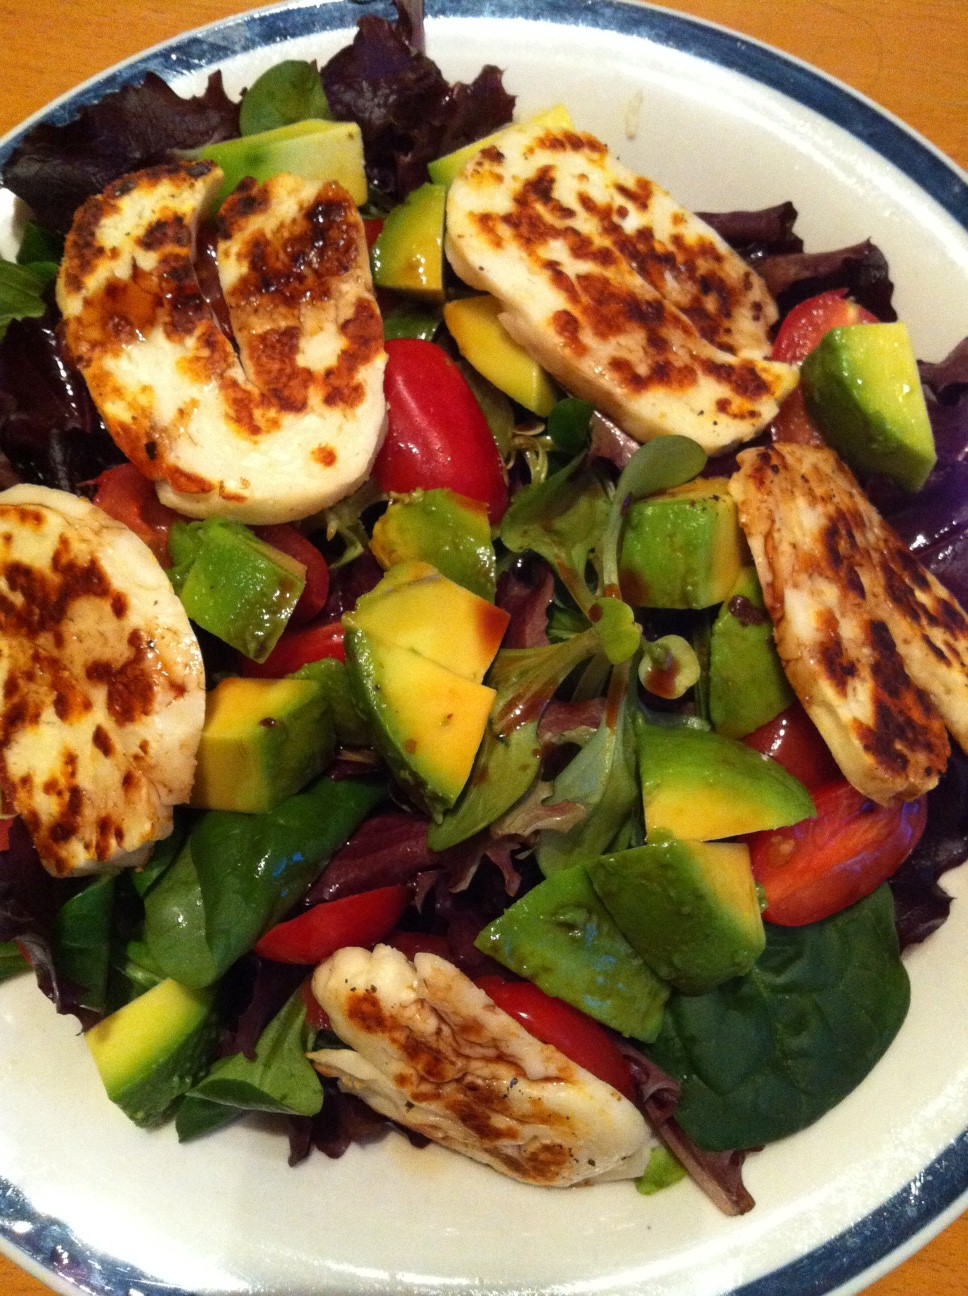
I confess that the inspiration for this salad came from a recent purchase of a non-stick frypan which is actually non-stick. I don’t know how I’ve been getting along without it. Do you know how liberating it is to cook without knowing you’ll need to soak the burnt pans overnight again? Really, if I’d known how ridiculously happy it would make me I would have spent the £2.99 a long time ago.
So I have been looking for things to fry (not easy with salads) and haloumi came to mind. Haloumi is a Cypriot cheese made from goat’s, sheep’s or cow’s milk, is salty to taste and firm in texture. I like it grilled, which creates a nice brown crust and softens the inside to a toothsome squidginess.
The bad news about haloumi is that if it goes cold, it takes on a rather rubbery texture (still tastes good though). Also, it is high in fat so if you’re concerned about that, try to watch the amount you’re using.
Haloumi salad
3-4 slices of haloumi
4 baby plum tomatoes
half an avocado
salad leaves
balsamic vinegar
Place the haloumi into a non-stick frypan (no oil necessary) over a medium heat.
While the cheese is grilling, arrange the salad leaves on a plate. Slice the tomatoes and avocado and add to the salad.
Make sure you turn the cheese once or twice during cooking so both sides take on that browned look. When they’re done, place them onto the salad and finish with a drizzle of balsamic vinegar.