banoffee pie

I know I was supposed to whip the cream. It was a long day, ok?
I really did mean to whip the cream, but sometimes loose & unstructured is just fine.

Even the most savoury-toothed person would have to admit that there’s something quite delightful about the idea of banoffee pie.

The name immediately conjures up all sorts of lovely images: golden, sticky caramel cascading onto a bed of crunchy biscuit crumbs; smooth slices of pale sunshiney banana; and curls of rich, bittersweet chocolate raining down in a dark flurry onto fluffy clouds of whipped cream.

You may think I’m waxing ridiculously lyrical, but you’ll understand when you eat it.

There are lots of variations of banoffee pies, but all of them involve the delicious combination of banana and toffee, and most will advise you to add whipped cream to the top. I feel, however, that there would be no great crime in adding chocolate or nuts or honeycomb pieces or even a smattering of peanut butter. These things are meant to evolve.

This banoffee pie doesn’t need to be baked, so it’s perfect for the oven-free amongst us. Who said that tiny kitchens need be deprived?

You can make this gluten-free if you like.

Banoffee pie
250g digestive biscuits (I used gluten-free biscuits, but feel free to go ahead and use whatever digestives you like)
2 x 100g unsalted butter
100g dark brown sugar (I used muscovado)*
400g can of condensed milk
4 bananas
300ml double thick cream

Grease a 20cm loose-bottomed springform cake tin.

Crush the digestives into powder; I used a freezer bag and a Vegemite jar to work off some aggression, but a rolling pin would probably be faster.

Melt 100g of butter and add to the digestives, mix into a soft, damp sand.

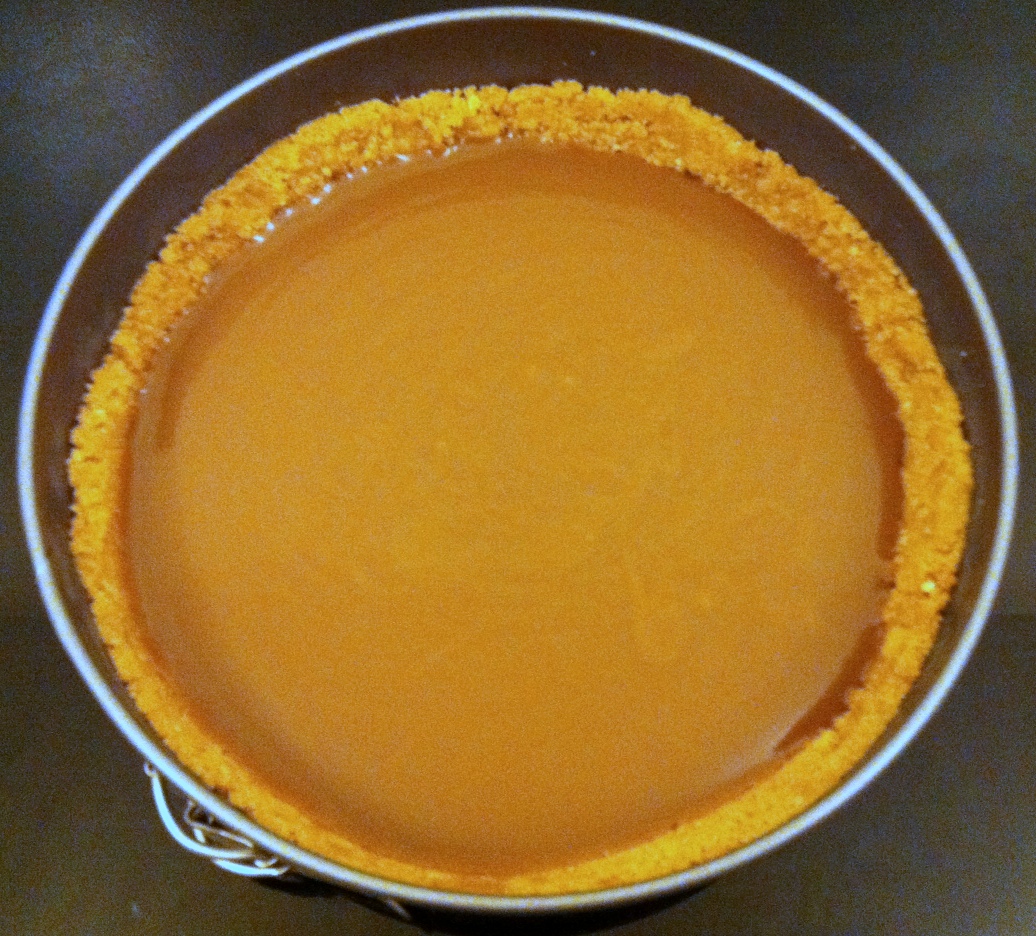
Press the biscuit mix into the cake tin, coming slightly up the sides and making sure it is packed tightly. You want to form a hollow that is about 1.5cm deep.

A biscuit base doesn't need to be baked
a biscuit base doesn’t need to be baked

Place the tin into the freezer for at least 20 minutes.

Meanwhile, place 100g of butter and the sugar into a pot and melt together, stirring constantly.

When you can no longer feel the sugar granules, add the condensed milk and bring to a rapid boil, stirring constantly. Boil for at least two minutes, until the mix forms a golden, caramel colour.

thick, luscious caramel

Allow to cool slightly, then pour the caramel into the biscuit base and place in the refrigerator for at least one hour.

at this point, it's just a toffee pie
at this point, it’s just a toffee pie

Before serving, top with sliced banana and whipped cream.

Note: A few of my guests thought this pie was a little too sweet, so I’d say you could safely reduce the sugar content. I haven’t tried it out to see how it goes, but next time I’d try halving the sugar. I mean, that almost makes it healthy – right?

Advertisement

spicy chorizo and curly kale

The perfect winter dinner.

I hadn’t heard of Nigel Slater before I landed in this fine country, but I’ve really taken to him. There’s something charming and earnest in his boyishly enthusiastic manner that inspires a certain recklessness in the kitchen – and I think we could all do with some of that now and again. ‘Use every last bit,’ he commands from the screen, turning pumpkin skin into crisps and dangerously ripe cherries into a tart. Don’t be afraid to experiment, just trust the flavours, be inventive and it will all work out.

A worthy mantra, especially if you’re living on a budget and your palate has progressed beyond the student days of burgers and pasta.

As soon as I saw curly kale, I knew I wanted to try it. It’s a hardy winter vegetable, a type of cabbage, rich in vitamins and minerals and perfect for the cold weather because you can cook it. No longer need your long, crisp nights be accompanied by an equally chilly salad.

The fantastic thing about curly kale is that when cooked, it takes on a substantial weightiness that can hold its own against meat, whilst also keeping its light, springy form. Like most greens, it doesn’t taste like much – all the better to flavour it with.

I confess I tweaked Nigel’s original recipe a little – I felt it needed just a little more to take on the complexity my stomach associates with a full meal. This is a perfect winter dinner; filling, nutritious and ready to eat in about fifteen minutes.

Spicy chorizo and curly kale
100g cooking chorizo (about 2 links)
100g curly kale, sliced
2 cloves garlic, sliced
Half a cup of edamame beans, cooked
Quarter of a cup of peas, frozen
Small handful of almonds (optional)

Remove the chorizo from its skin and pull the links into small pieces. You can chop them, of course, but I rather like the way pulling forms them into ragged sausage balls which then go on to have gloriously browned peaks.

Place the chorizo over medium heat and cook through – it should only take about 3 minutes if your pieces are small. Remove and set on kitchen paper.

Drain the fat and discard, but don’t wipe down the pan – the oil will help you to fry everything else and imbue it with the wonderful flavours of the chorizo. Turn the heat down to medium and add the garlic slices, followed by the peas and kale.

Fry until the kale starts turning a dark, shiny green, then add the cooked edamame beans and the chorizo back to the pan. Keep over a medium heat until the tough stalks of the kale are cooked through, then season to taste and serve on a large plate with a scattering of almonds.

Cooking with kale. Isn't it good to branch out a little!
Cooking with kale. Isn’t it good to branch out a little!

salmon fishcakes

When was the last time you made fishcakes?

As it nears the end of January, the health kick you started at the beginning of the year starts to lose its sheen and you begin to wonder if you can actually go to jail for clobbering that pizza-munching individual over the head with a cucumber and nicking off with a slice of Meatlovers.

If I was on the jury, I just might acquit you.

Not many people have a vast repertoire of healthy meals they routinely prepare, but I don’t think that’s because we don’t know how to make them. I think it’s just because we often forget how many things we can cook. Sometimes all it takes is seeing someone else making a dish to make us remember that we already know how to make it, that we too can reach the heights of healthy culinary brilliance.

So here’s a little reminder from the tiny kitchen that fishcakes are easy, light, delicious and nutritious. I’ve made these without potato because this month I’m trying to go easy on the carbs, but the cauliflower mash I made last night has substituted nicely. They are a little difficult to flip in the pan because of it, but they taste absolutely scrummy.

Low-carb salmon fishcakes – makes 12
Half an onion, very finely chopped
415g salmon
1 egg
1 cup cauliflower mash
Handful grated cheddar
Salt and pepper

Incredibly, the majority of the work is done as soon as you’ve prepped the ingredients. Simply combine everything in a large bowl and work through to form a sticky, lumpy paste. If it’s too dry, add some milk or another egg. If it’s a little too wet, it should dry out a bit when you place it in the fridge.

Fishcake mixture.
Refrigerate the mixture to help it set.

You’ll need to refrigerate for at least half an hour, then take it out and form into patties. Fry in a little oil for about five minutes on the first side, and flip very carefully – they’ll be difficult to flip, but you can do it with two spatulas.

The smell of these frying is incredible.
These are a one-turn job. Make sure you don’t try to flip them too early!

Serve with lemon, a dab of mayonnaise and a large salad.

gourmet cauliflower mash

It's cauliflower mash, only supercharged.
It’s cauliflower mash, only supercharged.

I have covered cauliflower mash before – a recipe so simple it’s almost cheating to call it a recipe – but lately I’ve been experimenting a little with the standard formula and whilst I still love the old favourite, I’ve got to say that this one is closer to the starchy texture of real potato mash.

The point of mash, for me, is to provide a good textural base on which to build your main meal – stew, casserole, pie, sausages. You’re not looking for a strong flavour, but I find that using a vegetable cube and garlic just lifts it slightly. You’d be surprised at how mild the garlic is, but if you don’t care for these flavours you might like to leave them out altogether.

The end product is closer to a mash that has had butter and milk added – thick, creamy and sticky, as opposed to the fine sand-like fluffiness of pure whipped potato.

Gourmet cauliflower mash
1 large head of cauliflower
Vegetable stock cube
3 cloves of garlic, peeled
30ml cream (I used soy cream)

Chop the cauliflower into florets and place in a pot with the garlic and stock cube. Cover with water and boil until very soft.

Drain the pot and mash, garlic and all. I used a hand masher but I’m sure a stick blender would produce excellent results.

Return the pot to medium heat without the lid. This bit is all about making it as fluffy and dry as possible, so you want to evaporate all the liquid left. Add the cream, stirring frequently and it should take around 5 minutes to produce a fantastic pot of cauliflower mash.

pumpkin soup

Hello, my pretties

More soup?

I grew up with Asian soups, which are mostly broth-style concoctions with various things floating in them – from the standard pork and prawn dumplings or chicken to the weird and wonderful unnameable items that are considered to be the ultimate panacea for everything from stomach aches to back pain.

There is pretty much only one Western-style soup my mother makes, and that is pumpkin soup. It’s a hearty, filling winter wonder that I think is fitting for my American buddies who’ll be tucking into all sorts of Thanksgiving goodies very soon.

In my wholly unbiased and humble opinion it is the finest pumpkin soup you will ever taste, anywhere, and it ridiculously healthy because unlike most pumpkin soups it has no cream and no sugar, instead relying on the smooth texture and natural sweetness of the pumpkin. Go forth and try it! Wrap yourself in the warm blanket of virtue and congratulate yourself on how healthy you’re being.

Pumpkin soup
For the vegetable stock:
2 carrots
Two-thirds of a leek
Half an onion
2 sticks of celery
4 bay leaves
6 black peppercorns

For the pumpkin soup:
Half a kilo butternut pumpkin
Half a kilo paquito pumpkin
One-third of a leek, sliced
Half an onion, chopped
2 carrots, chopped

Make the vegetable stock by placing all the stock ingredients in a pot, covering with cold water and bringing to a boil, then turning to a simmer for 20 minutes. Heston advises that you should slice the vegetables as thinly as possible to provide as much surface area as you can, but if you can’t be bothered it will turn out just fine.

Meanwhile, prepare the pumpkin. The butternut pumpkin in my photo is just over a kilo, and the paquito pumpkin is just under a kilo, and I used half of each. You could simply use one whole pumpkin, but I like the different tastes each pumpkin gives – the butternut has a nutty, robust undertone, and the paquito pumpkin is just a little sweeter and negates the need for you to add sugar.

There is nothing for it but to chop the pumpkins into small pieces, removing the skin as you go. This is a fairly painful process but sadly I see no way around it. Wear your pumpkin blisters with pride.

Pumpkin blisters. I hope you can avoid these, but if not, wear them with pride.

In a pan over a medium heat, place the onions and leek and cook until they start to soften but don’t brown them.

Add the pumpkin pieces and cook for 7-8 minutes.

A glorious orange frenzy

Meanwhile, drain the vegetable stock, reserving the liquid. Put the liquid back into the pot and add the chopped carrots, and when the pumpkin and onion is ready, add it to the pot. Cook for 20minutes or until the pumpkin is very soft.

Remove from heat and ladle out a bowlful of the liquid, keeping to one side. You want to hang onto this just in case the soup is thicker than you would like.

A stick blender would be ideal at this point, but I don’t have one, so I just used a hand masher instead – hence the rather pureed look of my soup. It still tasted wonderful. Proof positive that some recipes are extremely forgiving!

Bowlful of goodness

chicken soup

Sometimes, only chicken soup will do.

I’m sick.

I’m not a good sick person, either. There are people who bear their affliction with grace, fortitude and a staunch cheerfulness whilst delicately withering away, kind of like Beth in Little Women. I’m not one of them. When I have a cold, there’s wailing, whingeing, spluttering and coughing, the cursing of trans-seasonal weather, piles of tissues and a good deal of feeling sorry for myself. It’s unfortunate, but there it is.

Strange things happen to my appetite when I’m sick, and it’s probably the only time I’ll ever say ‘no thanks, I’m not hungry’. My culinary planet becomes sadly Pluto-nic, reduced to a dwarfish set of dry crackers and some hot tea. Eventually if that doesn’t help, I’m forced to pull out the big guns, the cure-all, the substance known throughout the world as Jewish penicillin – chicken soup.

Chicken soup is a lengthy two-stage process, but fortunately it’s so simple that even a sick person can probably cope with it. The stock itself involves almost no work, and if you’re beat after that then you can simplify the soup down to a handful of barley and a cup of frozen vegetables. The key is to serve up large, steaming bowls, wrap yourself in a furry blanket and let the love envelope you.

Chicken soup
The stock
4 chicken Marylands (you can use 8 chicken drumsticks if you prefer)
2 carrots
2 sticks of celery
Half a leek
4 cloves of garlic
6 black peppercorns

The soup
2 carrots, chopped
Half a cup of barley
Half a leek, sliced
Salt and pepper

Place all the ingredients for the stock in a pot and cover with cold water. Bring to a boil, then turn down to a low simmer and leave it for an hour. Skim off the scum that floats to the top.

Once the hour is up, remove the chicken and strip the bones, returning the bones to the pan and keeping the meat separate. Allow the bones to boil very gently for another 45 minutes.

Remove the bones and vegetables and discard. The best way to do this is obviously to strain it, but if you don’t have a strainer then a slotted spoon is fine. You should be left with a lovely stock.

If you’re conscious about fat, the best thing to do here is to refrigerate the soup overnight and skim off the layer of fat in the morning. The amount of fat can be quite substantial because of the chicken skin, and removing the solid form is easier. But if the thought of doing this makes you feel old and weary and defeated, crack on with the soup.

Return the chicken meat to the pot and add the barley, chopped carrot and sliced leek. Season with salt and pepper, then boil for half an hour and serve.

There are two reasons I remove and discard the original vegetables and then add new ones: firstly, because once they’ve been boiling for two hours their flavour and nutrients are already in the pot, and secondly I like to be able to control the texture of the final soup veg. Plenty of people have their own preferences as to what goes into the final chicken soup, adding potato, swede, peas, pasta or bread dumplings; I’m not going to interfere. If you’re sick, it’s time to be a little self-indulgent. Do whatever feels right for you.

A note about chicken stock: honestly, I don’t really care if my stock is cloudy, but some people prefer the clear consommé-style stocks. Really. There are entire discussions on various blogs about how why a stock goes cloudy and the best way to clarify it.

From what I understand, a stock will go cloudy if it is brought to a rolling boil, which breaks down the collagen in the bones and allows it to leach into the soup, making it thicker and sticky like tonkotsu ramen. Some people say it’s the fat, not the collagen, which emulsifies through the soup, giving it a cloudy appearance.

Whatever the reason, most cooks agree that if you want a clear soup, you need to bring the pot to just below boiling point and simmer for longer – a full cooking time of two and a half hours. As long as you don’t boil it, you’ll have a light, clear stock. And then you need to strain it through cheesecloth to get rid of the bits.

no-bake cottage pie

When the temperature begins to drop and the first frost is felt in the air, warm, comforting food becomes almost irresistible; rich, meaty stews brimming with wine and herbs, a fat roast chicken with crispy potatoes, simmering pots of thick, spicy soup, lasagne served in steaming, heaped mountains of starchy goodness. Oh, my.

Who am I to resist the call of winter goodies, even if it is only September? Without an oven it can be difficult to embrace winter food in all of its glory, but it’s not impossible. You just need to be a little open-minded and relax some of those stringent aesthetic standards you have. Take courage. Have faith. Trust me, the finished product might look a little strange, but it’s going to taste just wonderful.

The no-bake cottage pie
500g extra lean beef mince
1 onion, finely sliced
4 garlic cloves, chopped
1 cup vegetables (optional)
1 beef stock cube
A few sprigs of thyme
2 bay leaves
Mashed potato, to serve

Brown the mince in a pan with the onion and garlic. If you’ve bought extra lean beef mince, you won’t need to worry about draining it, but if you’re concerned about fat content or if you’ve bought a mince with a fat percentage of 12% or higher, you can drain it and return it to the pan.

Add the thyme and bay leaves to the pan and crumble in the stock cube.

Cube the vegetables and add to the pan. Cover with a lid and allow to cook for ten minutes. Make sure you have a little taste before you turn off the heat. It should be full of meaty flavour, rounded off by herbs and vegetables.

This would ordinarily be the point at which you would scoop it into a baking dish, cover with mashed potato and drag a fork across the top to create beautiful designs. Instead, the no-bake cottage pie is assembled as follows: scoop it onto a plate, freeform, and top with piping hot mashed potato. If you’re worried about how it looks, try using small individual dishes and cover the meat with the potato. If you’re game, try topping it with cauliflower mash instead.

I know, I know, I know that it doesn’t really look like your traditional cottage pie. But at the end of a long day and a freezing trudge home in the rain, this is simply a plateful of warm, loving goodness that reassures you that everything will be all right.

It might not win any beauty contests, but to me this pie is just gorgeous.

A note about vegetables: One of the nicest things about cottage pie is that it’s very forgiving in terms of ingredients. Traditionally, it was made with leftover roasted meat and sometimes appeared with no vegetables at all. These days you often see it with cubed carrot and potato, which you can absolutely use if you prefer, but for me it generally depends on what I have left in the fridge at the end of a week. Be adventurous! Mince can take almost anything you throw at it!

cauliflower mash

The ‘before’ picture.

Don’t worry, I haven’t completely lost the plot. I know this is a perfectly ordinary cauliflower sitting here and I know I might be cheating ever-so-slightly by giving you a recipe for essentially taking it and turning it into mush. But it is nevertheless a staple in this tiny kitchen, and it’s hard to get right, so here goes.

Cauliflower mash
1 large head of cauliflower

Cut the cauliflower into pieces. One of the best things about this is that since the cauliflower is going to be mashed, you don’t need to waste time agonising over cutting the thing into florets of the same size so they’ll cook at the same speed (does anyone else do that, or is it just me?).

Boil the cauliflower in a large saucepan. Normally, you’d try to take cauliflower to a stage of perfect toothsomeness, just the same way you’re searching for al dente pasta. For mash, you want to take it beyond that point, to where a fork can split the floret with a touch.

Drain the cauliflower and return it to the saucepan. Roll up your sleeves, grab the potato masher, and work through the frustrations of the day.

If you were to serve it now, it would be tasty, but wet and sloppy. Since I often use this as a substitute for potato, I prefer a lighter, fluffier mash. What you want to do is remove the liquid that has come out of the cauliflower, and the best way to do this is by evaporation. Draining, sadly, won’t cut it.

Once you’ve mashed the cauliflower, return it to the stove and place over a low heat. You need to leave it steaming gently over the stove for a good ten minutes. You don’t really need to worry about looking after it – cauliflower shouldn’t burn or stick to the pan – but give it a stir every now and then to check how much liquid is left. The end result should be light and fluffy, ready for use as a delicious alternative to mashed potato.

And… after.


*If you’re looking for a variation that holds together better and has the consistency of mash, try this gourmet cauliflower mash.