I have covered cauliflower mash before – a recipe so simple it’s almost cheating to call it a recipe – but lately I’ve been experimenting a little with the standard formula and whilst I still love the old favourite, I’ve got to say that this one is closer to the starchy texture of real potato mash.
The point of mash, for me, is to provide a good textural base on which to build your main meal – stew, casserole, pie, sausages. You’re not looking for a strong flavour, but I find that using a vegetable cube and garlic just lifts it slightly. You’d be surprised at how mild the garlic is, but if you don’t care for these flavours you might like to leave them out altogether.
The end product is closer to a mash that has had butter and milk added – thick, creamy and sticky, as opposed to the fine sand-like fluffiness of pure whipped potato.
Gourmet cauliflower mash
1 large head of cauliflower
Vegetable stock cube
3 cloves of garlic, peeled
30ml cream (I used soy cream)
Chop the cauliflower into florets and place in a pot with the garlic and stock cube. Cover with water and boil until very soft.
Drain the pot and mash, garlic and all. I used a hand masher but I’m sure a stick blender would produce excellent results.
Return the pot to medium heat without the lid. This bit is all about making it as fluffy and dry as possible, so you want to evaporate all the liquid left. Add the cream, stirring frequently and it should take around 5 minutes to produce a fantastic pot of cauliflower mash.
Suddenly, post-Christmas penance doesn’t seem so bad.
Well! Where on earth have I been?
You know how it is over Christmas. There’s the huge leadup where you embrace the Christmas spirit and try to push people out of the way when you’re buying presents on Oxford St, then there are the alcohol-soaked Christmas parties, then (if your family is anything like my boyfriend’s) there are days and days of being fed turkey and ham and potatoes and chocolate biscuits until you feel you might as well hop into the oven and roast alongside the bird. Ain’t it glorious?
Then, inevitably, comes the period of self-recrimination where you realise that you maybe ate one or fifteen too many Roses. The new year begins. And so does the diet.
Salads are fantastic because they’re healthy, quick and no-fuss. The trouble is, when you’re eating a salad you always, always know about it. It goes from making you feel virtuous and elated at how good you’re being to your body to making you feel depressed and like you’d kill a small puppy for a plate of pasta. Trust me, I know.
The trick is to use fresh ingredients and keep it interesting. I am not a fan of bitter leaves, although I know lots of people who think they provide a nice contrast in a salad (actually, I’m not a fan of bitter flavours, full stop). But each to their own.
I confess that the inspiration for this salad came from a recent purchase of a non-stick frypan which is actually non-stick. I don’t know how I’ve been getting along without it. Do you know how liberating it is to cook without knowing you’ll need to soak the burnt pans overnight again? Really, if I’d known how ridiculously happy it would make me I would have spent the £2.99 a long time ago.
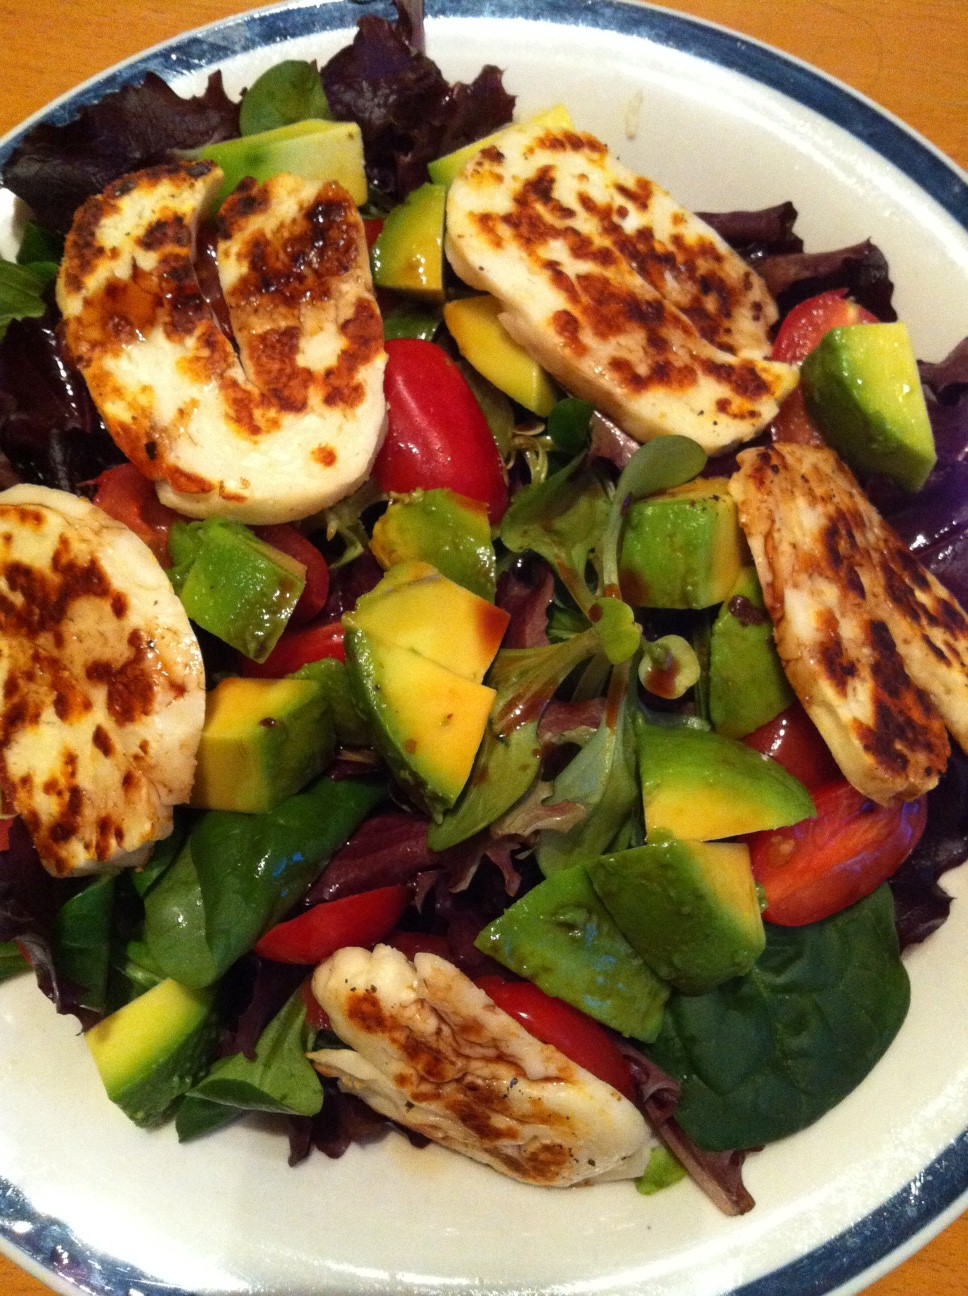
So I have been looking for things to fry (not easy with salads) and haloumi came to mind. Haloumi is a Cypriot cheese made from goat’s, sheep’s or cow’s milk, is salty to taste and firm in texture. I like it grilled, which creates a nice brown crust and softens the inside to a toothsome squidginess.
The bad news about haloumi is that if it goes cold, it takes on a rather rubbery texture (still tastes good though). Also, it is high in fat so if you’re concerned about that, try to watch the amount you’re using.
Haloumi salad
3-4 slices of haloumi
4 baby plum tomatoes
half an avocado
salad leaves
balsamic vinegar
Place the haloumi into a non-stick frypan (no oil necessary) over a medium heat.
While the cheese is grilling, arrange the salad leaves on a plate. Slice the tomatoes and avocado and add to the salad.
Make sure you turn the cheese once or twice during cooking so both sides take on that browned look. When they’re done, place them onto the salad and finish with a drizzle of balsamic vinegar.
I grew up with Asian soups, which are mostly broth-style concoctions with various things floating in them – from the standard pork and prawn dumplings or chicken to the weird and wonderful unnameable items that are considered to be the ultimate panacea for everything from stomach aches to back pain.
There is pretty much only one Western-style soup my mother makes, and that is pumpkin soup. It’s a hearty, filling winter wonder that I think is fitting for my American buddies who’ll be tucking into all sorts of Thanksgiving goodies very soon.
In my wholly unbiased and humble opinion it is the finest pumpkin soup you will ever taste, anywhere, and it ridiculously healthy because unlike most pumpkin soups it has no cream and no sugar, instead relying on the smooth texture and natural sweetness of the pumpkin. Go forth and try it! Wrap yourself in the warm blanket of virtue and congratulate yourself on how healthy you’re being.
Pumpkin soup
For the vegetable stock:
2 carrots
Two-thirds of a leek
Half an onion
2 sticks of celery
4 bay leaves
6 black peppercorns
For the pumpkin soup:
Half a kilo butternut pumpkin
Half a kilo paquito pumpkin
One-third of a leek, sliced
Half an onion, chopped
2 carrots, chopped
Make the vegetable stock by placing all the stock ingredients in a pot, covering with cold water and bringing to a boil, then turning to a simmer for 20 minutes. Heston advises that you should slice the vegetables as thinly as possible to provide as much surface area as you can, but if you can’t be bothered it will turn out just fine.
Meanwhile, prepare the pumpkin. The butternut pumpkin in my photo is just over a kilo, and the paquito pumpkin is just under a kilo, and I used half of each. You could simply use one whole pumpkin, but I like the different tastes each pumpkin gives – the butternut has a nutty, robust undertone, and the paquito pumpkin is just a little sweeter and negates the need for you to add sugar.
There is nothing for it but to chop the pumpkins into small pieces, removing the skin as you go. This is a fairly painful process but sadly I see no way around it. Wear your pumpkin blisters with pride.
Pumpkin blisters. I hope you can avoid these, but if not, wear them with pride.
In a pan over a medium heat, place the onions and leek and cook until they start to soften but don’t brown them.
Add the pumpkin pieces and cook for 7-8 minutes.
A glorious orange frenzy
Meanwhile, drain the vegetable stock, reserving the liquid. Put the liquid back into the pot and add the chopped carrots, and when the pumpkin and onion is ready, add it to the pot. Cook for 20minutes or until the pumpkin is very soft.
Remove from heat and ladle out a bowlful of the liquid, keeping to one side. You want to hang onto this just in case the soup is thicker than you would like.
A stick blender would be ideal at this point, but I don’t have one, so I just used a hand masher instead – hence the rather pureed look of my soup. It still tasted wonderful. Proof positive that some recipes are extremely forgiving!
It’s a zucchini, it has always been and will always be a zucchini, but today I will concede to the French because courgetti sounds so much better than zuchetti.
A while back, when I was investigating low-carb meals (that was a hoot), I came across the notion of using vegetables as alternatives to pasta and rice. There was the mysterious as-yet-unseen spaghetti squash (a pumpkin that turns into noodles when you cook it?? What?!), cauli-rice, cauliflower mash, and of course, courgette spaghetti.
At the time I thought nothing of it – but after watching Nigel Slater methodically clean his fridge by getting creative with his leftovers, I was inspired. I had half a bag of dangerously green spinach, a handful of plum tomatoes and a sliver of smoked salmon lying around. And so with a renewed creative burst I made the tastiest supper I’ve had in a long time, and I’m going to share it with you on the condition that you understand that I haven’t been disloyal to my Australian roots by calling it courgetti.
A myriad of flavours and textures. Just perfect.
Spinach and ricotta courgetti with smoked salmon
1 courgette
2 garlic cloves, sliced
Half a bag of spinach (about three handfuls)
1 small slice of smoked salmon, pulled into pieces
1 tablespoon smooth ricotta
6 mini mozzarella pearls (you can use one ball and slice it if you like, but I think the pearls are adorable)
6 plum tomatoes, sliced
Balsamic vinegar
In a pan, place the garlic and a good slug of olive oil and some salt to stop the garlic burning. Keep over a medium heat, being careful not to let the garlic colour, whilst you prepare the courgetti.
Take a vegetable peeler and run it down the length of the vegetable, as if you were going to peel it, but keep peeling in the same direction to form strips. I always, always find that peelers aren’t big enough to accommodate the full width of the courgette, so I peel until it starts to become a problem and then I turn it over and do the other side until the same thing happens. At this point, I slice the zucchini in half lengthways and continue with the peeler.
Once you’ve gotten to the point where no more noodles can be made, just chop the remaining chunk of courgette and add it to the pan with the garlic, which should be sizzling nicely by now.
Let the chunky courgette cook until soft and then add the spinach. When it starts to wilt, add the courgetti and move it around the pan. The courgetti really only needs about two or three minutes to warm through and take on the taste of the garlic.
Add the smoked salmon, then remove the pan from heat and dab in blobs of the ricotta. If you’ve bought smooth ricotta, it basically melts to form a creamy, garlicky sauce, but I imagine regular ricotta would be lovely as well.
Arrange on a plate and top with the mini mozzarella pearls, the plum tomatoes and drizzle with balsamic vinegar. The mildness of the courgette is the perfect base for the creaminess of the cheese and the sharpness of the tomatoes and vinegar, set off nicely by the zingy garlic. Bliss.
I’m not a good sick person, either. There are people who bear their affliction with grace, fortitude and a staunch cheerfulness whilst delicately withering away, kind of like Beth in Little Women. I’m not one of them. When I have a cold, there’s wailing, whingeing, spluttering and coughing, the cursing of trans-seasonal weather, piles of tissues and a good deal of feeling sorry for myself. It’s unfortunate, but there it is.
Strange things happen to my appetite when I’m sick, and it’s probably the only time I’ll ever say ‘no thanks, I’m not hungry’. My culinary planet becomes sadly Pluto-nic, reduced to a dwarfish set of dry crackers and some hot tea. Eventually if that doesn’t help, I’m forced to pull out the big guns, the cure-all, the substance known throughout the world as Jewish penicillin – chicken soup.
Chicken soup is a lengthy two-stage process, but fortunately it’s so simple that even a sick person can probably cope with it. The stock itself involves almost no work, and if you’re beat after that then you can simplify the soup down to a handful of barley and a cup of frozen vegetables. The key is to serve up large, steaming bowls, wrap yourself in a furry blanket and let the love envelope you.
Chicken soup The stock
4 chicken Marylands (you can use 8 chicken drumsticks if you prefer)
2 carrots
2 sticks of celery
Half a leek
4 cloves of garlic
6 black peppercorns
The soup
2 carrots, chopped
Half a cup of barley
Half a leek, sliced
Salt and pepper
Place all the ingredients for the stock in a pot and cover with cold water. Bring to a boil, then turn down to a low simmer and leave it for an hour. Skim off the scum that floats to the top.
Once the hour is up, remove the chicken and strip the bones, returning the bones to the pan and keeping the meat separate. Allow the bones to boil very gently for another 45 minutes.
Remove the bones and vegetables and discard. The best way to do this is obviously to strain it, but if you don’t have a strainer then a slotted spoon is fine. You should be left with a lovely stock.
If you’re conscious about fat, the best thing to do here is to refrigerate the soup overnight and skim off the layer of fat in the morning. The amount of fat can be quite substantial because of the chicken skin, and removing the solid form is easier. But if the thought of doing this makes you feel old and weary and defeated, crack on with the soup.
Return the chicken meat to the pot and add the barley, chopped carrot and sliced leek. Season with salt and pepper, then boil for half an hour and serve.
There are two reasons I remove and discard the original vegetables and then add new ones: firstly, because once they’ve been boiling for two hours their flavour and nutrients are already in the pot, and secondly I like to be able to control the texture of the final soup veg. Plenty of people have their own preferences as to what goes into the final chicken soup, adding potato, swede, peas, pasta or bread dumplings; I’m not going to interfere. If you’re sick, it’s time to be a little self-indulgent. Do whatever feels right for you.
A note about chicken stock: honestly, I don’t really care if my stock is cloudy, but some people prefer the clear consommé-style stocks. Really. There are entire discussions on various blogs about how why a stock goes cloudy and the best way to clarify it.
From what I understand, a stock will go cloudy if it is brought to a rolling boil, which breaks down the collagen in the bones and allows it to leach into the soup, making it thicker and sticky like tonkotsu ramen. Some people say it’s the fat, not the collagen, which emulsifies through the soup, giving it a cloudy appearance.
Whatever the reason, most cooks agree that if you want a clear soup, you need to bring the pot to just below boiling point and simmer for longer – a full cooking time of two and a half hours. As long as you don’t boil it, you’ll have a light, clear stock. And then you need to strain it through cheesecloth to get rid of the bits.
When my bestie and I want to get really cute, we call each other dumplings.
Is it an insult to be compared to something soft and squidgy, with delicate pudgy folds of goodness? Not at all. Because we love everything about dumplings, from the humble siu mai to the slightly dangerous xiao long bao (it’s like extreme eating). It’s a sign of our affection for each other.
But sadly, a lot of the commercially-produced dumplings in London are filled to the brim with MSG. I’ve got a real beef (boom tish!) with MSG, mainly because I consider it to be a chemical form of cheating, but also because I get headaches when I eat it. Chinese have almost no tolerance for hippie predilections, so the only alternative is to make my own.
I’d never tried making dumplings before, but it’s actually quite simple to do in a tiny kitchen. You make the filling in one bowl, then you just need a small flat surface to make the dumplings and a plate to hold the finished product. It’s a little time-consuming, but it’s compact and easy enough to do.
Now whenever I make these, I think of my bestie, my little dumpling, half a world away.
Pork Dumplings
Makes 48
Dumpling wrappers
500g pork mince (reduced fat if you can get it)
2 cups shredded cabbage (this translates to about 4 full leaves)
2 tbsp soy sauce
2 tbsp Chinese wine, white wine or dry sherry
6 tbsp sesame oil
½ teaspoon white pepper
2cm ginger, grated
1 shallot, finely diced
1 clove garlic, finely diced
Salt
Cornflour
Whoah, does that look like a scary lot of ingredients? It really isn’t – and it’s really easy to make the mix. Start by taking the shredded cabbage and salting it with 2 tablespoons of salt. Leave it for 5 minutes and you’ll see the leaves have become shiny and wet.
Meanwhile, combine the soy sauce, wine, sesame oil, pepper, ginger, shallot and garlic – basically all of the seasonings for the mix.
Take your shredded cabbage and squeeze very hard to get all the moisture out, then place it in a large bowl and shake it to loosen.
Add the mince. At this stage I always find it a bit easier to shake the mince a bit so it’s nice and loose, which helps the seasoning to go in evenly.
Ok, not that photogenic. But you just know it’s going to be good.
Add the seasoning and mix well, trying not to overwork the mix. That bit is done!
To make the dumplings, take a wrapper and lay it flat on a board. They should be lightly floured so they won’t stick. Mix the cornflour with a little water (room temperature) so it forms a white liquid.
We’re ready to roll.
Place about a teaspoon of mixture into the centre of the dumpling wrapper. If you can be bothered to get fancy, quenelling helps to form the right shape, but otherwise just lightly roll a little meatball. Dab the cornflour water all around the edges, and fold into a semicircle. Pinch the edges hard. You can leave them like that if you want, but I like to try to make mine stand up, so I crinkle and schmoosh a little so they stand up properly.
Dumplings, ready for the steamer!
To serve: steam for 8 minutes and serve with the classic dumpling sauce (vinegar, soy sauce and chilli).
First cauliflower, now broccoli. What is going on here?
YOU DON’T HAVE TO GO OUT ON A SATURDAY NIGHT.
This is something I only learned in my mid-twenties, and what a revelation it is. Sometimes, after a long week at work, the best medicine is to meet up with the girls and have a good natter over a few cocktails. Let your hair down, dance the night away, cavort and frolic into the wee hours of the morn and then grab a much-regretted kebab on the way home.
Sometimes, however, you just want to stay in and have a quiet night with a book and a glass of wine.
A quick, easy supper is in order, something crafted of cupboard ingredients with a minimal amount of fuss. That way you can go from stove to table in fifteen minutes and be happy as a clam for the rest of the evening (leave the washing up until tomorrow. Go on, I won’t tell.)
Pasta e broccoli
1 cup pasta (you’re looking for something that cooks in about 9 minutes)
1 small head broccoli
3-4 anchovies
3 garlic cloves
Small handful pine nuts
Olive oil
Start with the pasta. Put a pot of water on to boil while you finely slice the garlic cloves, and turn the head of broccoli into small, bite-size florets. If you can be bothered, making them even sizes will mean that they cook at the same time.
In a pan, drizzle some olive oil and add the garlic cloves over a low heat. Don’t let them brown, as this will lend a sharp, bitter taste to the dish.
‘Scuse the scorch marks. A bacon experiment that went slightly awry.
Once they’ve gone translucent, add the anchovies. If you’re a vegetarian or just don’t like anchovies, leave them out and add parmesan cheese at the end.
Cook until the anchovies have begun to break up, then add the broccoli. Add a dash of the pasta water to the pan to help the broccoli cook.
Once the pasta is done, drain and add to the pan. Mix well, and serve with the pine nuts sprinkled on top.
Quick, easy and simple.
A note about pasta: this is probably obvious enough, but it’s worth mentioning that when you’re adding cooked pasta to a hot pan, if you’re planning to keep the thing on the stove for any length of time you’ll need to underdo the pasta when you boil it. Otherwise, it keeps cooking along merrily in the pan when you don’t really want it to, and you end up with soggy pasta. Eurgh.
When the temperature begins to drop and the first frost is felt in the air, warm, comforting food becomes almost irresistible; rich, meaty stews brimming with wine and herbs, a fat roast chicken with crispy potatoes, simmering pots of thick, spicy soup, lasagne served in steaming, heaped mountains of starchy goodness. Oh, my.
Who am I to resist the call of winter goodies, even if it is only September? Without an oven it can be difficult to embrace winter food in all of its glory, but it’s not impossible. You just need to be a little open-minded and relax some of those stringent aesthetic standards you have. Take courage. Have faith. Trust me, the finished product might look a little strange, but it’s going to taste just wonderful.
The no-bake cottage pie
500g extra lean beef mince
1 onion, finely sliced
4 garlic cloves, chopped
1 cup vegetables (optional)
1 beef stock cube
A few sprigs of thyme
2 bay leaves
Mashed potato, to serve
Brown the mince in a pan with the onion and garlic. If you’ve bought extra lean beef mince, you won’t need to worry about draining it, but if you’re concerned about fat content or if you’ve bought a mince with a fat percentage of 12% or higher, you can drain it and return it to the pan.
Add the thyme and bay leaves to the pan and crumble in the stock cube.
Cube the vegetables and add to the pan. Cover with a lid and allow to cook for ten minutes. Make sure you have a little taste before you turn off the heat. It should be full of meaty flavour, rounded off by herbs and vegetables.
This would ordinarily be the point at which you would scoop it into a baking dish, cover with mashed potato and drag a fork across the top to create beautiful designs. Instead, the no-bake cottage pie is assembled as follows: scoop it onto a plate, freeform, and top with piping hot mashed potato. If you’re worried about how it looks, try using small individual dishes and cover the meat with the potato. If you’re game, try topping it with cauliflower mash instead.
I know, I know, I know that it doesn’t really look like your traditional cottage pie. But at the end of a long day and a freezing trudge home in the rain, this is simply a plateful of warm, loving goodness that reassures you that everything will be all right.
It might not win any beauty contests, but to me this pie is just gorgeous.
A note about vegetables: One of the nicest things about cottage pie is that it’s very forgiving in terms of ingredients. Traditionally, it was made with leftover roasted meat and sometimes appeared with no vegetables at all. These days you often see it with cubed carrot and potato, which you can absolutely use if you prefer, but for me it generally depends on what I have left in the fridge at the end of a week. Be adventurous! Mince can take almost anything you throw at it!
When I was growing up, one of my very favourite stories in the world was Stone Soup.
If you’re not familiar with the tale, it’s about a poor and tired traveller who convinces a rather cranky old bat to shelter him for the night. She agrees to let him stay, but tells him that she has no food to give him. He offers to feed her instead.
‘You – feed me? With what?’ she scornfully asks. ‘Stone soup,’ says he, and places a stone into a pot of water over the fire. He then proceeds to coax all sorts of things out of her – barley, carrots, celery, a bit of meat, potatoes – by telling her the stone is old, and might need a bit of help with flavour. That night they dine like kings in the little cottage, and in the morning she gives him a good breakfast, coffee and some coins to help him on his way, her crotchety old heart having been touched by the restorative powers of sharing food.
The story always got to the bit about barley and I would shiver – for it seemed, to my young ears, to be the transformative substance that took the water and stone and finally made it a soup. I had no idea what barley was, or even what it looked like. I just knew that it had to be magical.
This soup is a remembrance of how much I loved that story and everything it stands for. It reminds me of my childhood, of somehow feeling but not yet understanding that cooking and sharing a meal with someone can be a deeply healing experience. The heartwarming feeling I get when I make this soup is the same feeling I had when I got to the end of the story.
Barley Soup
1/2 cup barley
Yellow rock sugar
Handful gingko nuts
Dried bean curd sticks, roughly broken
Boiled eggs
Wash the barley and check for any pebbles that might have made it in.
Place the barley in a large pot of water – you’re looking for a ratio of about 1:5, but you can start with a litre of water and add as the soup boils.
Bring to a boil and add a large lump of yellow rock sugar, plus the gingko nuts.
Turn to a low boil and simmer for 1 hour. Barley has a tendency to bubble up, so make sure you’re around to watch or hear the pot. You might need to top up with water as it boils away.
Add the dried bean curd sticks and simmer for an additional 30 minutes. Again, you might need to top up the pot with water as the bean curd rehydrates. You might also need to add additional sugar to taste.
The end result is a light, translucent soup that is sweet and perfectly toothsome, thanks to the barley. It is traditionally served with a boiled egg, which enhances the sweetness.
A small note about gingko nuts: they are funny things. Widely used in Chinese cooking, I hated them when I was young and would pick them out of my soup, piling them in large heaps to be tossed back into the pot – or my parents’ bowls. They seemed to me to have a vaguely oniony taste, and I thought they had no place in my soup.
These days, I appreciate the slight pungent tang they lend the soup; it cuts through the sweetness and adds depth. I am, perhaps, not quite reformed – my parents would possibly use quite a lot more than a handful of nuts to make their soup, but I would never go beyond a handful and occasionally I leave them out altogether.
They are, however, said to be extremely good for you, helping cognitive function, memory and blood flow and fighting free radicals.