Frittatas are gloriously summery. Sweet and eggy, deliciously filling and incredibly versatile, frittatas are this lovely golden yellow that always makes me think that they’ve found a way to catch Italian sunshine and smuggle it back for the rest of us. Somehow, despite being basically a collection of eggs and odds and ends, they’re unfailingly cheerful. I challenge you to stare at a frittata and not feel uplifted by its simple goodness.
It’s pretty difficult to stray too far off the path with a frittata, even if you’re not following a recipe. They’re the kind of thing you vaguely know how to make almost instinctively, and they’re fairly forgiving, so they’re the ultimate in stress-free cookery. What’s not to love?
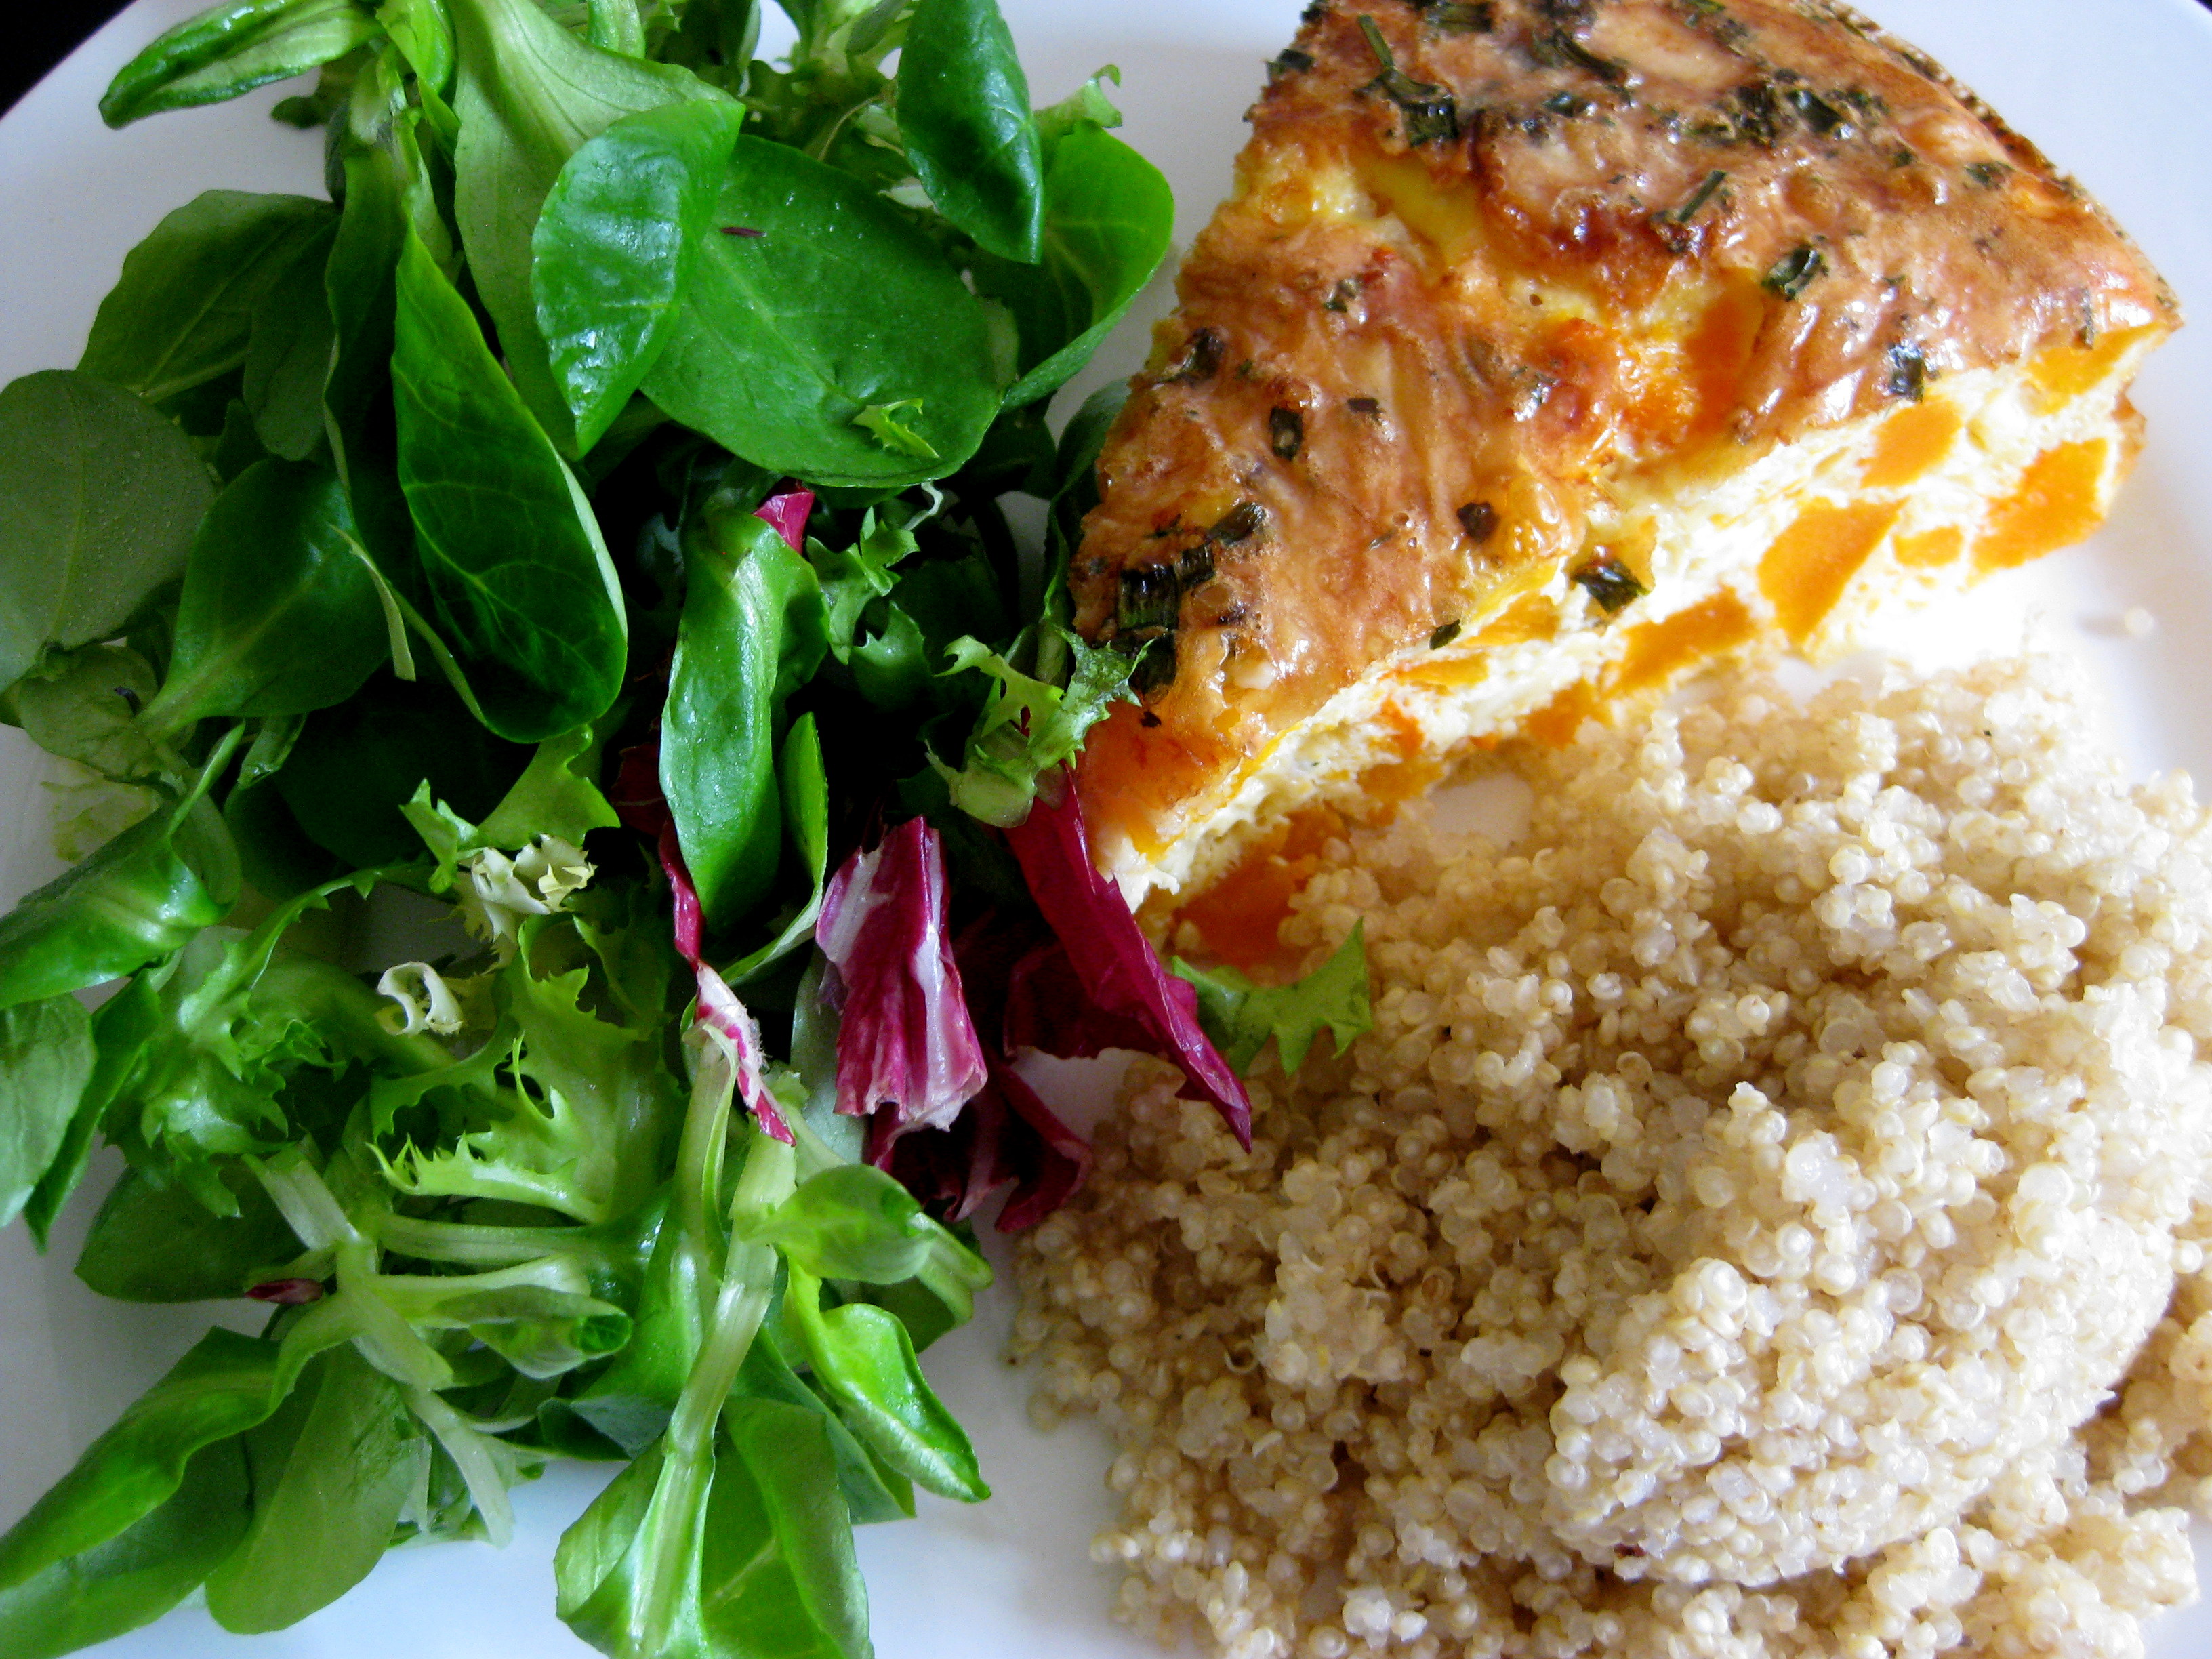
I love making frittatas with sweeter vegetables like pumpkin and zucchini to bring out the natural sweetness of eggs. You can serve frittatas hot or cold and they’re great accompanied by a fresh salad, beans or some quinoa.
Serve with salad and quinoa.
Pumpkin and cheddar frittata
1 x medium butternut squash
200g cheddar cheese, half grated, half cubed
9 eggs
Small bunch of chives
Salt and pepper
Cut the butternut squash into small chunks and roast in a 200C oven for around 20 minutes, or until soft.
Take it out and remove the skin – I find it easier and faster to do after it’s been cooked, but you do lose a little more pumpkin flesh.
Chop into cubes and place into a cake tin (one that doesn’t leak is helpful!) with the cubes of cheddar.
In a bowl, beat the eggs until light and fluffy, then snip the chives in and add a good strong pinch of salt and white pepper. Stir in the grated cheese and pour the lot into the cake tin.
The highly photogenic use-everything-up fridge omelette.
Let’s face it: everything in my fridge has seen better days.
How could I have let it come to this? Well, there’s a good reason for the very-unlike-me paucity of food in the tiny kitchen; I’m moving next week and I’m struggling to clear my cupboards to make things as simple as possible. That means the half-bags of pasta, cup of lentils, highly ambitious biryani mix, on-special kilo of chickpeas – it all has to go. I’ve been doing all sorts of odd culinary contortions (chicken bourgignon, anyone?) in an effort to use everything up.
So at the end of a determined month-long embargo on buying goods, my fridge is in a pretty sad state. What a creative and nutritional challenge!
Chop the haloumi into small chunks (rather than the slices used in a haloumi salad). Place in a non-stick frypan over medium-high heat. If your pan is properly non-stick, you won’t need oil.
Fry the haloumi until it begins to brown. This should take around 5 minutes. Make sure you flip the pieces so both sides get browned.
Meanwhile, slice the pointed pepper into slivers. Add them to the pan once the cheese is browned, then cover with the eggs.
I am not a great omelette-maker. That perfect omelette shape eludes me, especially since I don’t have a grill to finish the top. But I make up for this by not caring in the slightest what shape my omelette turns out to be. I wait until the edges of the omelette turn pale, meaning it’s safe to flip, then I flip it with two spatulas onto its other side and give it thirty seconds. Then I slide it onto the plate, attempting to fold it in half as I go.
The haloumi is really salty, so no seasoning is required. Serve with a drizzle of balsamic if you like, and a pile of pickled baby beetroot if it’s there just waiting to be used.
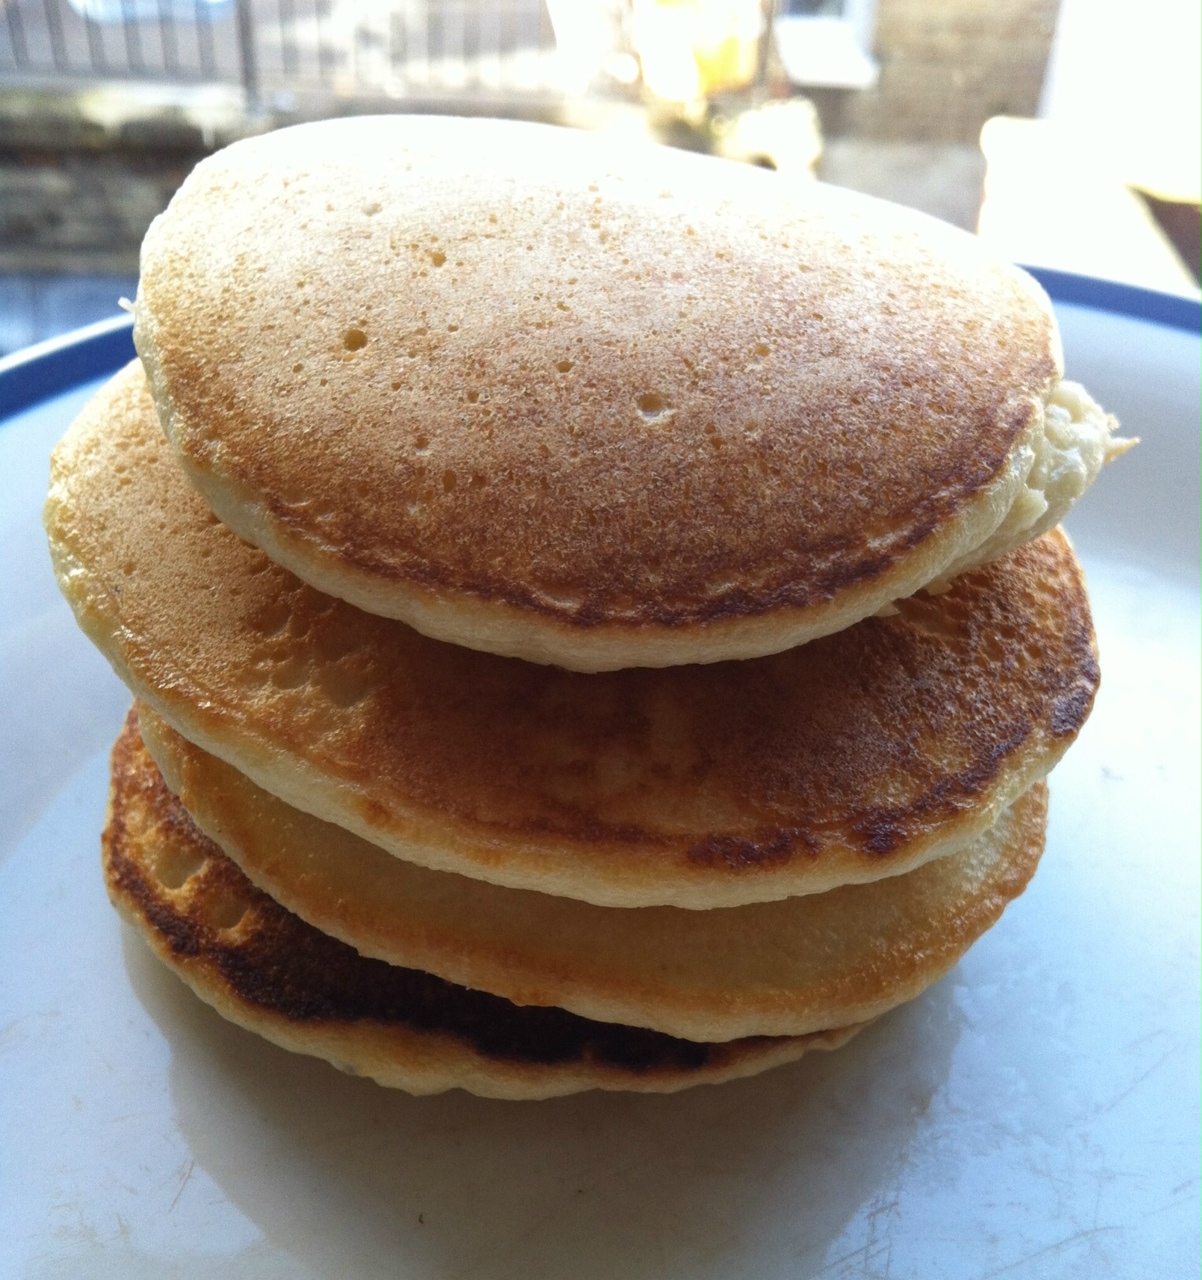
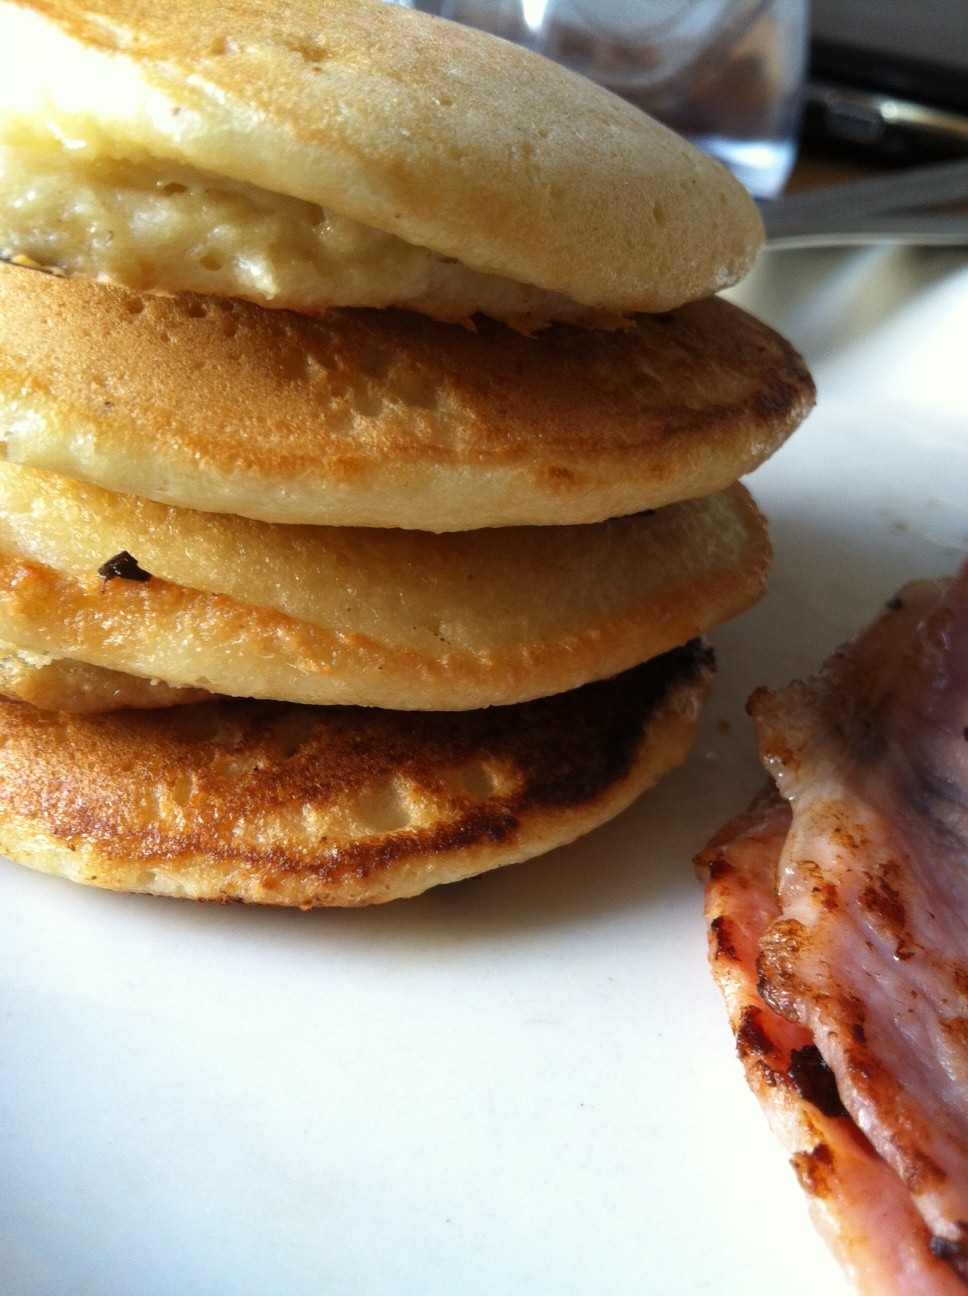
What is a Sunday without pancakes? Just another day of the week that ends in ‘y’, obviously.
When I was growing up, there was always a flurry of excitement when pikelets entered the house. Pikelets are really pancakes, but Down Under pancakes are the size of a small dinner plate, whereas pikelets are a neat, manageable handful. Each member of my family pretty much eats them the same way; slathered in peanut butter, or toasted and slathered in peanut butter.
It wasn’t until much later in life that I learned the ‘proper’ way of eating them in Australia is with golden syrup, and by then it was too late – the lifelong habit of eating savoury goods with these little gems had stuck. Eventually I happened upon the Canadian way of eating them with bacon and maple syrup, and it became a close second to the peanut butter breakfast rally.
Pancakes should be light, fluffy and served with something equally delicious.
Of course, making pancakes is pretty simple, but the primary ingredient is flour. Not only do I rarely keep flour in the house (there’s a bad weevil experience behind that), but one of my good friends has recently been diagnosed with both IBS and coeliac disease, and it has been my mission over the past few weeks to look at things she can eat, which is trickier than you might expect.
Coeliac disease is at least consistent, although painful: no gluten, which means no wheat, barley, rye, spelt, flour derived from any of those, nothing that has come into contact with gluten products. Restrictive, but straightforward. Lots of things are marked gluten-free and the label will generally tell you if gluten is present in the product.
IBS is a whole different beast. Following the FODMAP diet seems to help her, but it’s difficult to remember what to avoid. It’s also supremely tough to eat out when you have to avoid onion and garlic and that’s present in almost everything in a commercial kitchen.
I wanted to try out a recipe that would help my buddy put the spark back into her Sunday breakfast. So here it is: taken from about.com, these almond flour pancakes are gluten-free, IBS-friendly, low-carb, easy and very filling.
I probably did not need to eat all four pancakes, but hey, it’s a Sunday.
Almond flour pancakes (makes 4)
Half a cup of almond flour
1 egg
10 drops of liquid stevia (you can substitute with liquid sucralose or just use half a tablespoon of sugar)
1/8 cup of water
1 tablespoon oil
small sprinkle of salt
Warm your non-stick frying pan over medium heat whilst you mix all ingredients together.
Place two tablespoons of mixture into the pan. The good thing about this is that it doesn’t spread far, so if your pan is big enough you can do two at a time.
The pancake needs about 2-3 minutes on the first side before you flip it. They don’t really bubble the same way a pancake does, but you’ll know when it’s ready to turn because the edges will become lighter as they cook – once the pancake has a white ring all the way around, it’s ok to flip. It will need about a minute on the other side.
Serve with bacon, peanut butter or if you must, drizzled with golden syrup, and relish the Sunday-morning feeling.
The perfect Sunday breakfast.
A note about cooking for coeliacs: this is probably an obvious point but if you’re cooking for a coeliac, make sure the pan, all your utensils and crockery are ultra-squeaky-clean. The slightest bit of gluten can make them seriously ill.
I hadn’t heard of Nigel Slater before I landed in this fine country, but I’ve really taken to him. There’s something charming and earnest in his boyishly enthusiastic manner that inspires a certain recklessness in the kitchen – and I think we could all do with some of that now and again. ‘Use every last bit,’ he commands from the screen, turning pumpkin skin into crisps and dangerously ripe cherries into a tart. Don’t be afraid to experiment, just trust the flavours, be inventive and it will all work out.
A worthy mantra, especially if you’re living on a budget and your palate has progressed beyond the student days of burgers and pasta.
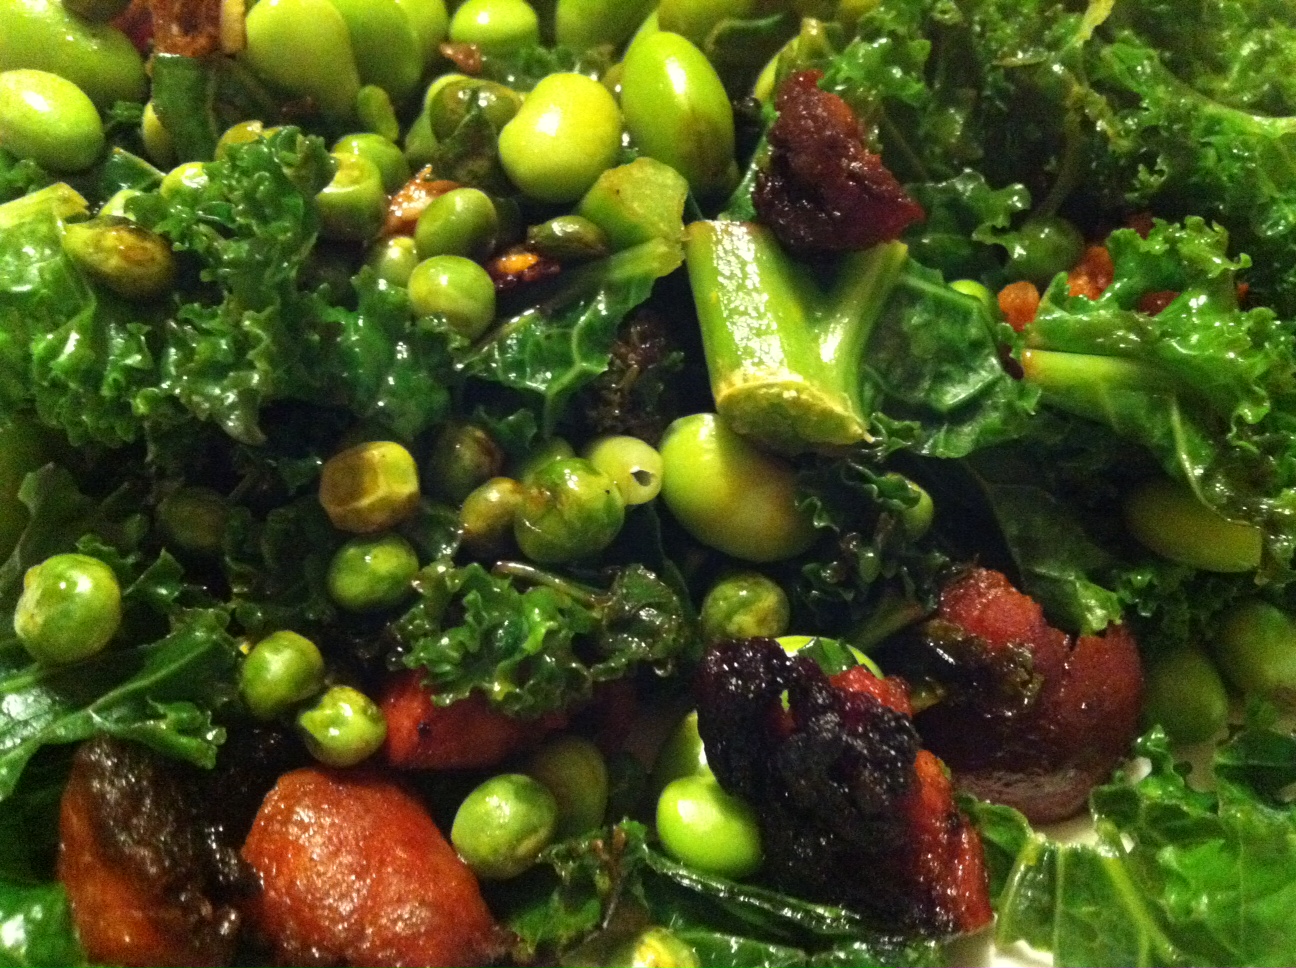
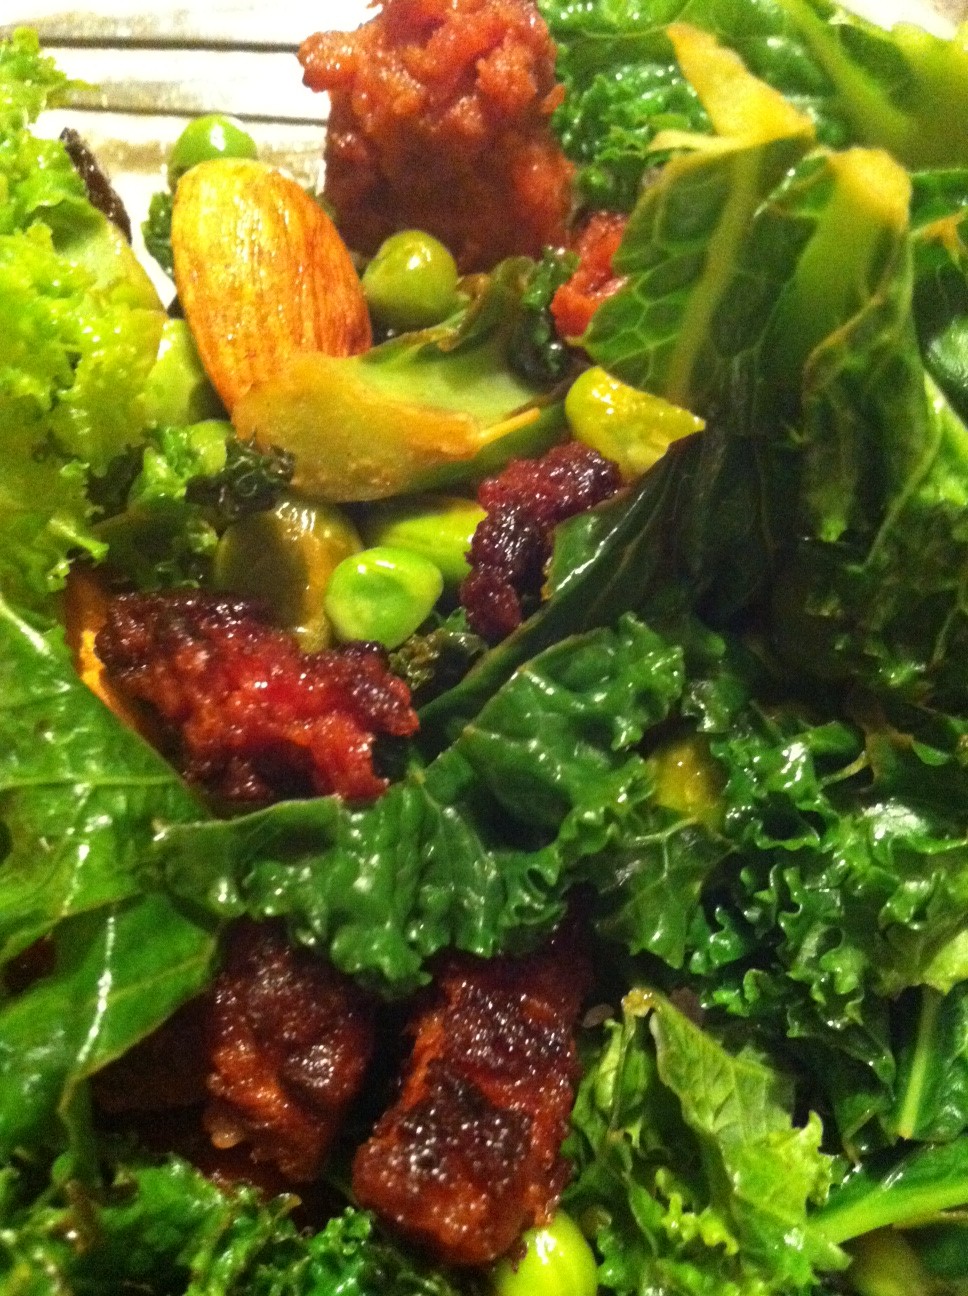
As soon as I saw curly kale, I knew I wanted to try it. It’s a hardy winter vegetable, a type of cabbage, rich in vitamins and minerals and perfect for the cold weather because you can cook it. No longer need your long, crisp nights be accompanied by an equally chilly salad.
The fantastic thing about curly kale is that when cooked, it takes on a substantial weightiness that can hold its own against meat, whilst also keeping its light, springy form. Like most greens, it doesn’t taste like much – all the better to flavour it with.
I confess I tweaked Nigel’s original recipe a little – I felt it needed just a little more to take on the complexity my stomach associates with a full meal. This is a perfect winter dinner; filling, nutritious and ready to eat in about fifteen minutes.
Spicy chorizo and curly kale
100g cooking chorizo (about 2 links)
100g curly kale, sliced
2 cloves garlic, sliced
Half a cup of edamame beans, cooked
Quarter of a cup of peas, frozen
Small handful of almonds (optional)
Remove the chorizo from its skin and pull the links into small pieces. You can chop them, of course, but I rather like the way pulling forms them into ragged sausage balls which then go on to have gloriously browned peaks.
Place the chorizo over medium heat and cook through – it should only take about 3 minutes if your pieces are small. Remove and set on kitchen paper.
Drain the fat and discard, but don’t wipe down the pan – the oil will help you to fry everything else and imbue it with the wonderful flavours of the chorizo. Turn the heat down to medium and add the garlic slices, followed by the peas and kale.
Fry until the kale starts turning a dark, shiny green, then add the cooked edamame beans and the chorizo back to the pan. Keep over a medium heat until the tough stalks of the kale are cooked through, then season to taste and serve on a large plate with a scattering of almonds.
Cooking with kale. Isn’t it good to branch out a little!
As it nears the end of January, the health kick you started at the beginning of the year starts to lose its sheen and you begin to wonder if you can actually go to jail for clobbering that pizza-munching individual over the head with a cucumber and nicking off with a slice of Meatlovers.
If I was on the jury, I just might acquit you.
Not many people have a vast repertoire of healthy meals they routinely prepare, but I don’t think that’s because we don’t know how to make them. I think it’s just because we often forget how many things we can cook. Sometimes all it takes is seeing someone else making a dish to make us remember that we already know how to make it, that we too can reach the heights of healthy culinary brilliance.
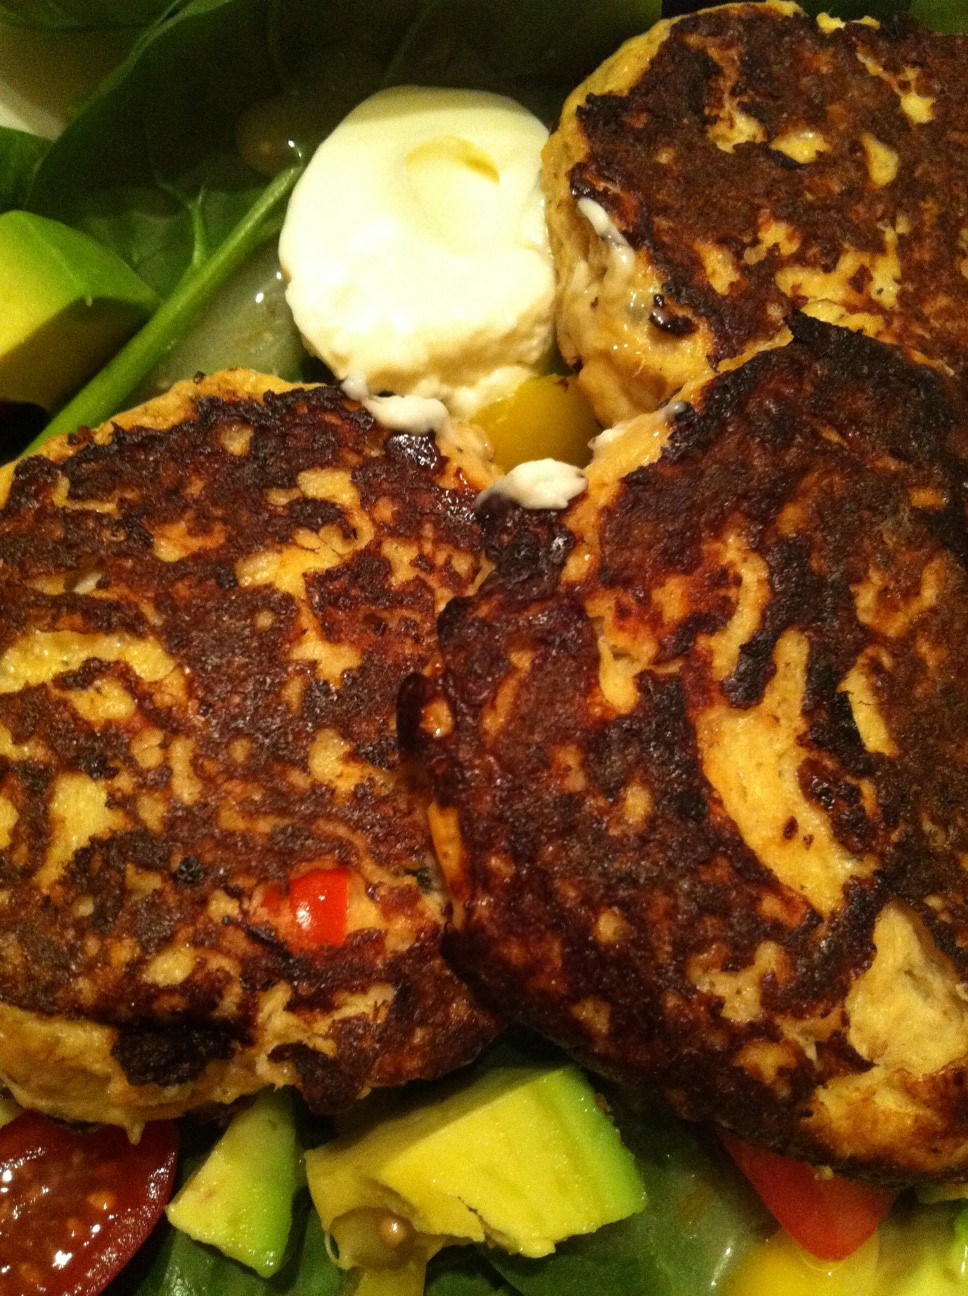
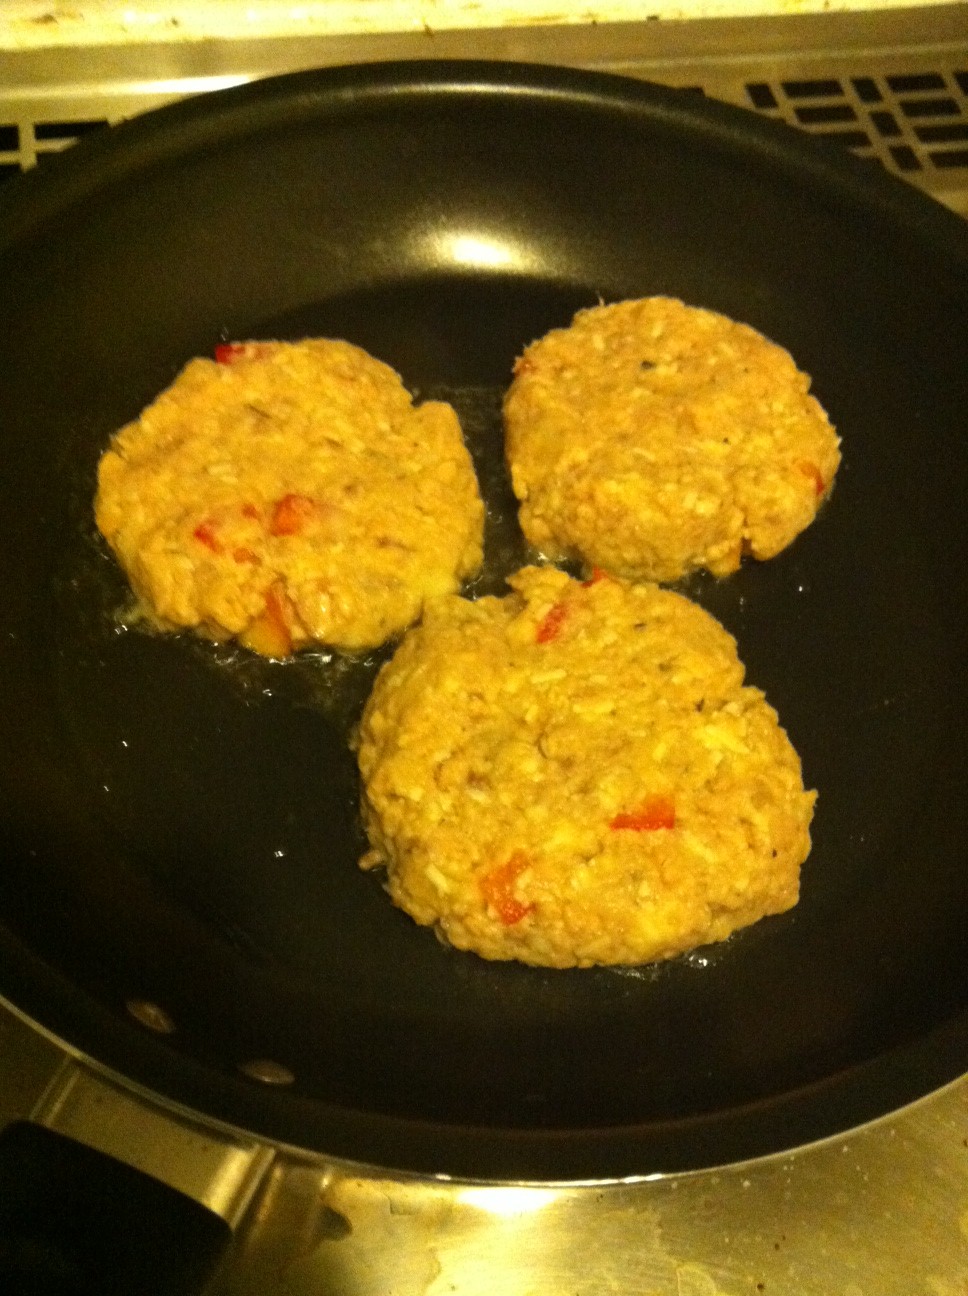
So here’s a little reminder from the tiny kitchen that fishcakes are easy, light, delicious and nutritious. I’ve made these without potato because this month I’m trying to go easy on the carbs, but the cauliflower mash I made last night has substituted nicely. They are a little difficult to flip in the pan because of it, but they taste absolutely scrummy.
Low-carb salmon fishcakes – makes 12
Half an onion, very finely chopped
415g salmon
1 egg
1 cup cauliflower mash
Handful grated cheddar
Salt and pepper
Incredibly, the majority of the work is done as soon as you’ve prepped the ingredients. Simply combine everything in a large bowl and work through to form a sticky, lumpy paste. If it’s too dry, add some milk or another egg. If it’s a little too wet, it should dry out a bit when you place it in the fridge.
Refrigerate the mixture to help it set.
You’ll need to refrigerate for at least half an hour, then take it out and form into patties. Fry in a little oil for about five minutes on the first side, and flip very carefully – they’ll be difficult to flip, but you can do it with two spatulas.
These are a one-turn job. Make sure you don’t try to flip them too early!
Serve with lemon, a dab of mayonnaise and a large salad.
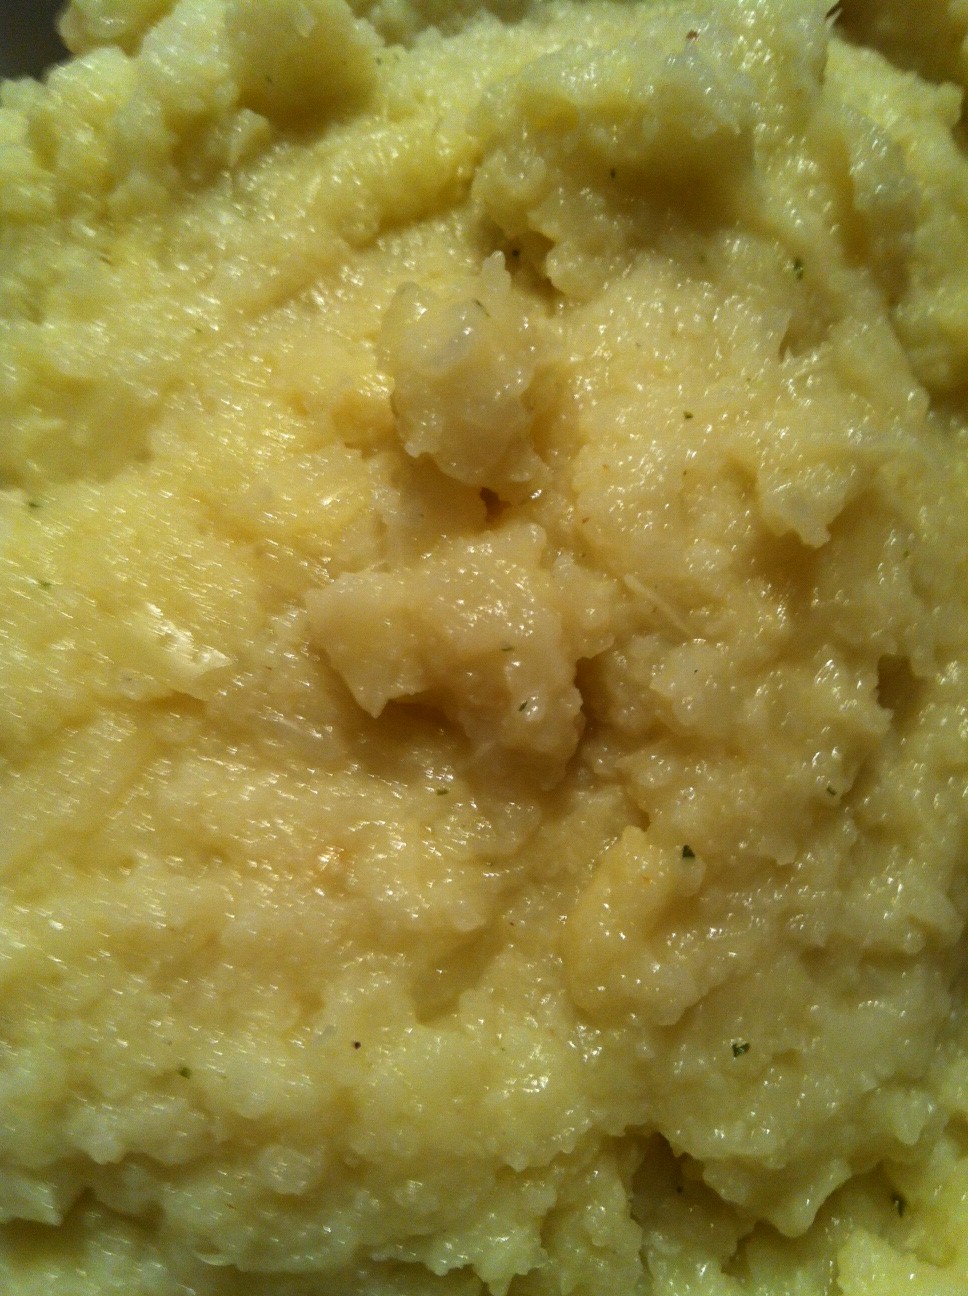
I have covered cauliflower mash before – a recipe so simple it’s almost cheating to call it a recipe – but lately I’ve been experimenting a little with the standard formula and whilst I still love the old favourite, I’ve got to say that this one is closer to the starchy texture of real potato mash.
The point of mash, for me, is to provide a good textural base on which to build your main meal – stew, casserole, pie, sausages. You’re not looking for a strong flavour, but I find that using a vegetable cube and garlic just lifts it slightly. You’d be surprised at how mild the garlic is, but if you don’t care for these flavours you might like to leave them out altogether.
The end product is closer to a mash that has had butter and milk added – thick, creamy and sticky, as opposed to the fine sand-like fluffiness of pure whipped potato.
Gourmet cauliflower mash
1 large head of cauliflower
Vegetable stock cube
3 cloves of garlic, peeled
30ml cream (I used soy cream)
Chop the cauliflower into florets and place in a pot with the garlic and stock cube. Cover with water and boil until very soft.
Drain the pot and mash, garlic and all. I used a hand masher but I’m sure a stick blender would produce excellent results.
Return the pot to medium heat without the lid. This bit is all about making it as fluffy and dry as possible, so you want to evaporate all the liquid left. Add the cream, stirring frequently and it should take around 5 minutes to produce a fantastic pot of cauliflower mash.
Suddenly, post-Christmas penance doesn’t seem so bad.
Well! Where on earth have I been?
You know how it is over Christmas. There’s the huge leadup where you embrace the Christmas spirit and try to push people out of the way when you’re buying presents on Oxford St, then there are the alcohol-soaked Christmas parties, then (if your family is anything like my boyfriend’s) there are days and days of being fed turkey and ham and potatoes and chocolate biscuits until you feel you might as well hop into the oven and roast alongside the bird. Ain’t it glorious?
Then, inevitably, comes the period of self-recrimination where you realise that you maybe ate one or fifteen too many Roses. The new year begins. And so does the diet.
Salads are fantastic because they’re healthy, quick and no-fuss. The trouble is, when you’re eating a salad you always, always know about it. It goes from making you feel virtuous and elated at how good you’re being to your body to making you feel depressed and like you’d kill a small puppy for a plate of pasta. Trust me, I know.
The trick is to use fresh ingredients and keep it interesting. I am not a fan of bitter leaves, although I know lots of people who think they provide a nice contrast in a salad (actually, I’m not a fan of bitter flavours, full stop). But each to their own.
I confess that the inspiration for this salad came from a recent purchase of a non-stick frypan which is actually non-stick. I don’t know how I’ve been getting along without it. Do you know how liberating it is to cook without knowing you’ll need to soak the burnt pans overnight again? Really, if I’d known how ridiculously happy it would make me I would have spent the £2.99 a long time ago.
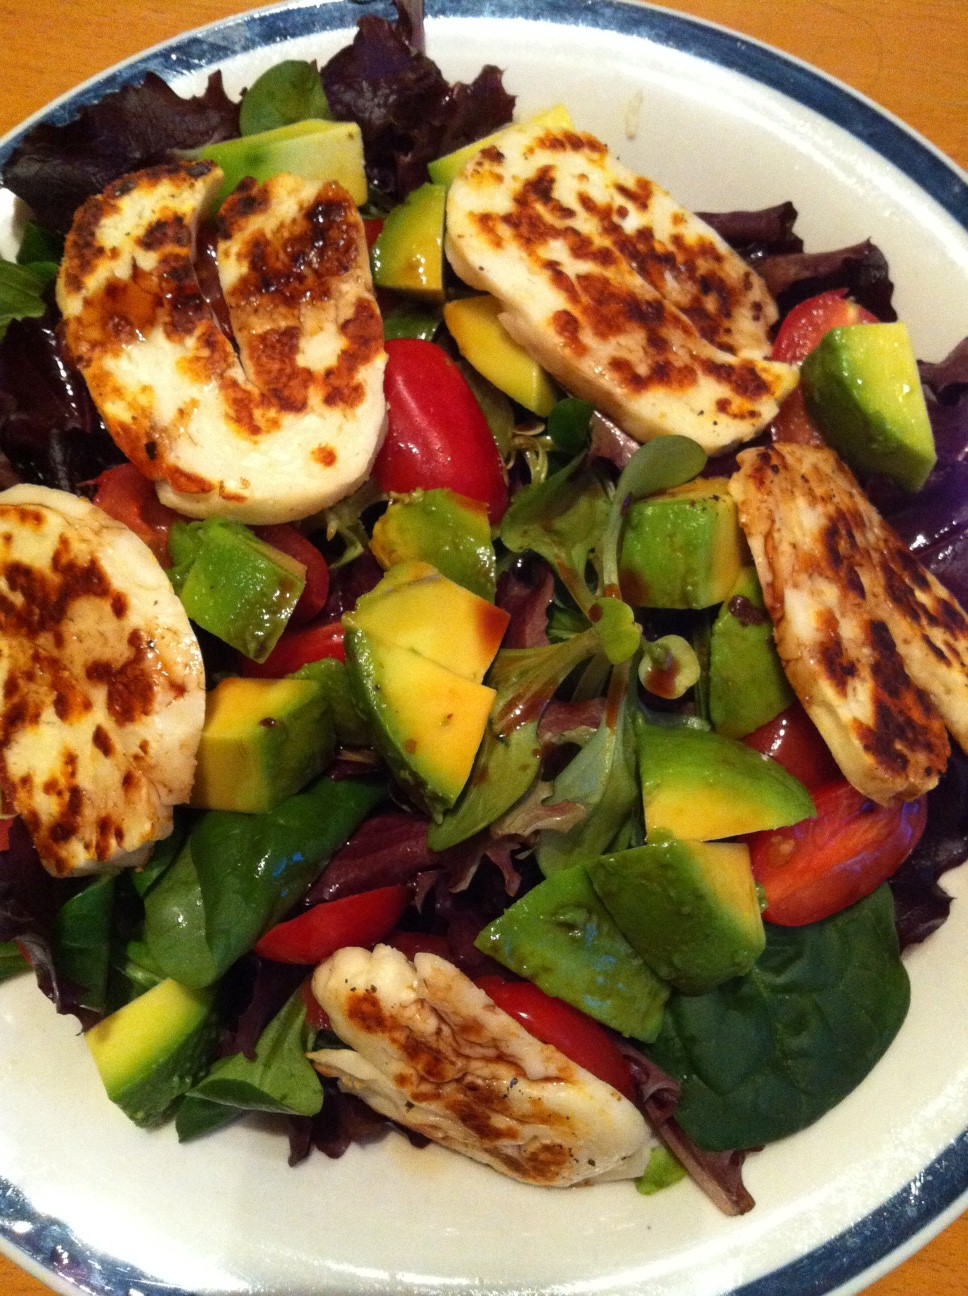
So I have been looking for things to fry (not easy with salads) and haloumi came to mind. Haloumi is a Cypriot cheese made from goat’s, sheep’s or cow’s milk, is salty to taste and firm in texture. I like it grilled, which creates a nice brown crust and softens the inside to a toothsome squidginess.
The bad news about haloumi is that if it goes cold, it takes on a rather rubbery texture (still tastes good though). Also, it is high in fat so if you’re concerned about that, try to watch the amount you’re using.
Haloumi salad
3-4 slices of haloumi
4 baby plum tomatoes
half an avocado
salad leaves
balsamic vinegar
Place the haloumi into a non-stick frypan (no oil necessary) over a medium heat.
While the cheese is grilling, arrange the salad leaves on a plate. Slice the tomatoes and avocado and add to the salad.
Make sure you turn the cheese once or twice during cooking so both sides take on that browned look. When they’re done, place them onto the salad and finish with a drizzle of balsamic vinegar.
It’s a zucchini, it has always been and will always be a zucchini, but today I will concede to the French because courgetti sounds so much better than zuchetti.
A while back, when I was investigating low-carb meals (that was a hoot), I came across the notion of using vegetables as alternatives to pasta and rice. There was the mysterious as-yet-unseen spaghetti squash (a pumpkin that turns into noodles when you cook it?? What?!), cauli-rice, cauliflower mash, and of course, courgette spaghetti.
At the time I thought nothing of it – but after watching Nigel Slater methodically clean his fridge by getting creative with his leftovers, I was inspired. I had half a bag of dangerously green spinach, a handful of plum tomatoes and a sliver of smoked salmon lying around. And so with a renewed creative burst I made the tastiest supper I’ve had in a long time, and I’m going to share it with you on the condition that you understand that I haven’t been disloyal to my Australian roots by calling it courgetti.
A myriad of flavours and textures. Just perfect.
Spinach and ricotta courgetti with smoked salmon
1 courgette
2 garlic cloves, sliced
Half a bag of spinach (about three handfuls)
1 small slice of smoked salmon, pulled into pieces
1 tablespoon smooth ricotta
6 mini mozzarella pearls (you can use one ball and slice it if you like, but I think the pearls are adorable)
6 plum tomatoes, sliced
Balsamic vinegar
In a pan, place the garlic and a good slug of olive oil and some salt to stop the garlic burning. Keep over a medium heat, being careful not to let the garlic colour, whilst you prepare the courgetti.
Take a vegetable peeler and run it down the length of the vegetable, as if you were going to peel it, but keep peeling in the same direction to form strips. I always, always find that peelers aren’t big enough to accommodate the full width of the courgette, so I peel until it starts to become a problem and then I turn it over and do the other side until the same thing happens. At this point, I slice the zucchini in half lengthways and continue with the peeler.
Once you’ve gotten to the point where no more noodles can be made, just chop the remaining chunk of courgette and add it to the pan with the garlic, which should be sizzling nicely by now.
Let the chunky courgette cook until soft and then add the spinach. When it starts to wilt, add the courgetti and move it around the pan. The courgetti really only needs about two or three minutes to warm through and take on the taste of the garlic.
Add the smoked salmon, then remove the pan from heat and dab in blobs of the ricotta. If you’ve bought smooth ricotta, it basically melts to form a creamy, garlicky sauce, but I imagine regular ricotta would be lovely as well.
Arrange on a plate and top with the mini mozzarella pearls, the plum tomatoes and drizzle with balsamic vinegar. The mildness of the courgette is the perfect base for the creaminess of the cheese and the sharpness of the tomatoes and vinegar, set off nicely by the zingy garlic. Bliss.
Don’t worry, I haven’t completely lost the plot. I know this is a perfectly ordinary cauliflower sitting here and I know I might be cheating ever-so-slightly by giving you a recipe for essentially taking it and turning it into mush. But it is nevertheless a staple in this tiny kitchen, and it’s hard to get right, so here goes.
Cauliflower mash
1 large head of cauliflower
Cut the cauliflower into pieces. One of the best things about this is that since the cauliflower is going to be mashed, you don’t need to waste time agonising over cutting the thing into florets of the same size so they’ll cook at the same speed (does anyone else do that, or is it just me?).
Boil the cauliflower in a large saucepan. Normally, you’d try to take cauliflower to a stage of perfect toothsomeness, just the same way you’re searching for al dente pasta. For mash, you want to take it beyond that point, to where a fork can split the floret with a touch.
Drain the cauliflower and return it to the saucepan. Roll up your sleeves, grab the potato masher, and work through the frustrations of the day.
If you were to serve it now, it would be tasty, but wet and sloppy. Since I often use this as a substitute for potato, I prefer a lighter, fluffier mash. What you want to do is remove the liquid that has come out of the cauliflower, and the best way to do this is by evaporation. Draining, sadly, won’t cut it.
Once you’ve mashed the cauliflower, return it to the stove and place over a low heat. You need to leave it steaming gently over the stove for a good ten minutes. You don’t really need to worry about looking after it – cauliflower shouldn’t burn or stick to the pan – but give it a stir every now and then to check how much liquid is left. The end result should be light and fluffy, ready for use as a delicious alternative to mashed potato.
And… after.
*If you’re looking for a variation that holds together better and has the consistency of mash, try this gourmet cauliflower mash.