avocado & oat cookies

Being good to yourself is important, but so is being kind to yourself.

Is it possible to have your cookie and eat it too?

I’m so glad you asked. Summer is well and truly here, bringing the whole healthy eating thing into glaringly sharp changing-room-lights focus. Not just because of the amount of skin we’re starting to show (a pretty terrifying prospect all on its own), but also because the heat makes it so much harder to feel good if we’re eating badly.

There are lots of differing opinions out there as to what constitutes ‘eating badly’, but I think you can’t go too far wrong if you listen to your body. For me, that means I physically feel pretty awful if I’m on a constant diet of deep-fried foods, fatty meats, sugary drinks and refined carbs (basically all the fun stuff). But at the same time, mentally I feel pretty awful if I’m restricted to lettuce leaves and a wistful, longing look at the wine list.

So is there a balance? I think so. I feel pretty good and fairly sane if I’m eating complex carbohydrates like brown rice and wholemeal bread, a smattering of lean meats, loads of vegetables and the occasional reality check of eating whatever I want to.

avocado and oat cookies

Which brings us nicely to today’s recipe. It’s basically an adapted Anzac biscuit recipe, made with wholemeal flour, a reduced amount of sugar and without butter. Once again, I’ve gone with avocados in place of butter – honestly I think I ought to take out shares in an avocado farm – which lends the cookies a brilliant green tinge. Take a deep breath, and think of pistachios.

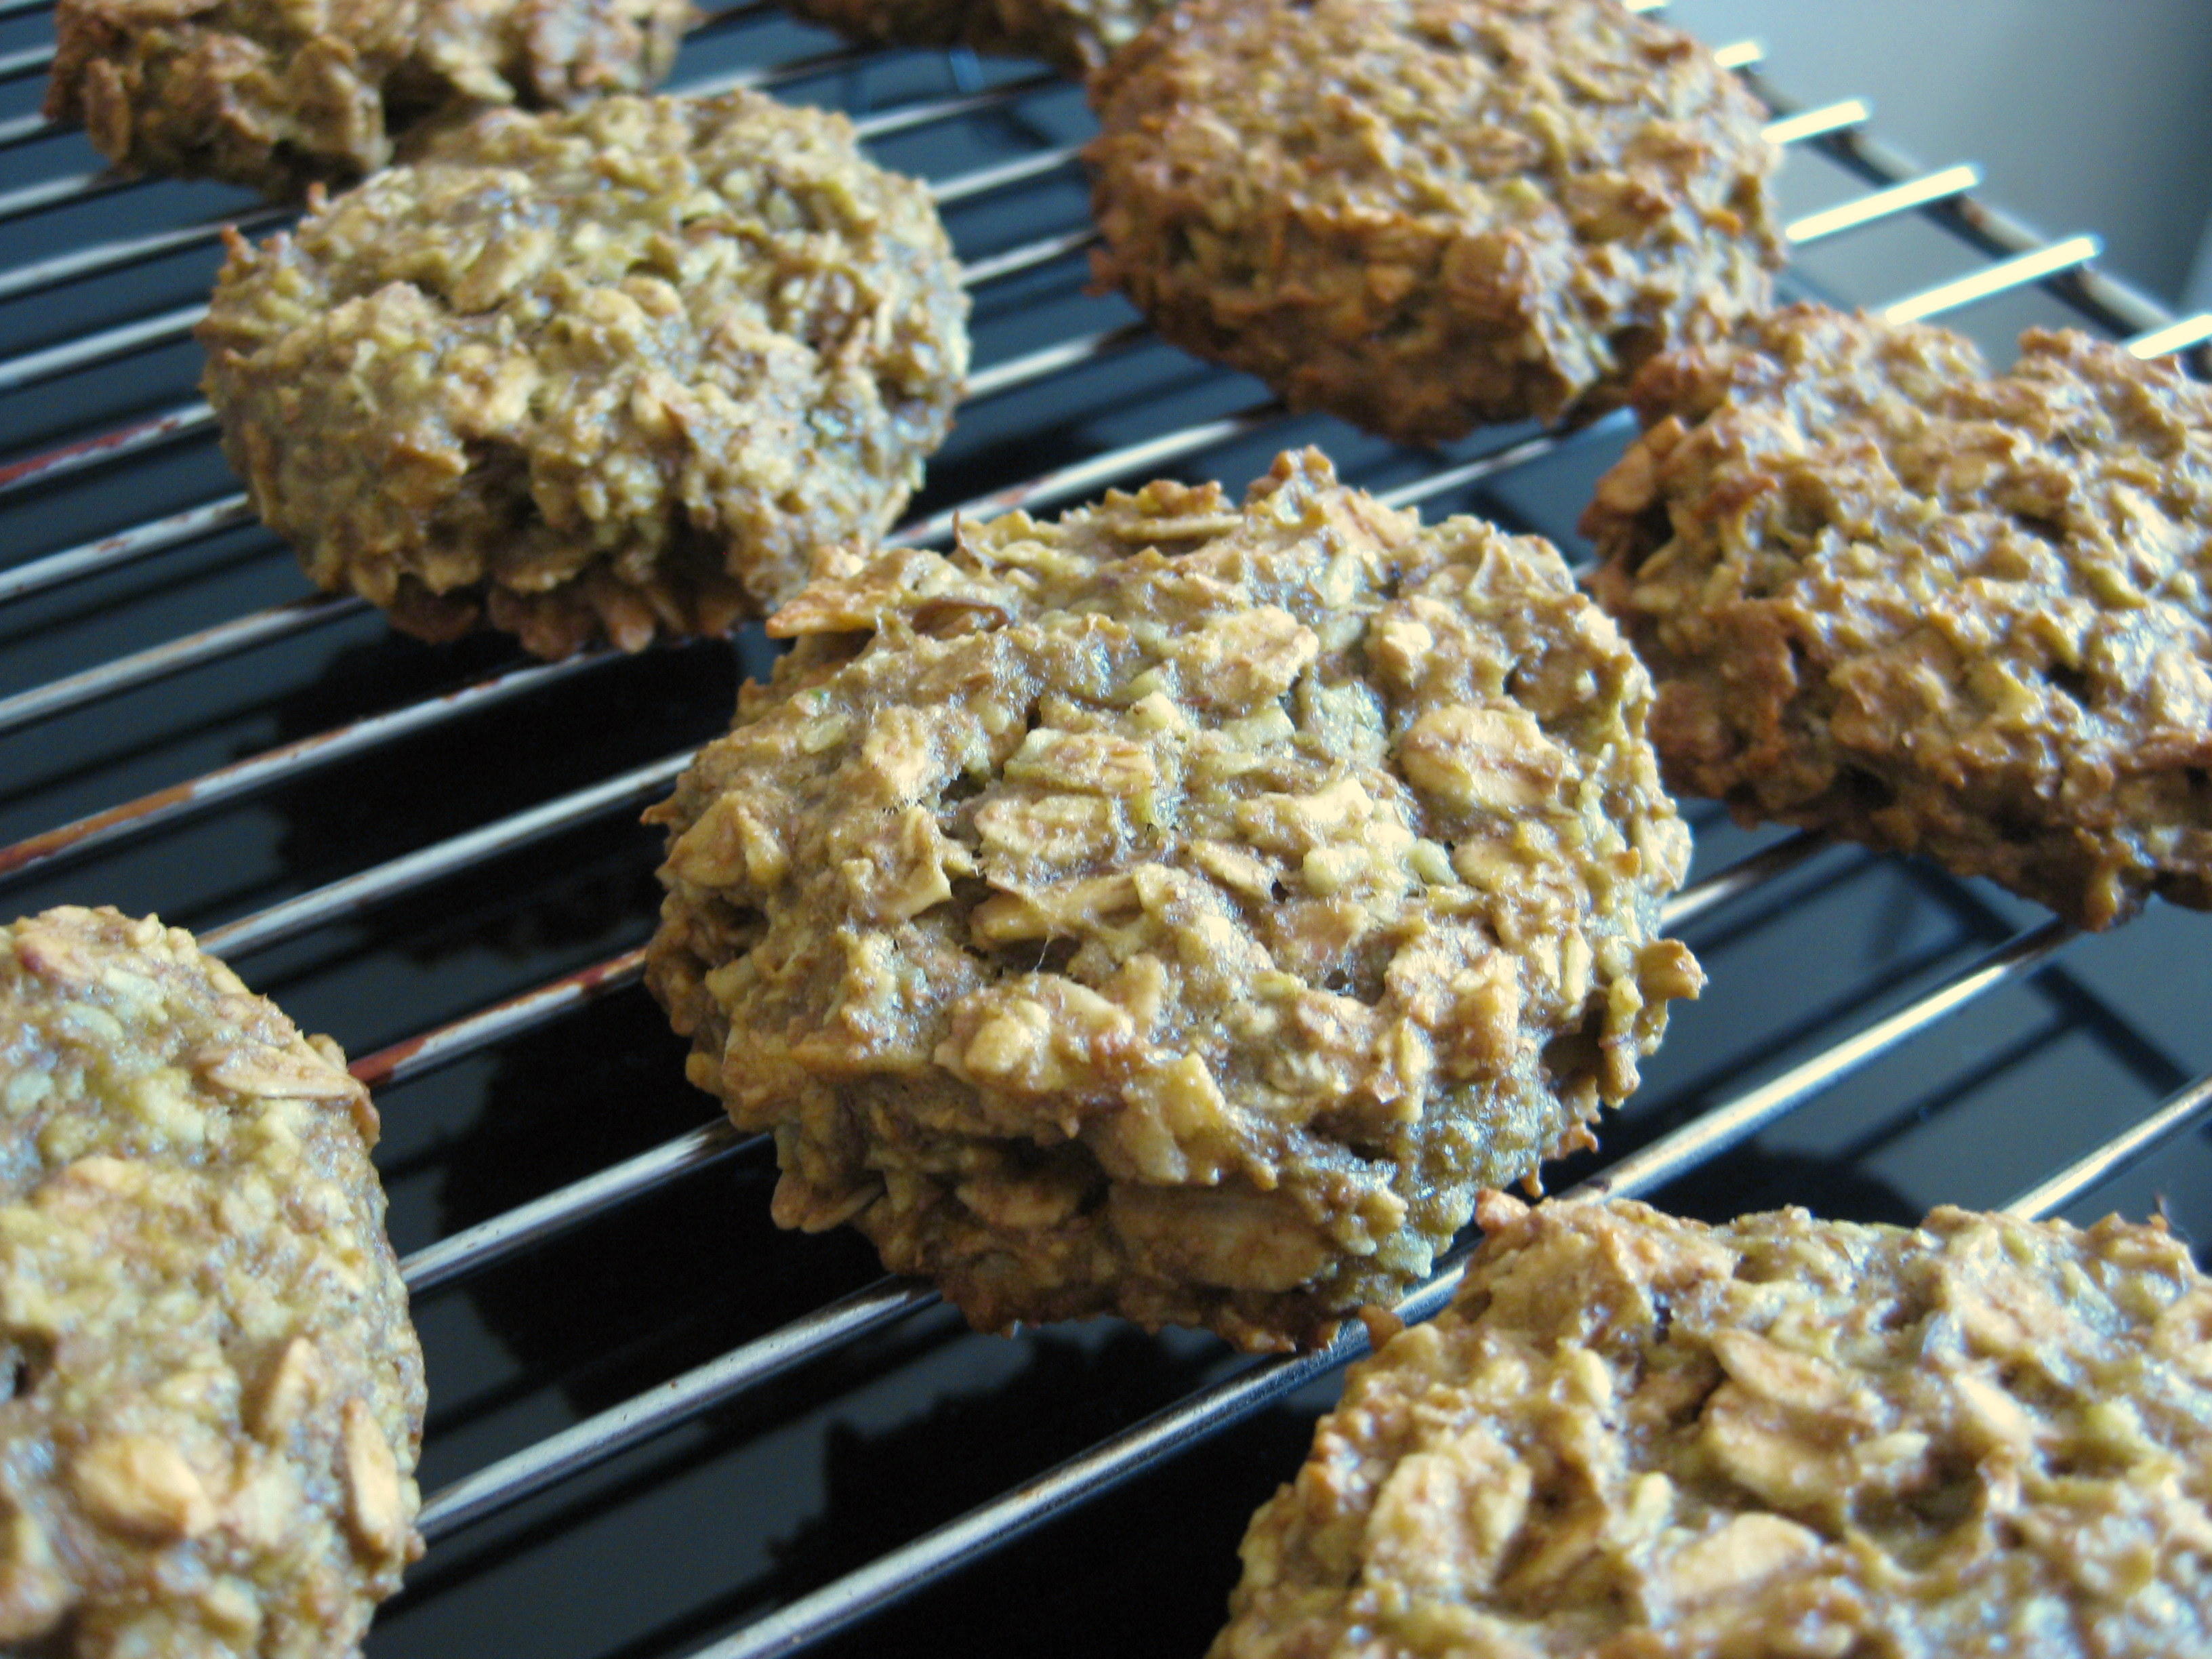
The final product has a dense chewiness (from the oats and coconut) amidst a soft, moist, cake-like texture (from the flour and avocados). They hit a fine balance of sweet-but-not-too-sweet – I personally think that they could go either way and be served alongside a coffee or on a cheese plate. Without strongly-flavoured ingredients, you do get a sense of the avocado, so if that worries you you might like to add a handful of chocolate chips, a mashed banana, or some cheese and tomato.

These cookies hold their shape, so make sure you're happy with how they go into the oven.
These cookies hold their shape, so make sure you’re happy with how they go into the oven.

Avocado and oat cookies (makes 12)
2 small ripe avocados
1 cup rolled oats
½ cup wholemeal flour
2 tablespoons caster sugar
¾ cup (60g) desiccated coconut
¹⁄3 cup golden syrup
1 teaspoon baking soda
2 tablespoons hot water

Preheat your oven to 165 degrees. While heating, you can toast the oats lightly while you get on with the cookies.

Place the flour, sugar and coconut into a large bowl.

Mash the avocados finely.

Place the golden syrup in a pot and heat gently, then add the avocados and stir until combined. This produces a slightly alarming-looking green mixture which may cause you to lose faith.

Add the hot water to the baking soda and then pour into the pot. The green mixture will turn into a frothy green concoction. At this stage, it would be perfectly natural for you to wonder what kind of crazy recipe you’re following.

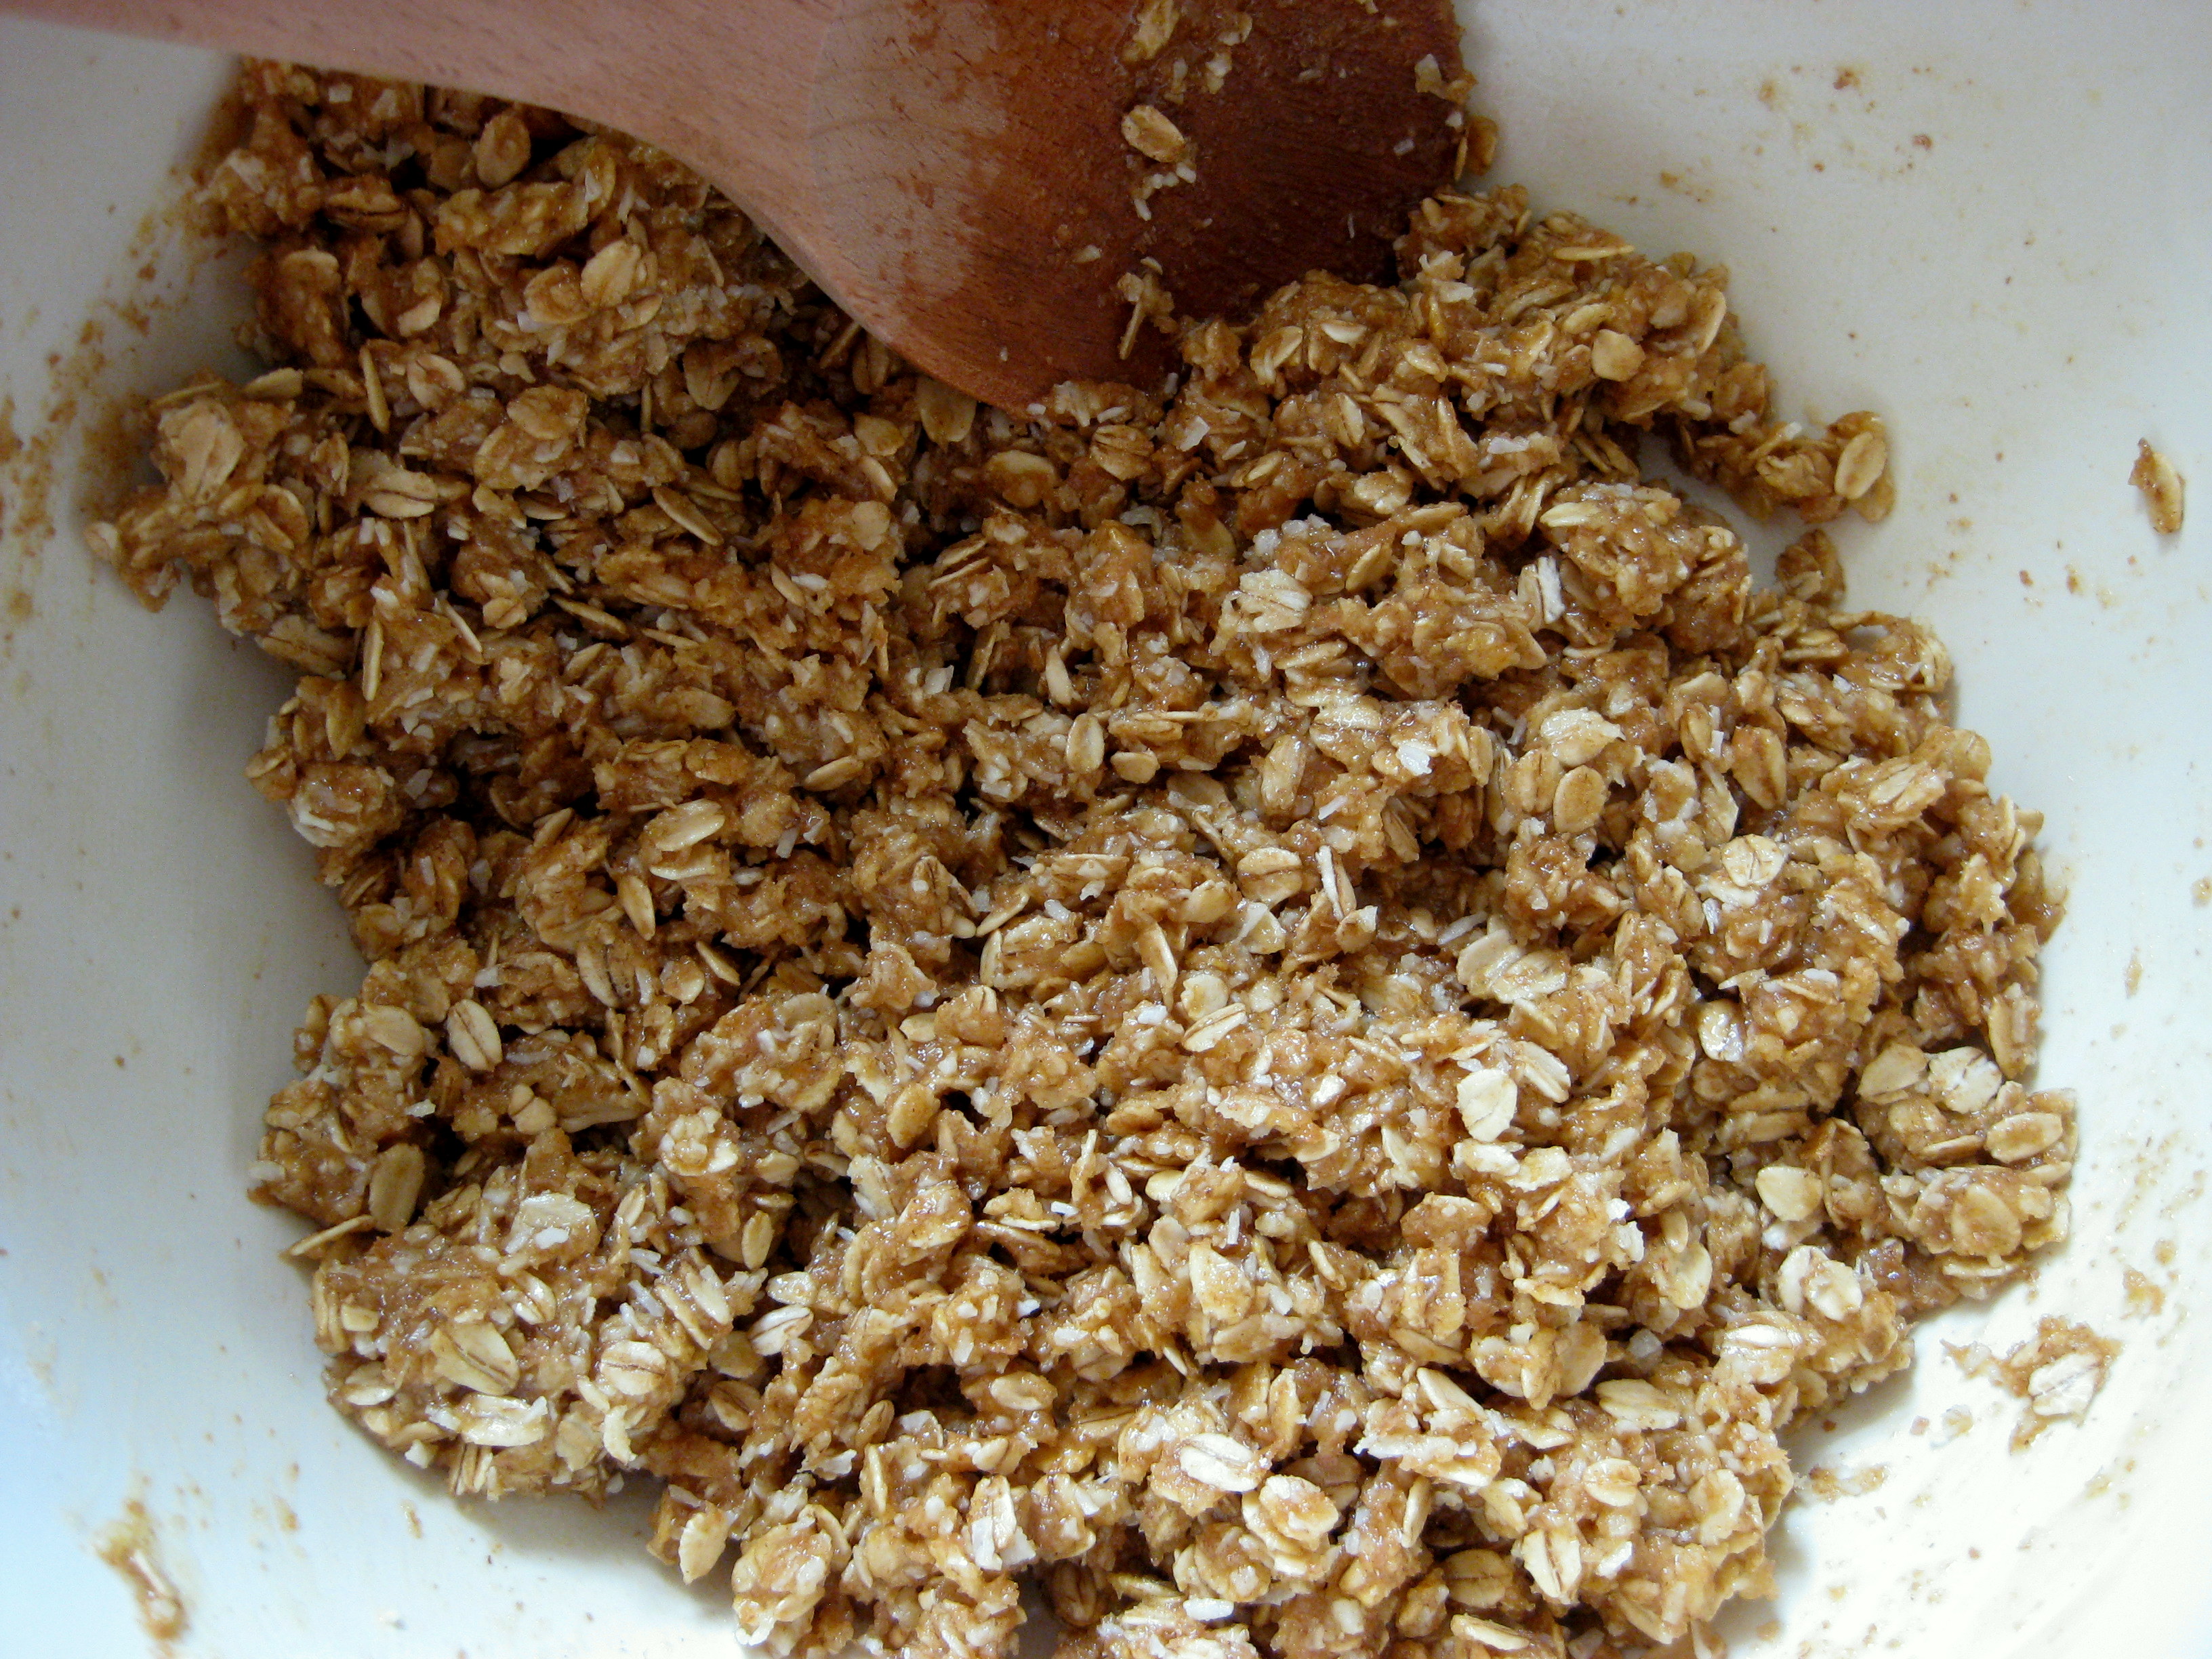
Add the toasted oats to the flour and then pour in the wet ingredients and mix.

Shape into 7cm discs and flatten. Without butter, these cookies don’t spread at all so you can afford to place them quite closely together.

Bake at 165 degrees for 15 minutes and cool on the tray for 5 minutes before transferring to a wire rack.

baked sweet potato wedges

Savoury, sweet and moreish.

Once upon a time in a vegetable patch far far away, a pumpkin fell in love with a potato. Their eyes met across a crowded plot and after a sweepingly romantic courtship amidst the tubers and the squash, they got married and started a happy little Plantae family.

And that, boys and girls, is how we came to have sweet potato.

Brilliant rows of low-GI goodness
Brilliant rows of delicious low-GI goodness

Okay, so the story isn’t at all scientifically sensible or even morphologically accurate, but it’s as good an explanation as any as to how sweet potatoes manage to combine the best elements of two wonderful vegetables: the caramel-toned taste, gently yielding yet toothsome texture and brilliant orange hue could only be a result of true love.

We never grew up eating sweet potato. I vividly remember my sister cooking them for us once, baked whole in the oven with cinnamon sugar and butter, which was sadly far too sophisticated for my twelve-year-old tastebuds. I didn’t like them, didn’t understand how they could be starchy-but-not-really and sweet-but-not-really, and it all seemed to me to be a rather confusing, unwelcome distraction from my love of potatoes.

So I have a lot – a lot – of catching up to do.

Ready for the oven
Ready for the oven

And yes, it is really pushing it to call this a recipe, but it’s how I finally came to understand sweet potatoes in all their glory. I like to enhance the sweetness of the potato with brown sugar, and the savouriness with smoked paprika. If I want to go crazy with the complexity of flavours, I’ll finish it off with a sprinkling of sea salt before serving to create a sweet-salty-savoury mouthful, slightly crispy on the outside and soft on the inside – the perfect accompaniment to pulled pork and coleslaw.

And they all lived happily ever after.

Baked sweet potato wedges
1kg sweet potatoes, cut into wedges
1 tbsp oil
1 tbsp brown or muscovado sugar
1 tsp smoked paprika

Toss the wedges in the oil, sugar and paprika.

Bake the wedges at 200C for 45 minutes-1 hour, until golden and the edges turn crisp.

mayo-free coleslaw

You know you’re in trouble when you’re rifling through the vegetable bin on a mad search for the most photogenic carrot in the bag.
You know you need serious help when you’re rifling through the vegetable bin on a mad search for a ‘photogenic carrot’.

I get the feeling that it’s not quite cool to love cabbage. I mean, there’s the trendy purple sprouting broccoli, showy rainbow collards and the ultra-chic kale, but you don’t really hear about artisanal cabbages, do you? And that’s a little sad. It always strikes me as somewhat underappreciated and overlooked; a steady and consistent performer, but hardly ever invited to be the star of the show.

Except, of course, in coleslaw.

Coleslaw is one of those mad concoctions that has the rather unexpected capacity to blow your culinary socks off. It’s a riot of colours and textures, a positive festival of flavours. Homemade coleslaw is a world away from its commercial counterpart, which tends to be a damp and colourless collection of mystery vegetables swimming in a sort of mayonnaise soup. If you have the chance, it’s worth the extra effort.

Mayo-free healthy coleslaw
It’s time to celebrate the humble cabbage, don’t you think?

Since it’s so often served with meat (like the weekend’s pulled pork), I think it particularly important that it be able cut through that rich density with a bright, crisp zingyness.

This mayo-free coleslaw is all zesty freshness and isn’t remotely heavy. You can serve it as a traditional side dish, but in my opinion it also stands on its own as a delicately balanced, intensely crunchy salad.

Mayo-free coleslaw
For the slaw:
4 x spring cabbage leaves, finely sliced into ribbons (you can use a quarter of a white cabbage if you prefer)
Quarter red cabbage, finely sliced into ribbons
Half a red onion, very finely sliced
1 carrot, grated
Juice of half a lemon

For the dressing:
4 tbsp olive oil
Juice of a whole lemon
1 tbsp honey
Half tbsp wholegrain mustard

To take the punch out of the onion, squeeze half a lemon over it and leave it to soak as you get on with the other ingredients. You can skip this bit if you’re fond of the taste.

In a large bowl, toss all your salad ingredients.

In a separate bowl, whisk the salad dressing ingredients together (you can also shake in a jar). The juice output of lemons varies, but you’ll know when you’ve got it right because it will form a light, citrusy emulsion. Season with a pinch of salt, or to taste.

Pour the dressing over the coleslaw and mix well. I tend to like mixing it ahead of time so the cabbage has time to lose a little of its rawness. The dressed or naked salad keeps well overnight.

pulled pork

Pulled pork: the ultimate comfort food.

‘So here’s the deal,’ I said. ‘I’m going to set this up right. I’m going to do the work, give you a lot of love, and make sure you’re all good to go. But once you’re in that oven, it’s over to you, buddy. I’ve done my bit. And we both know that if you don’t pull correctly at the end of it, that is not entirely my fault.’

Such is the conversation I had with a shoulder of pork this morning.

Sugar and spice. And a few other things.

Slow cooking is meant to be a relaxing process, but I can’t deny that there’s a little anxiety that always goes along with making pulled pork. Will it actually pull? Will it burn before it gets to pulling stage? At the end of this rather nerve-wracking day of cookery, will I have something to show for all my patience and devotion?

If you read any articles about the art of barbecue, you’ll discover that there’s an entire science behind it. You need a good amount of fat in the cut of meat, because there needs to be plenty of collagen running through the muscle fibres. The pulling texture occurs when the network of collagen denatures, turning into gelatine. This starts to happen at 70C (160F), so most recipes recommend cooking pork low and slow until it reaches an internal temperature of 87C (190F).

Wonderful. But do I sound like the sort of person who would have a meat thermometer handy?

Is pulled pork that hasn't been pulled just a roast?
Is pulled pork that hasn’t been pulled just a roast?

Reassuringly, I’ve never made pulled pork that hasn’t – well, pulled. Sometimes it’s been slightly more difficult than other times, sometimes it needs a bit of extra cooking, but it always comes good in the end.

Good pulled pork is smoky and rich, sweet and dense, moreish and juicy with that silky mouthfeel from all that gelatine. It speaks of long summer evenings with friends, a barbecue and an icy beverage, as well as cold nights huddled over deeply satisfying winter suppers. Since it’s cheap to make and feeds more people than you’d expect, it almost always features on my party menu.

Rich, dense and moreish – who can resist pulled pork?

Pulled pork
1.5kg pork shoulder
2 tbsp salt
2 tbsp dark muscovado sugar
1 tbsp smoked paprika
1 tbsp wholegrain mustard
3 onions, roughly sliced
6 cloves garlic
1-2 cups apple juice

Preheat the oven to 220C.

Oil the bottom of a baking dish and place the onions and garlic in it.

Rub the mustard into the pork, then mix the salt, sugar and paprika together and work it over the shoulder. Make sure you get it into the nooks and crannies.

Place into the baking dish, skin side up.

You want to blast the shoulder at a high temperature for about 1 hour. After that, take it out, add a cup of apple juice and cover with foil.

Cook at 150C for 4-5 hours. The hotter your oven, the more likely it is that you’ll need the extra cup of apple juice, so check it halfway through. If you’re away all day, you can lower the temperature to 125C for 8-9 hours. Always give yourself an hour at the end before you need to serve it, in case it hasn’t cooked to pulling temperature.

Remove from the oven and stand with foil on for 20 minutes. This helps the meat relax so you can pull it. It’s easiest to do this with two forks – I do it in the pan so the meat soaks up the juices at the bottom.

gluten-free lemon cake

gluten free lemon drizzle cake
I confess: I really only got into baking because of the pretty pictures.

I’ve always had this endless enthusiasm for potatoes. Where others would look longingly towards the dessert section, I would revel in the salty crunch of fries. Crisps filled my dreams at night and roasties haunted my days. My comfort was a sea of creamy mash, my excitement a bed of rosti. Oh yes. Leave no chip behind.

Was it inevitable, then, that I’d eventually find a way to incorporate potato into everything, including a lemon cake? I’ll admit I was slightly dubious when I found this recipe for a gluten-free lemon cake – sorry, you want me to put what in it? – but allow my own incredulity to reassure you: it sounds completely batty, but it works. Potato is a friend that keeps the cake light and reassuringly moist and doesn’t get in the way of the lemon at all.

It's lemon cake with a surprising helper: the humble potato.
The humble potato gives this lemon cake a light moistness.

Lemon, for me, is tremendously exciting. Its ability to enhance and be enhanced by the contrast of salt or sweet, to lurk pleasantly in the background or take centre stage as the main flavour, to hold fragrant oils and piquant juice in the one fruit – well, it’s kind of amazing. Somehow the moreish tang of lemon tempered with sugar dangles you precariously between the worlds of sharp and sweet, each clamouring for attention and yet working together in a curious harmony.

And harmonious is just how this cake turns out. It’s such a surprising and unexpected marriage between lemon and potato, but it’s a joyous celebration nevertheless and you get to be good to your coeliac and IBS friends.

Share the lemony love this summer (with a tall glass of Pimms, naturally).

Grab a fork. I promise you won't taste the potato.
Grab a fork. I promise you won’t taste the potato.

Gluten-free lemon cake
For the cake:
200g butter, softened
200g golden caster sugar
4 eggs
175g ground almonds
250g mashed potatoes (cooled)
zest of 3 lemons
2 tsp baking powder

To drizzle:
4 tbsp sugar
Juice of 1 lemon

Preheat the oven to 180 degrees celcius, and grease a 20cm cake tin.

Beat the butter and sugar together and then add the eggs one at a time, beating after each egg.

Add the baking powder and mix, then fold in the mashed potato, almonds and lemon zest.

Pour into the cake tin and bake for 45 minutes, or until the skewer comes out clean. Remove from the oven and allow to cool in the tin for 10 minutes, then transfer to a wire rack to cool completely.

Put the cake on the serving tray before you drizzle, and serve with double cream.

sweetcorn pancakes with bacon

Oh Sunday brunch, will you ever stop with your loveliness?
Oh Sunday, will you ever stop with your loveliness?

There’s something impossibly lazy about a Sunday morning. I’m always reluctant to wake, generally unwilling to leave the sanctuary of the doona covers, but Sunday beckons to me nevertheless, murmuring of long coffees and longer brunches in the soft sunlight, hinting at mellow, gentle laughter and promising peaceful moments of perfect happiness.

And who am I to resist Sunday’s siren song?

Corn pancakes with bacon: the perfect Sunday brunch.

It’s tempting to make something quick and easy like bagels, but if I’m feeling particularly motivated I like to make something indulgent and special for Sunday brunch. I love these corn pancakes – they’re basically a savoury variation of the American pancakes I made a few weeks ago. They might, in another lifetime, be called corn fritters, but I tend to think that fritters are deep-fried and crunchier, whereas these darlings are soft and fluffy, punctuated with sweet bursts of sunshine from golden kernels of corn.

They are best served with bacon and avocado, and I added a dab of crème fraîche and a splash of really good balsamic vinegar. You could also try something sharp like a citrusy salsa or springy relish. I did poach an egg to go on top, but don’t trouble yourself. In the end, I think it’s enough to go with the pancakes and bacon.

Rivers of rich egg yolk gliding down mountains of golden pancakes.
Rivers of rich egg yolk gliding down a mountain of golden pancakes.

My Sunday plans: feast well, then spend the rest of the day groaning under the immense weight of my own epicurian satisfaction.

Corn pancakes with bacon (makes 6)
225g plain flour (1½ cups)
1 tbsp baking powder
1 tsp sugar
1 pinch of salt
2 large eggs, beaten
30g butter, melted and cooled
300ml milk (1¼ cups)
400g tin of corn kernels, drained
2 spring onions, finely chopped
6 rashers of bacon

In a large bowl, mix the flour, baking powder, sugar and salt together.

Add the eggs, butter, milk, corn and spring onions and mix well.

Let the mixture stand while you heat a non-stick pan to a medium heat. Add a ladleful of batter. When bubbles start to form on the surface (about 2-3 minutes), you can flip and cook on the other side.

Depending on how crispy you like it, you can start cooking the bacon when there’s two pancakes left to cook (I like it crispy but not tough, which takes about 6 minutes under a grill or on the stovetop). Serve together with lamb’s lettuce, balsamic vinegar and crème fraîche.

low-fodmap meatballs

low-fodmap meatballs are comforting, delicious and safe for friends with IBS
Low-fodmap meatballs are comforting, delicious and safe for friends with IBS

One of my dearest friends is following the low-FODMAP diet to combat IBS, and it can be a little challenging to stick with the ‘no wheat, onion and garlic’ rule when you’re eating out. It’s not impossible, but I’ve seen the struggle – poring over menus, referencing the extensive list of prohibited foods and interrogating waiters as to the contents of a dish while your dining companions wait to order. A menu becomes a minefield and what should be a lovely, free and happy choice based purely on what you feel like eating becomes stressful, difficult and a little isolating.

Serve with rice or rice pasta for a FODMAP-friendly meal

So sometimes we eat in, and whenever I have her around I like to make something she can eat safely and share with everyone else. It’s maybe a little complicated, but with a bit of creativity and an understanding of good substitutions, everyone can tuck into the same dish.

The simple act of sharing – good food, a cheeky glass of wine and lots of laughter with friends – is a powerfully healing experience. I can’t think of a better way to spend a weekend!

Low-FODMAP meatballs (makes 60)
For the meatballs:
500g beef mince
500g pork mince
2 bunches spring onions (green part only), finely diced
5 sprigs of parsley, finely diced
1 tbsp mixed herbs
1 tbsp garlic oil
4 tbsp parmesan
4 eggs
1 tbsp salt
1 tbsp pepper
2 tsp baking soda
3-4 tbsp cornstarch

For the tomato sauce:
2 x 400g tins chopped tomatoes
2 x 500g passata
1 bunch spring onions (green part only), finely diced
3 bay leaves
3 mozzarella balls, to bake

Put it in the oven to bake and go and join your friends for a chat.

Mix all the ingredients except the cornstarch together with a fork.

The cornstarch is there to regulate the wetness of the mix, so start with 2 tablespoons, mix thoroughly and see how wet it is. You want it to be moist, but easy to handle.

Roll into small balls.

From here, there are a few ways to go about cooking the dish. The easiest is to place them directly into the sauce, top with mozzarella and bake the whole thing for 90 minutes in a 200 degree oven.

Alternatively, you can bake your meatballs separately for 30 minutes so they brown nicely, then place them into the sauce and bake for 30 minutes. This is also a good method if you like to drain the fat from your mince.

Finally, if you don’t have an oven, you can simmer them in the sauce. Don’t stir them at the start as they’ll break up – wait until the egg has cooked and will hold them together. Total cooking time is about 30 minutes, starting with a fast simmer for the first 15 minutes and coming back down to a low simmer.

Serve with brown rice or mashed potatoes.

FODMAP notes: I’ve included parmesan in the recipe, because even though lactose is a no-go, parmesan has very little lactose. I’m not quite sure what it is about the ageing process, but hard cheeses have far less lactose than soft cheeses and milk.

Having just said that, mozzarella is also on the safe list for FODMAP. Nevertheless, some people are super-sensitive to lactose, so leave it out if you have to.

spring pasta

Pasta with broccoli - the perfect spring supper.
Pasta with broccoli – the perfect spring supper.

This week I celebrated the arrival of my new baby: a beautiful, pristine Cambridge-blue ceramic pan.

Yes, I’m aware this is a little strange. Most people celebrate the arrival of actual children, of Spring, of parcels and packages and Christmas and birthdays. But those of you who understand the excitement associated with a new kitchen accessory – its perfect white ceramic surface gleaming up at you – you’re my kindred spirits. We’ll be completely mad together.

The colour makes me think of spring, which is fitting because it’s growing ever so slightly warmer in London – by which I mean you can now leave the scarf, hat and gloves at home and just go out with a coat and umbrella. Every day I throw open the curtains and peer eagerly up at the sky, just waiting for the moment I can put away the Vitamin D tablets and bask in the sunshine.

It’s just around the corner. I can feel it.

Pasta with broccoli, garlic and chilli.

Broccoli with pasta is traditional to the south of Italy. This light, simple dish is bright enough to celebrate the imminent arrival of sunshine and filling enough to stave off the last of the winter blues, and it always makes me think of the outdoors and lazy days full of wine and laughter. I love the juicy burst of fresh tomatoes and the crunchy zing of parsley, combined with the dense bite of pasta and the gentle heat of garlic and chilli.

For me, this is the perfect spring supper.

Pasta with broccoli, garlic and chilli
250g short pasta
1 small head of broccoli, cut into small florets
5 cloves garlic, diced
½ teaspoon Chiu Chow chilli oil (you can use chilli flakes)
3-4 sprigs parsley, chopped
10 cherry or baby plum tomatoes

Cook the pasta in salted water until firm but not hard.

Three minutes before the pasta finishes, add the broccoli to the pot.

Reserve 1 cup of the cooking liquid and drain the pasta and broccoli.

In a frying pan over a medium heat, add the garlic in some oil and heat for around 30 seconds, taking care not to let it burn.

Add the chilli and fry for another 15 seconds, then add half the reserved liquid to the frypan. Turn the heat up so it bubbles.

Add the pasta/broccoli and heat through. If it becomes too dry, add more of the cooking liquid so it forms a creamy sauce.

Top with parsley and serve with cherry tomatoes.

anzac biscuits

The Anzac biscuit - a national culinary treasure.
The Anzac biscuit – a national culinary treasure.

Anzac Day marks the anniversary of the battle at Gallipoli during the First World War, where many soldiers died during the campaign to capture Constantinople. It is said that Australia’s national identity, the ‘Anzac spirit’, was forged during that brutal campaign – a defining moment for a relatively new nation. It is a day of solemnity where we think about our troops, the fallen and the sacrifices they and their families have made to keep us safe.

Naturally, we also commemorate the day with biscuits.

Crunchy and chewy and golden and delicious.

It might seem strange that a day that inspires so much thoughtfulness, sadness and gratitude in Aussies should be accompanied by something as irreverent as a biscuit – but in some ways, there’s nothing more fitting.

Made with rolled oats, flour, coconut and golden syrup (and egg-free to ensure no spoilage on the long journey to the troops), Anzac biscuits are a national culinary symbol right up there with lamingtons and Tim Tams.

Oh, and you can’t call an Anzac biscuit a cookie. We’re a little touchy about that.

Fresh from the oven
Fresh from the oven

Wholemeal flour works really well in this recipe because the biscuits are already grainy and slightly nutty, so I substituted the whole lot. Rumour has it that you can actually make quite a few substitutions without affecting the final taste too much, but for the original crunchy-on-the-outside, slightly-chewy-on-the-inside biscuits I love this recipe.

Anzac biscuits (makes 24)
2 cups rolled oats
1 cup wholemeal flour
²⁄3 cup (150g) caster sugar
¾ cup (60g) desiccated coconut
¹⁄3 cup golden syrup
125g unsalted butter
1 teaspoon baking soda
2 tablespoons hot water

Mix the oats, flour, sugar and coconut together in a large bowl.

Place the butter and golden syrup over a low heat until melted.

Mix the baking soda with the hot water and then add to the butter/syrup mixture. It will froth up.

Pour this into the dry ingredients and mix well.

Oats are delicious!
Oats are delicious!

Shape into flat discs of about 5cm across – they spread quite far, so you need to give them a lot of room on the baking sheet.

Bake at 165 degrees celcius for around 10 minutes, until golden. They’ll come out soft, but let them cool for five minutes on the tray before transferring them to a wire rack and they’ll crisp up nicely.